Introduction
Vous n'arrivez plus à faire cracher du feu à Bowser en soufflant sur le microphone ? Remplacez le micro cassé et brûlez tout ce que vous voyez!
Ce dont vous avez besoin
-
-
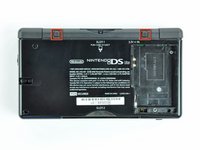
Dévissez la vis cruciforme qui maintient le cache de la batterie fixé sur la console.
-
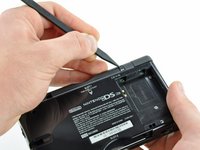
Soulevez le cache de la batterie avec un spudger ou votre ongle, et retirez-le de la console.
-
-
-
Faites levier avec la pointe d'une spatule (spudger) pour extraire les deux patins en caoutchouc de la DS Lite.
-
-
-
Retirez les vis suivantes qui tiennent en place la coque inférieure de la DS Lite :
-
Deux vis cruciformes dorées de 4,3 mm
-
Une vis Tri-Wing noire de 3,9 mm
-
Une vis cruciforme argentée de 3,3 mm
-
Trois vis Tri-Wing argentées de 5,5 mm
I cannot remove the tri-wing screws.
Same to me. I tried opening the case by force. Broke several parts of the motherboard…
Leon -
I can't remove the final tri wing screw in the battery section and it looks like I grinded the screw out too much for any screwdriver to work.Is there anything I can do?
From what I know, the only solution is to drill the screw out with a very small-headed drill :/
Polaris -
-
-
-
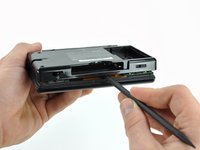
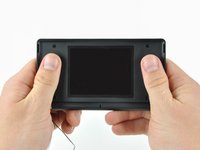
Insérez le bout plat d'une spatule entre les parties inférieure et supérieure de la coque de la DS Lite.
-
Faites délicatement glisser la spatule le long du bord droit de la DS Lite pour créer une ouverture.
-
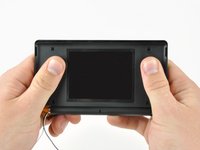
Continuez à faire glisser la spatule le long de l'arrière de la DS Lite jusqu'à ce que les parties inférieure et supérieure se séparent.
Don’t forget to remove the GBA cartridge placeholder before removing the backside
You forgot to mention to remove the battery compartment Phillips screw.
-
-
-
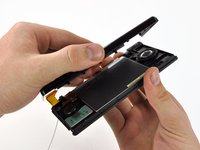
Séparez la partie inférieure du reste de la DS lite
When you reassemble, make sure that you have the volume and power buttons in place, and make sure they are in the right position to line up with the switches on the motherboard. If they are not aligned, you risk snapping off the tiny switches on the motherboard (in which case, you are in for some soldering work).
I should have read the comments first - broke off the power switch because I didn't know about aligning it. No way I can do soldering, guess it's for the dustbin :-(
Emma -
Whoops, remembered the power button but forgot the volume slider.
I'll do it later.
There is no way that the fact you have to line up the volume and power switch toggles upon reassembly is not in this guide. I just carefully followed this guide to replace the shoulder buttons but ruined my DS lite because I didn’t read these (practically hidden comments due to the design of the website) comments and broke the power switch. Thankfully there are 150 million DS I can buy second hand but “repeat the steps backwards” wasn’t sufficient in this repair. And that’s what this website is for.
Watch out with the shoulder buttons. The spring jumped out and I have to clear my entire room to find it ;_;
-
-
-
Soulevez les deux gâchettes hors de la DS Lite.
Anything after step 7 is unnecessary if having to replace the left or right trigger button(s).
-
-
-
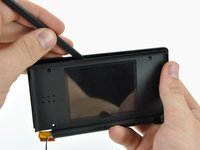
Utilisez le bout plat d'une spatule (spudger) pour débrancher le connecteur de l'antenne Wi-Fi de sa prise la carte Wi-Fi.
There is absolutely no need to follow steps 8-13 if like me, all you needed to do was access the face buttons for cleaning/replacement. Once you have unscrewed the motherboard from the front casing you can just flip it up, making sure you take the front screen with it. You will have full access to the buttons and all of their contacts. No need to remove the wifi board and microphone cable, etc. Also, replacing the ribbon cables for the screen is especially frustrating. Avoid taking them out at all costs, if you can.
what is the "etc."?
Rita Cao -
For those replacing the bottom screen, you can just skip to step 13 and go from there. No need to remove the wifi board, antenna, etc.
-
-
-
Faites levier avec le bout plat de la spatule pour retirer la carte Wi-Fi de sa prise sur la carte mère.
Do you have to put back in the WiFi board? As far as I know it does not require it to play games.
With the Nintendo servers now off, and all the games are playable without WiFi. That being said, I don’t know what is used for local multiplayer.
Polaris -
-
-
-
-
Utilisez encore le bout plat de la spatule pour séparer le bord droit de la carte Wi-Fi de la carte mère.
-
Retirez la carte Wi-Fi de la DS Lite.
I took it apart successfully and I replaced the screen but I've put it back together and it the green light turns on for about 2seconds quiet dim, brighter for about 1 and then it turns off... I then took the wifi board out, and it turned on! What have I done to it and why doesn't it work with it and only without?!
Exact same symptoms for me : on boot up, green light would stay on for 1 second, then shut down. Without wifi, green light would stay on, but blank screens. In fact, it's because on boot up, DS will check if wifi is present, and stop if there is an error. Then, it checks for upper screen, and after that, for lower screen. If one of these is not responding, DS will turn off. I check my cables (upper screen) and DS started again with no problem.
-
-
-
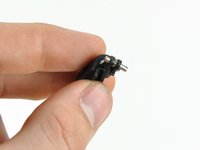
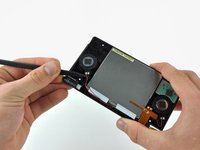
Utilisez le bout plat d'une spatule pour retirer le connecteur du microphone de sa prise sur la carte mère.
-
-
-
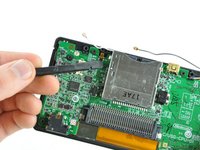
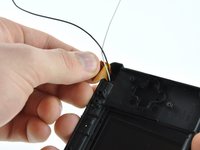
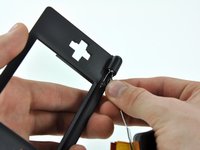
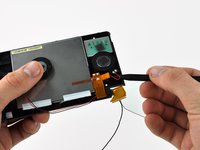
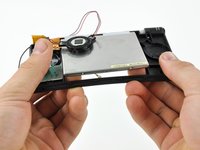
Orientez le câble d'antenne et son connecteur dans la direction opposée à la carte mère en utilisant une spatule pour le maintenir dans l'espace entre les puces sur la carte mère.
-
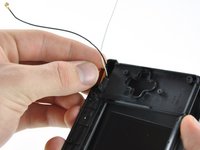
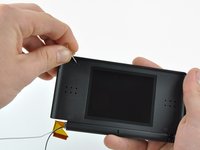
Tirez délicatement et doucement le câble d'antenne jusqu'à qu'il soit sous le lecteur de cartouches de jeu.
-
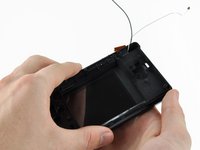
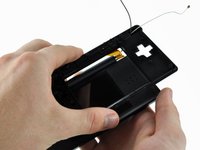
Continuez de tirer le câble jusqu’à ce que le connecteur sorte de sous le lecteur du côté droit.
I can't for the life of me get this freaking antenna cable back when putting everything together, it keeps getting stuck under slot-1 ... how do you aid it through? I'm just pushing it through using the cable itself, but the connector gets stuck somewhere close to the other side and the cable pushing won't do anything but flex the cable.
I had some .015" solder that I fed through the other side and wrapped around the antenna cable to help guide it when I was feeding it back through.
Fantastic guide, although you !@#$%^&* :P forgot to add that you need a Soldiering Kit at the LAST step, thanks..
I did mine without have to soldier, but then again I was cannibalizing the upper screen from one DS to another.
Tried to add this but unsure if it will stay but here is my advice for the cable feeding.
When reassembling and attempting to feed the antenna cable back under the DS Lite game cartridge reader the cable will likely kink and be difficult to feed through.
Therefore tie a piece of white cotton (or another visible colour) thread tightly around the cable, just below the connector. Then feed the cotton under the DS Lite game cartridge reader and through to the other side. Then gently guide the connector back through by pulling on the white thread and moving either up or down to clear obstacles.
Attach a thread to the antenna wire BEFORE removing the antenna. Pull the antenna throught with the thread attached. After you get the antenna out, cut the thread from the antenna but LEAVE THE THREAD threaded thru the cartridge slot. Tape it to the cartridge slot so it doesn't fall out while you're working on the DS. After repairing, re-tie the thread to the antenna and use the thread to pull the antenna back thru to where it belongs. PULL GENTLY!
it was ez until i tried to put it back >:(
Light the space behind the card slot with a light source, cut a plastic straw the necessary size and feed it through the space where there are no components, feed the antenna cable through the plastic straw and then pull the straw on the other side while holding the cable to remove it. Worked fine for me and I keep the cut straw in my DS maintenance kit so I can quickly open it to clean the buttons contact when needed for the disassembly.
I just decided to cut it and replace it with a wifi antenna connector instead.
-
-
-
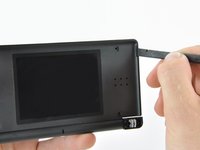
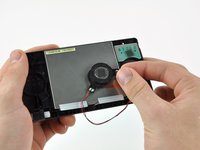
Utilisez votre ongle ou le bout plat d'une spatule pour soulever délicatement le clapet de verrouillage de la nappe de la vitre tactile.
-
Utilisez la pointe de la spatule pour tirer la nappe de la vitre tactile tout droit hors de sa prise.
The little black ribbon clip broke off and now I can't put it back on. What do I do now???
Same Problem here :( touc dosnt work anymore
Mine did the same thing, will it still work?
If I take it to a shop could they fix it????
There should be an added caution remark when removing the ribbon cable from the connector. If the black clip breaks, you're screwed. I have found the connector on another website for about $6. Then the issue is having the right tools to remove the broken connector and soldering on the new one.
How in the world do you get the ribbion cable back in there?
This requires care to make sure the black clip does not break off. If it does, replacing that connector will be a microsoldering job likely to exceed the value of the board.
It is also worth noting, that you can simply leave this connector as you found it and not remove the ribbon cable, and still complete this repair. Unless you intend to remove the lower LCD from the mainboard or if it is interfering with the microphone cable (white) routing, it will not be an issue.
Leaving this connected will also help keep the lower LCD from flopping around when you remove the mainboard.
This is tricky! I used my finger nail to open it since I was scared to put too much strenght with a spudger. Be really careful when moving the retaining flap. Just open it 90°, no more or you’ll breack it!
Putting back the ribbon of the (new) touch screen was the hardest part. The ribbon was bent to the side and my fingers too big to grab it withouth bumping on the mother board.
I finally found that holding the mobo with my left hand, looking at the ribbon from behind and pushing it with my index was more convenient, although my index was bumping on the retaining flap, thus partially closing it. After many trials and sweat, I finally inserted it and closed the flap! But the ribbon detached from te slot! :’( I put it back easily this time (after reopening the flap of course). And closed the retaining flap, pushing a bit harder this time, making sure I could feel a “click” confirming the proper closing. Don’t put too much strenght on it though!
The slot to insert it is so tiny! Use a magnifying glass if you can.
The microscopic flap came off in this step and I think you can’t ever put it back on, given you have no space to work with. This should really be explained better.
Has anyone had any luck replacing the retaining flap if it just falls out? Mines not broken, I just can't figure out how to get it back in.
You don’t need to remove this flap if you’re not removing the touchscreen (and even so, you can do it later). The touch and LCD screen can come out with the motherboard, so this cable doesn’t interfere with the disassembly.
The cable won’t go back in, and got damaged whilst I attempted to put it in.
This step didn't warn that the black retaining flap is easily breakable. Not only can it come off easily but hinges can break off. Unknown if kapton tape will be able to hold this in or if this part can be ordered third party. Very stupid explanation of the step. Broke my digitizer permanently while only trying to make a minor repair. Looks like this is a common complaint and the guide should be immediately taken down, edited, and then only put back up when it is safe.
Guide should have to explain how to mend or replace this part if it breaks since it's such a common problem.
Try snapping it back into place, making sure you do not break it.
-
-
-
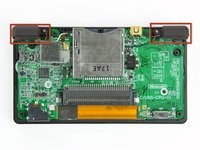
Enlevez les deux vis cruciformes de 3,4 mm qui maintiennent la carte mère sur la partie supérieure du boitier.
This has changed since, the right hand screw has been replaced by a screw under the battery, I didn’t have this screw in mine
-
-
-
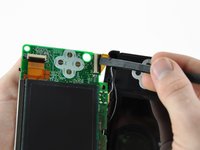
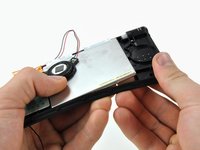
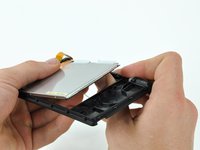
Utilisez un ongle ou la partie plate d'une spatule pour relever le rabat de la nappe de l'écran LCD supérieur.
-
Éloignez la carte mère de la DS Lite pour séparer la nappe de sa prise sur la carte mère.
-
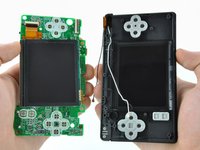
Retirez la carte mère de la DS Lite.
-
Vous pouvez maintenant ouvrir le rabat de l'écran LCD inférieur de la même manière que celui du supérieur et séparer la carte mère de l'écran LCD inférieur.
this part on putting it back together is a straight nightmare, anyone got some tips on doing this quickly? i'm just getting a flickering bottom screen which is supposed to be an upper display connection problem, not sure if i'm getting the ribbon cable in deep enough. or an up close view of it in there so i know im not forcing it
I don't think there's a quick way for this, but I can tell you that the piece at the end is supposed to fit in all the way, and stop when you get to the corners of the bottom of it. A better way to explain this: put it in until you no longer see the gold part of it, or until it reaches the orange part of it.
After my first reassembly, the top screen was not working (bottom screen briefly flashind and DS turning off imediatly after swithcing on).
I found out it is the top screen that is not connected correctly.
You have to insert the ribbon until the part which is wider than the rest of the ribbon, almost bumps on the white connector.
This was too difficult with just my (too big) fingers. I used the spudger to push the ribbon from behind and maintain it when closing the retaining flap. This is kinda tricky, but it worked!
Guilhem's point is crucial - the ribbon connectors wider wings must be only a miniscule fraction away from the connector, or you'll get the flash screen of death. This is well worth checking especially as the later stages of manipulating the ribbon through the silver ring (if doing a full shell replacement) can make you feel like you're damaging the ribbon cable. Also check to make sure the black clip is fully closed, otherwise even the smallest movement during reassembly will pull it back out.
-
-
-
Retirez les deux vis cruciformes de 8,3 mm qui attachent la coque à l'ensemble écran.
-
-
-
Utilisez une épingle pour enlever les quatre cache-vis du joint supérieur.
-
-
-
En utilisant vos deux mains, faites glisser le joint vers le haut.
I wish I would have read this guide instead of watching videos that did not show this part. Because of this the rear bezel's tabs got deformed and now i can't put it back on. Trying to remove those tabs and just screw it in once its in place
-
-
-
Utilisez la pointe d'une spatule pour retirer les deux haut-parleurs de leur emplacement et déplacez-les derrière l'écran LCD.
-
-
-
En commençant par le coin supérieur droit, séparez l'écran LCD du joint avant.
-
Continuez à les séparer le long des bords supérieur et gauche de l'écran LCD.
-
Enfin, poussez l'écran LCD vers le haut pour le détacher du joint.
Any recommendations for where to get a good functioning LCD replacement?
HandheldLegend has a good one
Nicholas -
-


Pour réassembler votre DS, suivez les instructions dans l’ordre inverse.
Pour réassembler votre DS, suivez les instructions dans l’ordre inverse.
Annulation : je n'ai pas terminé ce tutoriel.
10 autres ont terminé cette réparation.
Merci à ces traducteurs :
100%

Ces traducteurs nous aident réparer le monde ! Vous voulez contribuer ?
Commencez à traduire ›

A Phillips #000 (PH000) seems to give a more secure fit (no slipping) than the stated Phillips #00.
Ritchie - Réponse
This will be good for mods
Matthew Bevins - Réponse
I'm having a problem getting the screw to unscrew. I have the right Phillips ( it was included with all the stuff I got this) Any tips. it doesn't look like the screw is spinning but i haven't played my Nintendo DS Lite for 3 years.
whittlegirls - Réponse
bonjour j’ai une petite question pour vous fais trés longtemps que j’ai pas utiliser mon nintendo ds lite et quand je le branche il allume 1 fois orange après il s’enteint même s’il est brancher ça veux tu dire qu’il faut que je change de batterie ? Merci
Marie-Julie Richer - Réponse
Soit un changement de batterie, soit la carte-mère a peut-être un court-circuit :/
Polaris -