Aller au contenu principal
Pour réparer ensemble - Je crée un compte

Samsung Galaxy Note10 Plus 5G Vibration Motor Replacement

Ce dont vous avez besoin

  1. Samsung Galaxy Note10 Plus 5G Vibration Motor Replacement, Heat the rear cover: étape 1, image 1 de 1
    • Completely power off your phone before you begin disassembly.

    • Prepare an iOpener and apply it to the left edge of the rear cover for one minute.

    • A hair dryer, heat gun, or hot plate may also be used, but be careful not to overheat the phone—the display and internal battery are both susceptible to heat damage.

    Demander à FixBot

    Ajouter un commentaire

  2. Samsung Galaxy Note10 Plus 5G Vibration Motor Replacement, Insert an opening pick: étape 2, image 1 de 3 Samsung Galaxy Note10 Plus 5G Vibration Motor Replacement, Insert an opening pick: étape 2, image 2 de 3 Samsung Galaxy Note10 Plus 5G Vibration Motor Replacement, Insert an opening pick: étape 2, image 3 de 3
    • Apply a suction cup to the heated edge of the rear cover, as close to the edge as possible.

    • If your rear cover is badly cracked, covering it with a layer of clear packing tape may allow the suction cup to adhere. Alternatively, very strong tape may be used instead of the suction cup. If all else fails, you can superglue the suction cup to the broken cover.

    • Pull up on the suction cup with strong, steady force to create a gap between the rear cover and the frame.

    • Depending on the age of your phone, this may be difficult. If you are having trouble, apply more heat to the edge and try again.

    • Insert the point of an opening pick into the gap.

    Demander à FixBot

    Ajouter un commentaire

  3. Samsung Galaxy Note10 Plus 5G Vibration Motor Replacement, Begin to slice the adhesive: étape 3, image 1 de 3 Samsung Galaxy Note10 Plus 5G Vibration Motor Replacement, Begin to slice the adhesive: étape 3, image 2 de 3 Samsung Galaxy Note10 Plus 5G Vibration Motor Replacement, Begin to slice the adhesive: étape 3, image 3 de 3
    • Slide the opening pick along the left edge towards the bottom left corner to slice the adhesive.

    • Don't insert the opening pick more than halfway into the phone or you risk damaging internal components.

    • Leave the pick inserted in the bottom left corner to prevent the adhesive from re-sealing.

    Demander à FixBot

    Ajouter un commentaire

  4. Samsung Galaxy Note10 Plus 5G Vibration Motor Replacement, Slice around the perimeter of the phone: étape 4, image 1 de 3 Samsung Galaxy Note10 Plus 5G Vibration Motor Replacement, Slice around the perimeter of the phone: étape 4, image 2 de 3 Samsung Galaxy Note10 Plus 5G Vibration Motor Replacement, Slice around the perimeter of the phone: étape 4, image 3 de 3
    • Repeat the previous heating and cutting procedure for the remaining three sides of the phone.

    • Leave an opening pick on each side as you continue to the next to prevent the adhesive from resealing.

    • The rear cover will begin to separate from the phone as you finish all sides of the phone.

    Demander à FixBot

    Ajouter un commentaire

  5. Samsung Galaxy Note10 Plus 5G Vibration Motor Replacement, Lift off the rear cover: étape 5, image 1 de 2 Samsung Galaxy Note10 Plus 5G Vibration Motor Replacement, Lift off the rear cover: étape 5, image 2 de 2
    • Lift the rear cover straight up to remove it.

    • Follow this guide to reinstall the rear cover and replace the adhesive.

    • Be sure to turn on your device and test your repair before installing new adhesive and resealing the device.

    • If you're using Tesa tape to reattach components, follow this guide.

    Demander à FixBot

    Ajouter un commentaire

  6. Samsung Galaxy Note10 Plus 5G Vibration Motor Replacement, Lift up the metal cover: étape 6, image 1 de 1
    • Use a Phillips screwdriver to remove the five 4 mm screws securing the wireless charging coil.

    Demander à FixBot

    Ajouter un commentaire

  7. Samsung Galaxy Note10 Plus 5G Vibration Motor Replacement: étape 7, image 1 de 3 Samsung Galaxy Note10 Plus 5G Vibration Motor Replacement: étape 7, image 2 de 3 Samsung Galaxy Note10 Plus 5G Vibration Motor Replacement: étape 7, image 3 de 3
    Outil utilisé dans cette étape :
    Tweezers
    $4.99
    • Use a pair of tweezers to lift up and flip back the metal shield covering the battery connector.

    Demander à FixBot

    Ajouter un commentaire

  8. Samsung Galaxy Note10 Plus 5G Vibration Motor Replacement, Disconnect the battery: étape 8, image 1 de 2 Samsung Galaxy Note10 Plus 5G Vibration Motor Replacement, Disconnect the battery: étape 8, image 2 de 2
    • While holding the metal shield up and out of the way, use the pointed end of a spudger to pry up the battery connector to disconnect it.

    Demander à FixBot

    Ajouter un commentaire

  9. Samsung Galaxy Note10 Plus 5G Vibration Motor Replacement, Disconnect the wireless charging coil: étape 9, image 1 de 2 Samsung Galaxy Note10 Plus 5G Vibration Motor Replacement, Disconnect the wireless charging coil: étape 9, image 2 de 2
    • Use the pointed end of a spudger to disconnect the wireless charging coil connector from the motherboard.

    Demander à FixBot

    Ajouter un commentaire

  10. Samsung Galaxy Note10 Plus 5G Vibration Motor Replacement, Remove the wireless charging coil: étape 10, image 1 de 3 Samsung Galaxy Note10 Plus 5G Vibration Motor Replacement, Remove the wireless charging coil: étape 10, image 2 de 3 Samsung Galaxy Note10 Plus 5G Vibration Motor Replacement, Remove the wireless charging coil: étape 10, image 3 de 3
    • Tilt the metal shielding up so you can grip it with your fingers.

    • Peel the wireless charging coil up and away from the device.

    • The wireless charging coil is secured to the phone with some light adhesive.

    • Remove the wireless charging coil.

    Demander à FixBot

    Ajouter un commentaire

  11. Samsung Galaxy Note10 Plus 5G Vibration Motor Replacement, Remove the loudspeaker screws: étape 11, image 1 de 1
    • Use a Phillips screwdriver to remove the five 4 mm screws securing the loudspeaker.

    Demander à FixBot

    Ajouter un commentaire

  12. Samsung Galaxy Note10 Plus 5G Vibration Motor Replacement, Remove the loudspeaker: étape 12, image 1 de 3 Samsung Galaxy Note10 Plus 5G Vibration Motor Replacement, Remove the loudspeaker: étape 12, image 2 de 3 Samsung Galaxy Note10 Plus 5G Vibration Motor Replacement, Remove the loudspeaker: étape 12, image 3 de 3
    Outil utilisé dans cette étape :
    Tweezers
    $4.99
    • Use a pair of tweezers to remove the loudspeaker.

    Demander à FixBot

    Ajouter un commentaire

  13. Samsung Galaxy Note10 Plus 5G Vibration Motor Replacement, Disconnect the interconnect cables: étape 13, image 1 de 3 Samsung Galaxy Note10 Plus 5G Vibration Motor Replacement, Disconnect the interconnect cables: étape 13, image 2 de 3 Samsung Galaxy Note10 Plus 5G Vibration Motor Replacement, Disconnect the interconnect cables: étape 13, image 3 de 3
    • Use the pointed end of a spudger to disconnect the main interconnect cable from the motherboard.

    • Disconnect the secondary interconnect cable from the motherboard.

    Demander à FixBot

    Ajouter un commentaire

  14. Samsung Galaxy Note10 Plus 5G Vibration Motor Replacement: étape 14, image 1 de 3 Samsung Galaxy Note10 Plus 5G Vibration Motor Replacement: étape 14, image 2 de 3 Samsung Galaxy Note10 Plus 5G Vibration Motor Replacement: étape 14, image 3 de 3
    • Use the pointed end of a spudger to disconnect the main interconnect cable from the daughterboard.

    • Disconnect the secondary interconnect cable from the daughterboard.

    Demander à FixBot

    Ajouter un commentaire

  15. Samsung Galaxy Note10 Plus 5G Vibration Motor Replacement: étape 15, image 1 de 1
    • Remove the main interconnect cable.

    Demander à FixBot

    Ajouter un commentaire

  16. Samsung Galaxy Note10 Plus 5G Vibration Motor Replacement: étape 16, image 1 de 2 Samsung Galaxy Note10 Plus 5G Vibration Motor Replacement: étape 16, image 2 de 2
    • Don't try to remove the secondary interconnect cable. The cable is connected to the side 5G mmWave antenna.

    • Use a spudger or your fingers to gently fold the secondary interconnect cable away from the battery.

    Demander à FixBot

    Ajouter un commentaire

  17. Samsung Galaxy Note10 Plus 5G Vibration Motor Replacement, Remove the daughterboard: étape 17, image 1 de 1
    • Use a Phillips screwdriver to remove the three 4 mm screws securing the charging assembly daughterboard.

    Demander à FixBot

    Ajouter un commentaire

  18. Samsung Galaxy Note10 Plus 5G Vibration Motor Replacement: étape 18, image 1 de 2 Samsung Galaxy Note10 Plus 5G Vibration Motor Replacement: étape 18, image 2 de 2
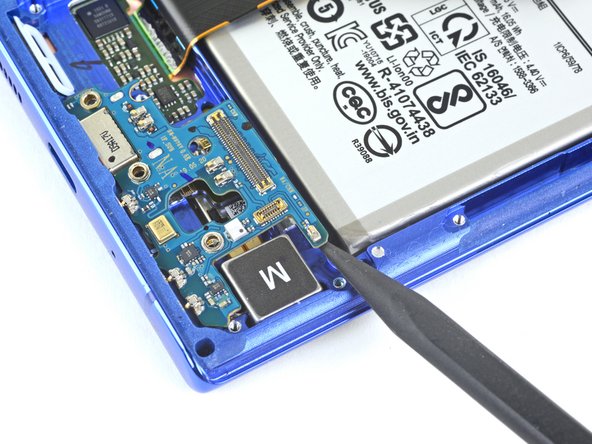
    • Use the pointed end of a spudger to pivot the daughterboard out of its recess.

    Demander à FixBot

    Ajouter un commentaire

  19. Samsung Galaxy Note10 Plus 5G Vibration Motor Replacement: étape 19, image 1 de 2 Samsung Galaxy Note10 Plus 5G Vibration Motor Replacement: étape 19, image 2 de 2
    Outil utilisé dans cette étape :
    Tweezers
    $4.99
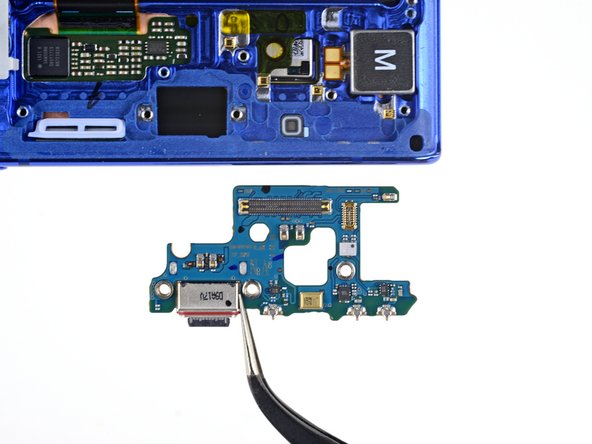
    • Use a pair of tweezers to lift up and remove the daughterboard.

    Demander à FixBot

    Ajouter un commentaire

  20. Samsung Galaxy Note10 Plus 5G Vibration Motor Replacement, Remove the vibration motor: étape 20, image 1 de 3 Samsung Galaxy Note10 Plus 5G Vibration Motor Replacement, Remove the vibration motor: étape 20, image 2 de 3 Samsung Galaxy Note10 Plus 5G Vibration Motor Replacement, Remove the vibration motor: étape 20, image 3 de 3
    Outil utilisé dans cette étape :
    Tweezers
    $4.99
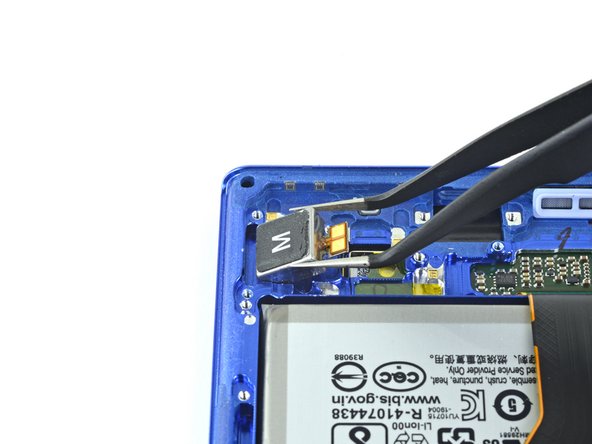
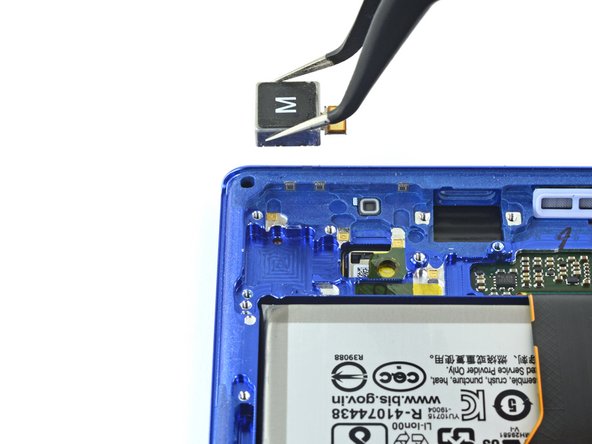
    • Use a pair of tweezers to pull the vibration motor out of its recess in the frame.

    • The vibration motor is secured with some light adhesive.

    • Whenever you use tweezers near the battery, be very careful not to puncture the battery.

    • Remove the vibration motor.

    Demander à FixBot

    Ajouter un commentaire

Conclusion

Compare your new replacement part to the original part—you may need to transfer remaining components or remove adhesive backings from the new part before installing.

To reassemble your device, follow the above steps in reverse order.

Take your e-waste to an R2 or e-Stewards certified recycler.

Repair didn’t go as planned? Try some basic troubleshooting, or ask our Answers community for help.

Annulation : je n'ai pas terminé ce tutoriel.

Une autre personne a terminé cette réparation.

Arthur Shi

Membre depuis le 01/03/18

343 723 Réputation

915 tutoriels rédigés

Équipe

iFixit Membre de l'équipe iFixit

Staff

123 membres

28 236 tutoriels rédigés

0 commentaires de tutoriel

Ajouter un commentaire

Nombre de vues :

Dernières 24 heures : 1

7 derniers jours : 3

30 derniers jours : 28

Total : 1,015