Aller au contenu principal

Cette version peut contenir des modifications incorrectes. Passez au dernier aperçu vérifié.

Ce dont vous avez besoin

  1. Cette étape n’est pas traduite. Aidez à la traduire

    : étape 1, image 1 de 3 : étape 1, image 2 de 3 : étape 1, image 3 de 3
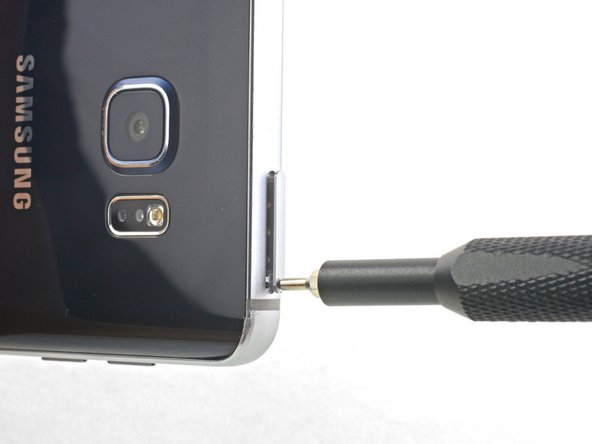
    • Insert a SIM eject tool, SIM eject bit, or a straightened paperclip into the small hole in the SIM card tray at the top of the phone.

    • Press to eject the tray. This may require some force.

    • Remove the SIM card tray.

  2. Cette étape n’est pas traduite. Aidez à la traduire

    : étape 2, image 1 de 3 : étape 2, image 2 de 3 : étape 2, image 3 de 3
    • Using your fingernail, push the S-Pen button until it clicks and pops out of the phone.

    • Remove the S-Pen.

  3. Cette étape n’est pas traduite. Aidez à la traduire

    : étape 3, image 1 de 1
    • If the glass back is cracked, carefully tape over the entire surface with packing tape.

    • Apply a heated iOpener to the bottom of the phone for about two minutes.

    • You may need to reheat and reapply the iOpener several times to get the phone warm enough. Follow the iOpener instructions to avoid overheating.

    • A hair dryer, heat gun, or hot plate may also be used, but be careful not to overheat the phone—the OLED display and internal battery are both susceptible to heat damage.

  4. Cette étape n’est pas traduite. Aidez à la traduire

    : étape 4, image 1 de 3 : étape 4, image 2 de 3 : étape 4, image 3 de 3
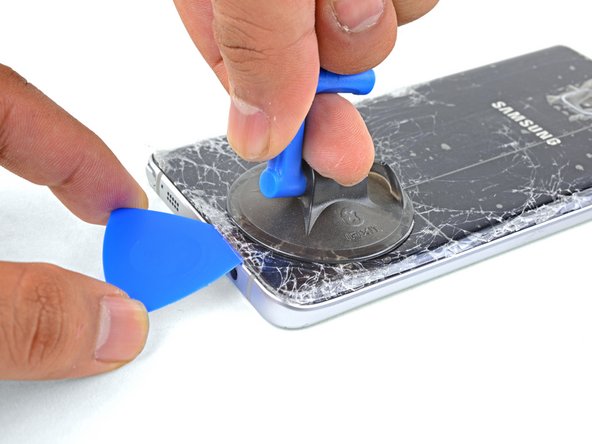
    • Apply a suction cup as close as possible to the bottom edge of the phone.

    • If the phone's back cover is cracked, the suction cup may not stick. Try lifting it with strong tape, or superglue the suction cup in place and allow it to cure so you can proceed.

    • Lift on the suction cup and insert an opening pick under the rear glass.

    • The rear glass very fragile and can break if you use too much force or attempt to pry with metal tools.

  5. Cette étape n’est pas traduite. Aidez à la traduire

    : étape 5, image 1 de 1
    • Once the pick is in place, reheat the edge with an iOpener for another minute.

  6. Cette étape n’est pas traduite. Aidez à la traduire

    : étape 6, image 1 de 3 : étape 6, image 2 de 3 : étape 6, image 3 de 3
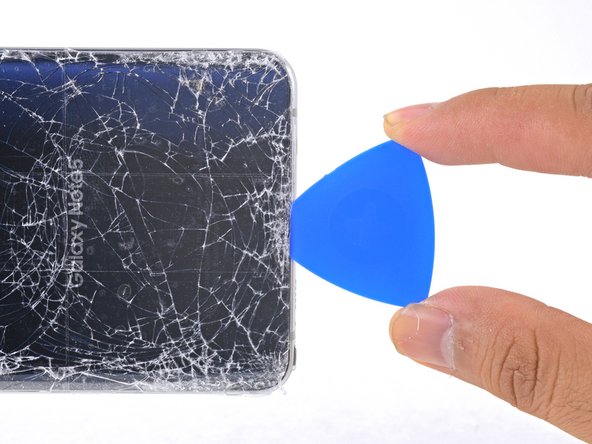
    • Slide the pick down the bottom edge of the phone.

    • Go slowly so that the tip doesn't slip out of the seam. If sliding becomes difficult, reheat and reapply the iOpener.

    • Leave the pick in place to prevent the adhesive from resealing, and grab another pick as you proceed to the next step.

  7. Cette étape n’est pas traduite. Aidez à la traduire

    : étape 7, image 1 de 3 : étape 7, image 2 de 3 : étape 7, image 3 de 3
    • Insert another pick and slowly cut around the corner of the phone.

    • Due to the curved shape of the back, the glass is extremely fragile and prone to cracking in the corners. Be patient and reapply an iOpener if the corner feels hard to slice through.

  8. Cette étape n’est pas traduite. Aidez à la traduire

    : étape 8, image 1 de 1
    • Before cutting further, apply a heated iOpener to the long edge.

  9. Cette étape n’est pas traduite. Aidez à la traduire

    : étape 9, image 1 de 3 : étape 9, image 2 de 3 : étape 9, image 3 de 3
    • Repeat the previous heating and cutting procedure for the remaining three sides of the phone.

    • Leave an opening pick in each edge of the phone as you continue to the next to prevent the adhesive from resealing.

  10. Cette étape n’est pas traduite. Aidez à la traduire

    : étape 10, image 1 de 3 : étape 10, image 2 de 3 : étape 10, image 3 de 3
    • Use an opening pick to cut any remaining adhesive around the edges of the glass.

    • Lift the glass and remove it from the phone.

  11. Cette étape n’est pas traduite. Aidez à la traduire

    : étape 11, image 1 de 1
    Outil utilisé dans cette étape :
    Tesa 61395 Tape
    $5.99
    J'achète
    • To reinstall the back cover:

    • Use tweezers to peel away any remaining adhesive from both the back cover and the phone's chassis.

    • Clean the adhesion areas with high concentration isopropyl alcohol (at least 90%) and a lint-free cloth. Swipe in one direction only, not back and forth. This will help prep the surface for the new adhesive.

    • Be sure to turn on your phone and test your repair before installing new adhesive and resealing the phone.

    • Replacement adhesive comes in a pre-cut sheet to match the exact contours of the back cover. If that's not available, you can use a high-bond double-sided tape, such as Tesa 61395. Be aware that this leaves gaps that are vulnerable to liquid intrusion.

    • After installing the rear cover, apply strong, steady pressure to your phone for several minutes to help the adhesive form a good bond, such as by placing it under a stack of heavy books.

    • If desired, you may reinstall the back cover without replacing the adhesive. Remove any large chunks of adhesive that might prevent the back cover from sitting down flush. After installation, heat the back cover and apply pressure to secure it. It won't be waterproof, but the glue is usually more than strong enough to hold.

Ligne d'arrivée

7 autres ont terminé cette réparation.

Arthur Shi

Membre depuis le 01/03/18

253 576 Réputation

526 tutoriels rédigés

Équipe

iFixit Membre de l'équipe iFixit

Staff

135 membres

17 218 tutoriels rédigés

0 commentaires

Ajouter un commentaire

Nombre de vues :

Dernières 24 heures : 1

7 derniers jours : 14

30 derniers jours : 43

Total : 5,053