Il est possible que cette traduction ne reflète pas les dernières mises à jour du tutoriel source. Aidez à mettre à jour la traduction ou bien consultez le tutoriel source.
Introduction
Utilisez ce tutoriel pour remplacer la batterie usée de votre Samsung Galaxy S6 Edge +.
Avant de démonter votre appareil, veuillez à décharger la batterie en dessous de 25 %. Une batterie lithium-ion chargée risque de s'enflammer et/ou de provoquer une explosion si elle est accidentellement perforée.
Si votre batterie est gonflée, veuillez prendre les précautions appropriées. Ne pas chauffer votre appareil. Si besoin, vous pouvez utiliser un compte-goutte ou une seringue pour déposer de l'alcool à 90° autour des angles de la coque arrière de l'appareil afin de ramollir la colle . Si votre batterie est gonflée, le remplacement de celle-ci peut s’avérer dangereux. Veuillez à faire très attention , nous vous conseillons de porter des lunettes de protection, ou de le faire réparer chez un professionnel si vous n’êtes pas sûr de procéder correctement .
Pour réaliser le changement de la batterie, il sera nécessaire de retirer la vitre arrière, ce qui détruira la colle qui la tient en place. Cette colle devra être remplacée avant de remplacer ou de réinstaller la vitre arrière.
Ce dont vous avez besoin
-
Cette étape n’est pas traduite. Aidez à la traduire
-
Heat an iOpener and apply it to the volume button side of the phone for about two minutes.
-
-
Cette étape n’est pas traduite. Aidez à la traduire
-
Once the back panel is hot to the touch, apply a suction cup near the center of the phone, and as close as possible to the edge of the panel.
-
Lift on the suction cup to create a small gap underneath the rear glass, and insert an opening pick into the gap.
-
-
Cette étape n’est pas traduite. Aidez à la traduire
-
Slide the pick along the side of the phone to cut the adhesive securing the rear panel.
-
-
Cette étape n’est pas traduite. Aidez à la traduire
-
Repeat the heating and cutting procedure for the remaining three sides of the phone.
-
Leave an opening pick under each edge to prevent the adhesive from resealing.
-
-
-
Cette étape n’est pas traduite. Aidez à la traduire
-
Use an opening pick to slice through any remaining adhesive.
-
Remove the rear glass.
-
-
Cette étape n’est pas traduite. Aidez à la traduire
-
First use tweezers to peel away any remaining adhesive from both the back cover and the phone's chassis.
-
Then, clean the adhesion areas with high concentration isopropyl alcohol (at least 90%) and a lint-free cloth. Swipe in one direction only, not back and forth. This will help prep the surface for the new adhesive.
-
Be sure to turn on your phone and test your repair before installing new adhesive and resealing the phone.
-
Replacement adhesive comes in a pre-cut sheet to match the exact contours of the back cover. The sheet is asymmetrical, so make sure the screw holes in the adhesive sheet line up with the screws on the frame before applying the adhesive.
-
After installing the rear cover, apply strong, steady pressure to your phone for several minutes to help the adhesive form a good bond, such as by placing it under a stack of heavy books.
-
-
Cette étape n’est pas traduite. Aidez à la traduire
-
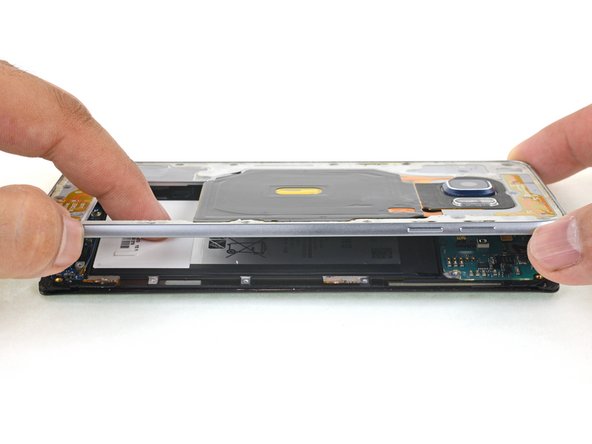
Remove eighteen 3.2 mm screws from the midframe.
-
-
Cette étape n’est pas traduite. Aidez à la traduire
-
Press down on the back of the battery while you lift up on the edges of the midframe to separate the midframe from the rest of the phone.
-
-
Cette étape n’est pas traduite. Aidez à la traduire
-
Insert an opening pick between the display frame and the battery.
-
Slide the pick underneath the battery as far as you can while maintaining a firm grip on the pick.
-
Slide the pick down the side of the battery to break up the adhesive underneath.
-
-
Cette étape n’est pas traduite. Aidez à la traduire
-
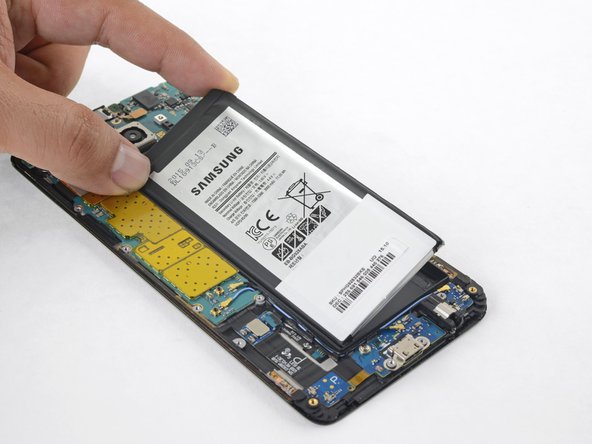
Twist the opening pick to lift the battery away from the display frame.
-
Remove the battery.
-
Remove any remaining adhesive from the phone, and clean the glued areas with isopropyl alcohol and a lint-free cloth.
-
Secure the new battery with pre-cut adhesive or double-sided adhesive tape. In order to position it correctly, apply the new adhesive into the phone, not directly onto the battery. The adhesive should go around the perimeter of the battery compartment, but not in the rectangular cutout in the center (which is actually the back side of the display).
-
Press the battery firmly into place for 5-10 seconds.
-


Pour remonter votre appareil, suivez ces étapes dans le sens inverse.
Après avoir complété ce tutoriel,
Pour remonter votre appareil, suivez ces étapes dans le sens inverse.
Après avoir complété ce tutoriel,
Annulation : je n'ai pas terminé ce tutoriel.
24 autres ont terminé cette réparation.
Merci à ces traducteurs :
66%


Ces traducteurs nous aident réparer le monde ! Vous voulez contribuer ?
Commencez à traduire ›

8 commentaires
This guide is not too realistic the iFixit iOpener does not get anywhere hot enough to actually heat the glue and the suction cup is also really inadequate and does not keep suction long enough to pull the back off. I managed to do it with a heat gun and glass mover suction cup, which in my opinion is necessary for this fix. This over all was an easy fix and only took about 40 mins to complete
I have tried using a hair dryer and one of the suction cups that comes with replacement kits and it didn’t work, will a dent puller suction cup work?
Do I really need new adhesive for the battery or will the midframe and old adhesive hold it well enough?
I would recommend new adhesive for the battery, just to be safe. The battery won’t fall out of the phone if it doesn’t have new adhesive, but there’s always a chance that if it slides around it could damage its cable or connector.
So when i lift up the suction cup should teh back just lift up a little or do i need to hold the phone down some how?