Introduction
Utilisez ce tutoriel pour remplacer le châssis de votre Samsung Galaxy S6. L'unité du châssis comprend la bobine d'induction, les boutons de marche et de volume, l'objectif de la caméra et le haut-parleur.
Ce tutoriel implique l'enlèvement de la vitre arrière. Ceci détruira l'adhésif qui la tient en place. Suivez ce tutoriel pour remonter la vitre arrière.
Ce dont vous avez besoin
-
-
Insérez un trombone ou un outil d'éjection de carte SIM dans le trou du tiroir de la carte SIM du côté du bouton de marche du smartphone.
-
Appuyez pour éjecter le tiroir de la carte SIM.
-
-
-
-
Remplissez une casserole ou une poêle avec suffisamment d'eau pour immerger complètement un iOpener.
-
Faites chauffer l'eau jusqu'à ébullition. Puis éteignez le feu.
-
Placez un iOpener dans l'eau chaude pendant 2 à 3 minutes. Assurez-vous que l'iOpener est complètement immergé dans l'eau.
-
Utilisez des pinces pour extraire l'iOpener chauffé de l'eau chaude.
-
Séchez soigneusement l'iOpener avec une serviette.
-
Votre iOpener est prêt à être utilisé ! Si vous devez réchauffer l'iOpener, portez l'eau à ébullition, éteignez le feu et placez l'iOpener dans l'eau pendant 2 à 3 minutes.
-
-
-
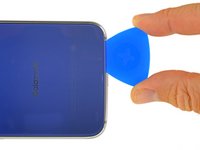
Posez l'iOpener chauffé sur le panneau pendant environ deux minutes afin de ramollir l'adhésif autour du bord de la vitre.
-
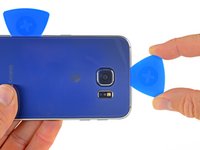
Déplacez l'iOpener pour chauffer la partie restante du panneau pendant deux autres minutes.
-
-
-
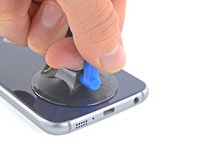
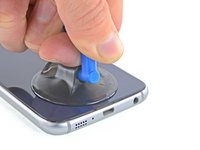
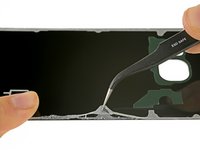
Utilisez une pincette pour décoller les restes d'adhésif du châssis interne du téléphone.
-
Nettoyez les zones d'adhérence avec de l'alcool isopropylique (concentré à au moins 90 %) et un chiffon non-pelucheux. Essuyez dans une seule direction, sans faire de mouvements de va-et-vient. Cela préparera la surface pour la nouvelle couche d'adhésif.
-
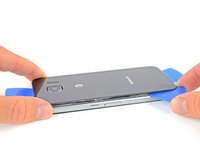
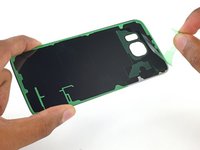
Décollez le film de protection de la nouvelle vitre arrière. Alignez soigneusement un bord de l'écran contre le châssis du téléphone, et appuyez fermement sur la vitre pour l'encastrer dans le téléphone.
-
-
-
Retirez les treize vis Phillips #00 de 3,5 mm fixant le châssis au téléphone.
-
-
-
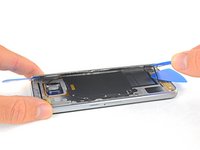
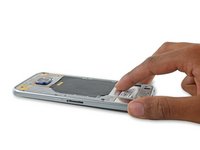
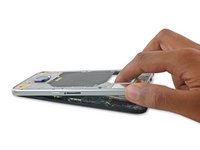
Saisissez fermement le bord du châssis.
-
Soulevez le châssis tout en poussant la batterie vers le bas pour séparer le châssis du reste du téléphone.
-
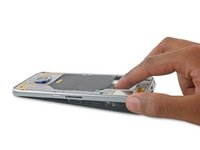
En soulevant le châssis, faites attention à ne pas rester accroché à la prise jack ou la prise de chargement.
-
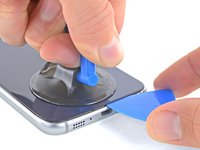
Une fois le châssis partiellement séparé, passez précautionneusement un médiator autour des angles du reste du téléphone pour séparer la partie supérieure du châssis.
-
Pour éviter d'endommager la prise jack, enlevez d'abord la partie supérieure du châssis puis poussez le châssis vers le bas pour désengager la prise jack.
-
Vous devrez peut-être chauffer et appliquer un iOpener sur les bords de l'écran pour ramollir l'adhésif si la séparation du châssis est difficile.
-


Pour remonter votre appareil, suivez ces instructions dans l'ordre inverse. Pour le remontage de la vitre arrière, reportez-vous au tutoriel pour remplacer l'adhésif de la vitre arrière.
Pour remonter votre appareil, suivez ces instructions dans l'ordre inverse. Pour le remontage de la vitre arrière, reportez-vous au tutoriel pour remplacer l'adhésif de la vitre arrière.
Annulation : je n'ai pas terminé ce tutoriel.
18 autres ont terminé cette réparation.
Merci à ces traducteurs :
100%


Ces traducteurs nous aident réparer le monde ! Vous voulez contribuer ?
Commencez à traduire ›

6 commentaires
Step 18
Is it really that "simple" to separate the midframe from the front of the phone? In most videos (even the one on ifixit) a suction cup is used (after warming the front) with some prying tools.
So, does Step 18 really work?
It appears that the front is hold together by only 4 adhesives in the corners. Are this damaged during the front removal process? (is there a replacement kit?)
Just another question, I damaged the heart sensor plastic cover, is it possible to buy just that part or do I need to buy a complete midframe?
Can this step be exactly with a simple push as stated? Other sources required focusing heat on the 4 corners and run through with a pick....?
Secondly, how can one avoid damaging the lamination under the glass while removing it or trying to get the first foothold with the pick. Most guides I have seen appear to skip this step.
I have seen one phone parts site (EtradeSupply) list all different variants of the mid housing (G920F, G920V, G920R etc). But another site (WitRigs) has just one, as if they aren't specific.
Does anyone know? Because i'm in Australia and can't find G920i variant.
Also, has anyone simply swapped over the antennas, and crimped them onto the new housing?
Ok Guys I am definitely !#^&@@ off right now.... but to the point.
Please Edit to this guide --> @Step 18:
First of all: Heat the for corners with your iOpener to lose the adhesive which sits in the corners.
Be very very gentle when you push down on the battery and try to put a little pressure onto or maybe into the headphone jack when you first encounter that the display gets lose, because the headphone-jack fits very well in the frame and holds on a little corner.
Only go around the whole display with a spudger when the adhesive is really warm to lose it when it doesn't come out as easy as you thought. Because otherwise you may face that the display to display-glass laminate gets damaged. That just happened to me at the upper display side... so to get a perfect new looking phone I have to replace that as well....EXPENSIVE :(
Hope this may help you guys.
but ... nevertheless ... thank you guys from IFixit for your continous effort to help people repairing there stuff - heads up :-)
Hi Jakob, thanks for your input! When writing this guide we used a device that had been previously disassembled, so our experience may have been different from yours. Just to be clear: you have an issue with step 18 because the adhesive between the midframe and front assembly is very strong and simply pushing the battery is not adequate? Are there other steps that need to be adjusted?
And, as a general note, you can edit this guide yourself! When you hover your cursor over any particular step, an "Edit" button will appear. Alternatively, you can scroll to the top of the page and click the "Edit" tab up there.