Introduction
Un bouton de jeans permet de fixer solidement une paire de jeans à la taille.
Ce tutoriel vous montrera comment fixer un nouveau bouton de jeans.
Lisez l'intégralité du tutoriel avant de commencer la réparation jean, et rassemblez les outils et matériaux nécessaires. Bien que les matériaux spécifiques à Patagonia soient idéaux, ils ne sont pas obligatoires. Vous pouvez obtenir des pièces de rechange Patagonia en appelant ou en envoyant un message au service client de Patagonia.
Vous pouvez également apporter les produits Patagonia à un magasin local pour une évaluation de réparation ou les envoyer à Patagonia via leur service de réparation par courrier.
Commençons à réparer !
ATTENTION ! Petites pièces. Patagonia ne recommande pas d'effectuer ces réparations sur des vêtements destinés à des enfants de 3 ans ou moins. Nous vous recommandons plutôt de retourner le produit pour qu'il soit réparé par un pro.
Tutoriel connexe : Changement rivet pantalon de travail
Ce dont vous avez besoin
-
-
Rassemblez les pièces de rechange, y compris un bouton et son clou.
-
Posez le jean sur une table ou un établi solide, l'arrière du jean contre le support.
-
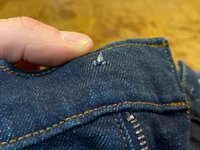
Ouvrez la fermeture éclair et localisez le trou où se trouvait l'ancien bouton.
-
Retirez tout reste de l'ancien bouton avant d'installer le nouveau. Jetez les morceaux de façon responsable.
-
-
-
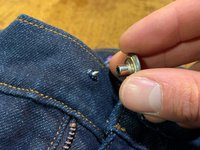
Insérez le clou à l'arrière du trou.
-
Poussez le clou dans le trou jusqu'à ce qu'il soit au ras du tissu.
-
-
-
-
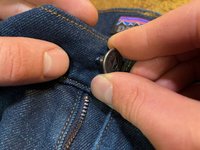
Maintenez le clou en place par derrière, placez le bouton sur le clou et maintenez les pièces en place avec vos doigts.
-
-
-
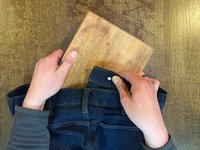
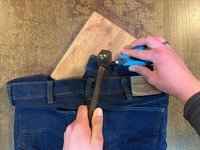
Retournez le jean sur une surface plate et lisse, comme une planche en bois ou un morceau de cuir.
-
Utilisez une pince à bec long pour maintenir le clou en place, en faisant attention à ce que le clou et le bouton soient bien alignés.
-
Tapez le clou d'un coup franc avec le marteau.
-
-
-
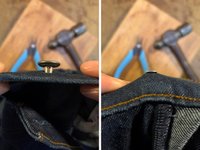
Essayez le nouveau bouton en boutonnant et en tirant sur ce dernier, pour savoir s'il est solide et bien installé.
-


Annulation : je n'ai pas terminé ce tutoriel.
48 autres ont terminé cette réparation.
Merci à ces traducteurs :
100%


Ces traducteurs nous aident réparer le monde ! Vous voulez contribuer ?
Commencez à traduire ›


10 commentaires
Nice, but let's consider how this situation occurs. The tack comes out of its hole, just simply replacing it is not realistic, unless the new tack is significantly bigger. So how do you "repair" the hole such that it will hold a tack again?
As noted in step 2, you can move the tack over to where the denim isn't damaged. If that will cause the jeans not to fit properly, you can sew a folded piece of denim behind the hole (sew around the edges on the inside of the jeans) and punch the tack through the new piece.
I didn´t have a new button and was in a pinch. Just ripped the old button off completely, jammed it in the tail end of a hammer and yanked it apart with som pliers. Then i followed the instructions in this fix. Worked like a charm, so far...
Thanks I’m gonna try this first!
The best thing to do is patch the hole. I simply use fabric glue and some pieces of blue jeans that you probably have hanging around. Trim off the extra threads and then apply fabric glue to the back of the waist band covering the hole made by the old button. Do the same on the front and then let dry. about 30 minutes or so, if you have a machine I always stitch back and for on the edges. Trim any edges or use additional glue to tack them down. Now because you have strengthened the hole carefully push the back of the button through where you can see the end, add the front to the nail end and turning the garment face down on a protected hard surface hammer about 3 times and check to see if it is sturdy, continue to hammer until you have reached the objective. Now you have got many more years with that button.