Aller au contenu principal
Pour réparer ensemble - Je crée un compte

iPad Mini 6 Speaker Assembly Replacement

Ce dont vous avez besoin

    1. iPad Mini 6 Speaker Assembly Replacement, Apply tape to a cracked screen: étape 1, image 1 de 3 iPad Mini 6 Speaker Assembly Replacement, Apply tape to a cracked screen: étape 1, image 2 de 3 iPad Mini 6 Speaker Assembly Replacement, Apply tape to a cracked screen: étape 1, image 3 de 3
      • If your display glass is cracked, keep further breakage contained and prevent bodily harm during your repair by taping the glass.

      • Lay overlapping strips of clear packing tape over the iPad's display until the whole face is covered.

      • This will keep glass shards contained and provide structural integrity when prying and lifting the display.

      • Do your best to follow the rest of the guide as described. However, once the glass is broken, it will likely continue to crack as you work, and you may need to use a metal prying tool to scoop the glass out.

      • Wear safety glasses to protect your eyes, and be careful not to damage the LCD screen.

      Demander à FixBot

      Ajouter un commentaire

    1. iPad Mini 6 Speaker Assembly Replacement, Heat the bottom edge: étape 2, image 1 de 1
      • Completely power off your device before you begin.

      • Apply a heated iOpener to the bottom edge of the device for 90 seconds to loosen the adhesive underneath.

      • A hair dryer, heat gun, or hot plate may also be used, but be careful not to overheat the device.

      Demander à FixBot

      Ajouter un commentaire

    2. iPad Mini 6 Speaker Assembly Replacement, Screen removal information: étape 3, image 1 de 3 iPad Mini 6 Speaker Assembly Replacement, Screen removal information: étape 3, image 2 de 3 iPad Mini 6 Speaker Assembly Replacement, Screen removal information: étape 3, image 3 de 3
      • While you're waiting for the adhesive to loosen, note the following:

      • The areas at the top and bottom of the screen are sensitive to prying.

      • Don't insert a pick more than 3 mm to avoid damaging the screen.

      • There's a long circuit board attached to the screen that sits parallel to the left edge.

      • Don't insert a pick more than 1.5 mm to avoid damaging the circuit board.

      • The first two images are mirrored for demonstration purposes.

      Demander à FixBot

      Ajouter un commentaire

    3. iPad Mini 6 Speaker Assembly Replacement, Insert an opening pick: étape 4, image 1 de 3 iPad Mini 6 Speaker Assembly Replacement, Insert an opening pick: étape 4, image 2 de 3 iPad Mini 6 Speaker Assembly Replacement, Insert an opening pick: étape 4, image 3 de 3
      • Once the screen is warm to touch, apply a suction handle to the bottom edge of the screen and as close to the edge as possible.

      • Lift the screen with the suction handle to create a small gap between the screen and the frame.

      • Insert an opening pick into the gap between the frame and the screen.

      • Don't insert the pick more than 1.5 mm to avoid damaging the circuit board.

      • Leave the opening pick in place to prevent the adhesive from resealing.

      Demander à FixBot

      Ajouter un commentaire

    4. iPad Mini 6 Speaker Assembly Replacement, Separate the bottom adhesive: étape 5, image 1 de 3 iPad Mini 6 Speaker Assembly Replacement, Separate the bottom adhesive: étape 5, image 2 de 3 iPad Mini 6 Speaker Assembly Replacement, Separate the bottom adhesive: étape 5, image 3 de 3
      • Slide the pick along the bottom edge of the device towards the bottom-right corner.

      • Leave the pick in to prevent the adhesive from resealing.

      Demander à FixBot

      Ajouter un commentaire

    5. iPad Mini 6 Speaker Assembly Replacement, Heat the right edge: étape 6, image 1 de 1
      • Apply a heated iOpener to the right edge of the device for 90 seconds to loosen the adhesive underneath.

      Demander à FixBot

      Ajouter un commentaire

    6. iPad Mini 6 Speaker Assembly Replacement, Separate the bottom-right corner adhesive: étape 7, image 1 de 3 iPad Mini 6 Speaker Assembly Replacement, Separate the bottom-right corner adhesive: étape 7, image 2 de 3 iPad Mini 6 Speaker Assembly Replacement, Separate the bottom-right corner adhesive: étape 7, image 3 de 3
      • Rotate the opening pick around the bottom-right corner of the device.

      Demander à FixBot

      Ajouter un commentaire

    7. iPad Mini 6 Speaker Assembly Replacement, Separate the remaining adhesive: étape 8, image 1 de 2 iPad Mini 6 Speaker Assembly Replacement, Separate the remaining adhesive: étape 8, image 2 de 2
      • Repeat the heating, slicing, and leaving opening picks for the remaining edges of the device.

      • When you slice near the front camera, don't insert the pick more than 1.5 mm to avoid damaging or smearing the camera.

      Demander à FixBot

      Ajouter un commentaire

    8. iPad Mini 6 Speaker Assembly Replacement, Reposition the screen: étape 9, image 1 de 3 iPad Mini 6 Speaker Assembly Replacement, Reposition the screen: étape 9, image 2 de 3 iPad Mini 6 Speaker Assembly Replacement, Reposition the screen: étape 9, image 3 de 3
      • If there's still resistance around the edges of the screen, use an opening pick to cut the adhesive again.

      • Don't try to remove the screen all the way yet; it's still connected to the frame by a flex cable.

      • With the bottom of the device facing you, pull the right edge of the screen up and towards the left edge of the device.

      • Rest the screen upside down and parallel to the frame before continuing.

      • Don't twist the screen or move it too far away from the frame to avoid damaging the flex cable.

      Demander à FixBot

      Ajouter un commentaire

    9. iPad Mini 6 Speaker Assembly Replacement, Unfasten the display cable bracket: étape 10, image 1 de 2 iPad Mini 6 Speaker Assembly Replacement, Unfasten the display cable bracket: étape 10, image 2 de 2
      • Use a Phillips #000 screwdriver to remove the five 1.2 mm-long screws securing the frame bracket to the frame.

      Demander à FixBot

      Ajouter un commentaire

    10. iPad Mini 6 Speaker Assembly Replacement, Remove the display cable bracket: étape 11, image 1 de 2 iPad Mini 6 Speaker Assembly Replacement, Remove the display cable bracket: étape 11, image 2 de 2
      Outil utilisé dans cette étape :
      Tweezers
      $4.99
      • Use tweezers, or your fingers, to remove the display cable bracket from the frame.

      Demander à FixBot

      Ajouter un commentaire

    11. iPad Mini 6 Speaker Assembly Replacement, Disconnect the display: étape 12, image 1 de 3 iPad Mini 6 Speaker Assembly Replacement, Disconnect the display: étape 12, image 2 de 3 iPad Mini 6 Speaker Assembly Replacement, Disconnect the display: étape 12, image 3 de 3
      • Use the flat end of a spudger to pry up and disconnect the display cable's two press connectors secured to the frame.

      Demander à FixBot

      Ajouter un commentaire

    12. iPad Mini 6 Speaker Assembly Replacement, Remove the screen: étape 13, image 1 de 2 iPad Mini 6 Speaker Assembly Replacement, Remove the screen: étape 13, image 2 de 2
      • Remove the screen from the frame.

      Demander à FixBot

      Ajouter un commentaire

    1. iPad Mini 6 Speaker Assembly Replacement, Disconnect the battery: étape 14, image 1 de 2 iPad Mini 6 Speaker Assembly Replacement, Disconnect the battery: étape 14, image 2 de 2
      • The the flat end of a spudger to pry up and disconnect the battery's press connector secured to the frame.

      • To re-attach press connectors like this one, carefully align and press down on one side until it clicks into place, then repeat on the other side. Do not press down on the middle. If the connector is misaligned, the pins can bend, causing permanent damage.

      Demander à FixBot

      Ajouter un commentaire

    1. Attention : l'étape 15 est issue d'un tutoriel marqué comme en cours.

      iPad Mini 6 Speaker Assembly Replacement, Speaker information: étape 15, image 1 de 2 iPad Mini 6 Speaker Assembly Replacement, Speaker information: étape 15, image 2 de 2
      Demander à FixBot

      Ajouter un commentaire

    1. Attention : les étapes 16 à 26 sont issues d'un tutoriel marqué comme étant en cours.

      iPad Mini 6 Speaker Assembly Replacement, Unfasten the front camera shield: étape 16, image 1 de 2 iPad Mini 6 Speaker Assembly Replacement, Unfasten the front camera shield: étape 16, image 2 de 2
      • The next 11 steps will show how to remove the top speaker.

      • Use a Phillips #000 screwdriver to remove the two 1.2 mm screws securing the front camera shield to the frame.

      Demander à FixBot

      Ajouter un commentaire

    2. iPad Mini 6 Speaker Assembly Replacement, Remove the front camera shield: étape 17, image 1 de 2 iPad Mini 6 Speaker Assembly Replacement, Remove the front camera shield: étape 17, image 2 de 2
      Outil utilisé dans cette étape :
      Tweezers
      $4.99
      • Use tweezers, or your fingers, to remove the front camera shield.

      Demander à FixBot

      Ajouter un commentaire

    3. iPad Mini 6 Speaker Assembly Replacement, Disconnect the volume button board: étape 18, image 1 de 2 iPad Mini 6 Speaker Assembly Replacement, Disconnect the volume button board: étape 18, image 2 de 2
      • Use a spudger to pry up and disconnect the volume button board's press connector secured to the frame.

      Demander à FixBot

      Ajouter un commentaire

    4. iPad Mini 6 Speaker Assembly Replacement, Reposition the volume button board's cable: étape 19, image 1 de 2 iPad Mini 6 Speaker Assembly Replacement, Reposition the volume button board's cable: étape 19, image 2 de 2
      • Use tweezers, or your fingers, to peel back the volume button board's cable from the top speaker.

      Demander à FixBot

      Ajouter un commentaire

    5. iPad Mini 6 Speaker Assembly Replacement, Disconnect the top speaker: étape 20, image 1 de 2 iPad Mini 6 Speaker Assembly Replacement, Disconnect the top speaker: étape 20, image 2 de 2
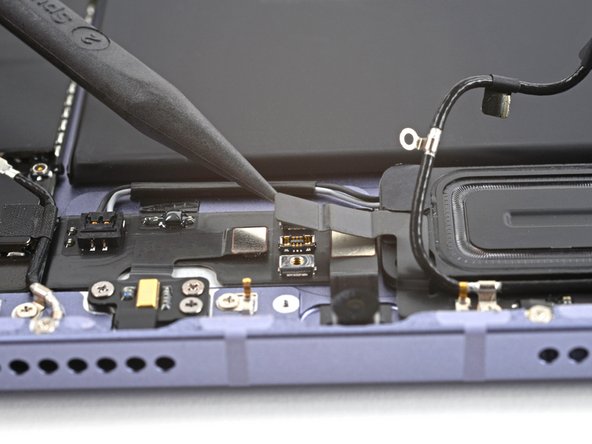
      • Use the point of spudger to pry up and disconnect the top speaker's cable.

      • Be very careful when performing this step; apply equal force to both cords to prevent any damage to the connector.

      Demander à FixBot

      Ajouter un commentaire

    6. iPad Mini 6 Speaker Assembly Replacement, Reposition the top speaker's cable: étape 21, image 1 de 2 iPad Mini 6 Speaker Assembly Replacement, Reposition the top speaker's cable: étape 21, image 2 de 2
      • The top speaker's cable is lightly adhered to the frame.

      • Gently peel back the cable to separate it from the frame.

      Demander à FixBot

      Ajouter un commentaire

    7. iPad Mini 6 Speaker Assembly Replacement, Heat the top speaker: étape 22, image 1 de 1
      • Apply a heated iOpener to the top-left edge of the device for 90 seconds to loosen the top speaker's adhesive.

      Demander à FixBot

      Ajouter un commentaire

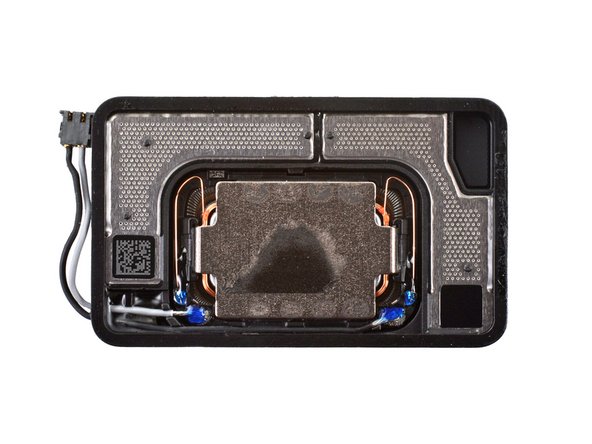
    8. iPad Mini 6 Speaker Assembly Replacement, Top speaker information: étape 23, image 1 de 2 iPad Mini 6 Speaker Assembly Replacement, Top speaker information: étape 23, image 2 de 2
      • While you're waiting for the adhesive to loosen, note the following:

      • Adhesive is located around the perimeter of the speaker.

      • Insert a pick 2 mm to separate this adhesive.

      • Adhesive is also located in the center of the speaker.

      • Insert a pick 7 mm to separate this adhesive.

      Demander à FixBot

      Ajouter un commentaire

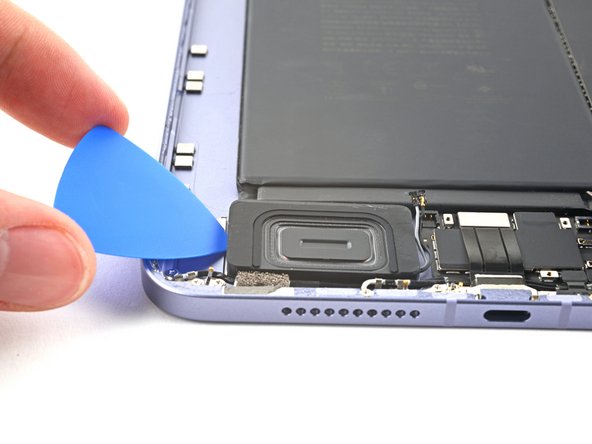
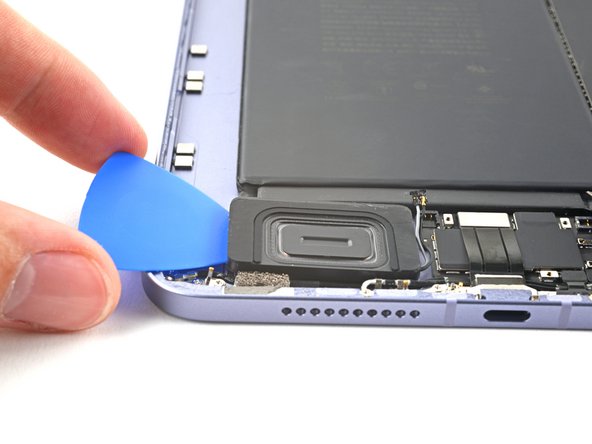
    9. iPad Mini 6 Speaker Assembly Replacement, Separate the top speaker's adhesive: étape 24, image 1 de 3 iPad Mini 6 Speaker Assembly Replacement, Separate the top speaker's adhesive: étape 24, image 2 de 3 iPad Mini 6 Speaker Assembly Replacement, Separate the top speaker's adhesive: étape 24, image 3 de 3
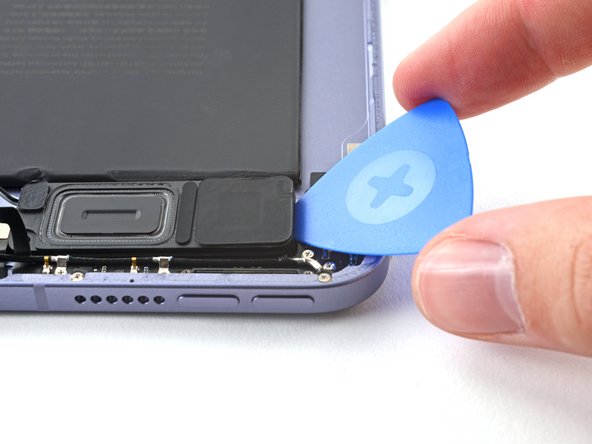
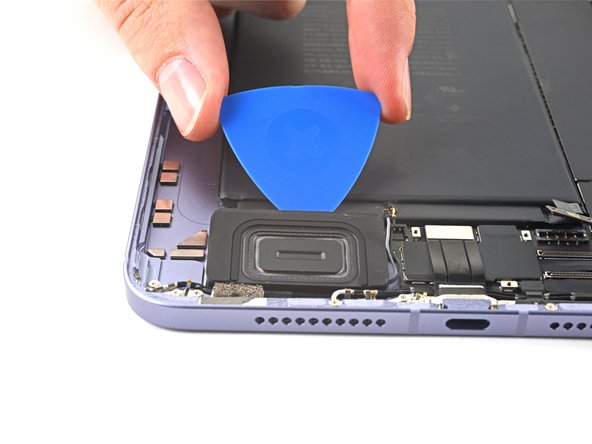
      • Insert an opening pick between the top speaker and the frame.

      • Insert the pick at least 7 mm to separate the center adhesive.

      Demander à FixBot

      Ajouter un commentaire

    10. iPad Mini 6 Speaker Assembly Replacement: étape 25, image 1 de 3 iPad Mini 6 Speaker Assembly Replacement: étape 25, image 2 de 3 iPad Mini 6 Speaker Assembly Replacement: étape 25, image 3 de 3
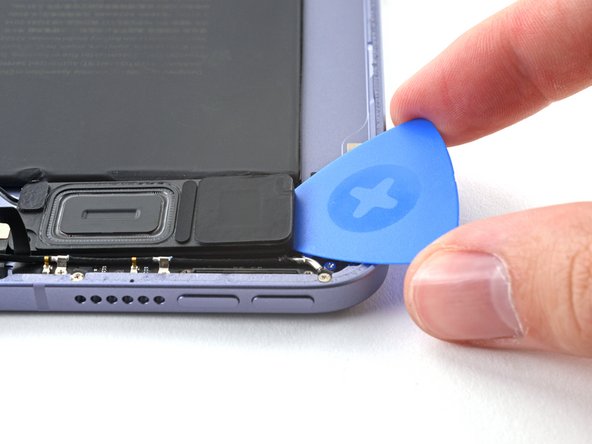
      • Slice along the perimeter of the top speaker to separate the adhesive.

      Demander à FixBot

      Ajouter un commentaire

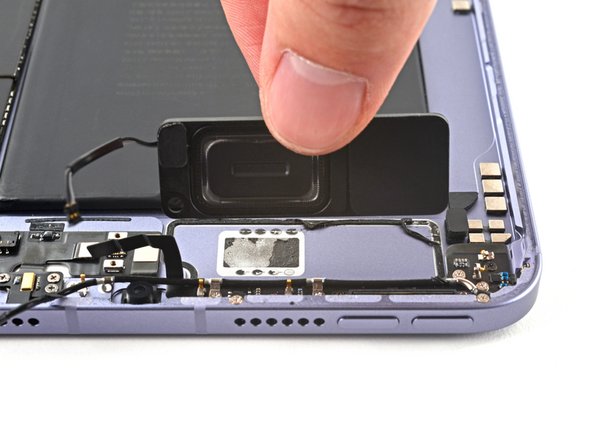
    11. iPad Mini 6 Speaker Assembly Replacement, Remove the top speaker: étape 26, image 1 de 3 iPad Mini 6 Speaker Assembly Replacement, Remove the top speaker: étape 26, image 2 de 3 iPad Mini 6 Speaker Assembly Replacement, Remove the top speaker: étape 26, image 3 de 3
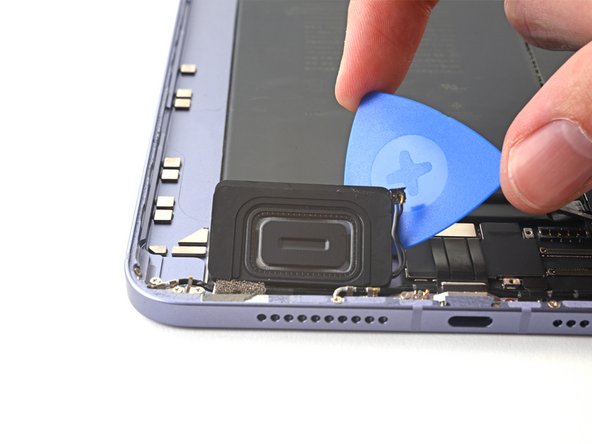
      • At this point, the perimeter of the speaker should be separated from the frame. If there's still resistance around the edges of the speaker, use an opening pick to cut the adhesive again.

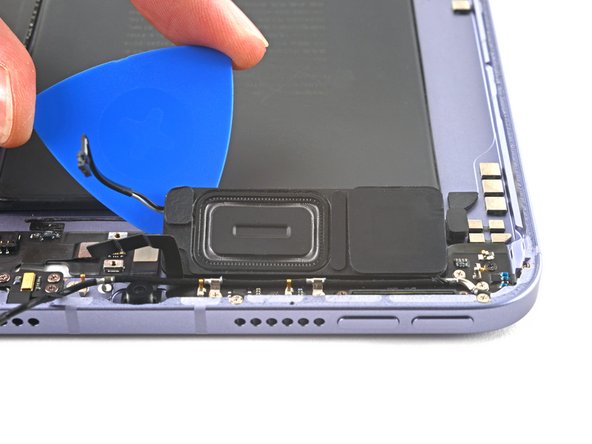
      • Pry up with the opening pick to completely separate the top speaker from the frame.

      • Remove the top speaker.

      Demander à FixBot

      Ajouter un commentaire

    1. Attention : les étapes 27 à 32 sont issues d'un tutoriel marqué comme étant en cours.

      iPad Mini 6 Speaker Assembly Replacement, Disconnect the bottom speaker: étape 27, image 1 de 2 iPad Mini 6 Speaker Assembly Replacement, Disconnect the bottom speaker: étape 27, image 2 de 2
      • The next six steps will show how to remove the bottom speaker.

      • Use the point of spudger to pry up and disconnect the bottom speaker's cable.

      • Be very careful when performing this step; apply equal force to both cords to prevent any damage to the connector.

      Demander à FixBot

      Ajouter un commentaire

    2. iPad Mini 6 Speaker Assembly Replacement, Heat the bottom speaker: étape 28, image 1 de 1
      • Apply a heated iOpener to the bottom-left edge of the device to loosen the bottom speaker's adhesive.

      Demander à FixBot

      Ajouter un commentaire

    3. iPad Mini 6 Speaker Assembly Replacement, Bottom speaker information: étape 29, image 1 de 2 iPad Mini 6 Speaker Assembly Replacement, Bottom speaker information: étape 29, image 2 de 2
      • While you're waiting for the adhesive to loosen, note the following:

      • Adhesive is located around the perimeter of the speaker.

      • Insert a pick 2 mm to separate this adhesive.

      • Adhesive is also located in the center of the speaker.

      • Insert a pick 9 mm to separate this adhesive.

      Demander à FixBot

      Ajouter un commentaire

    4. iPad Mini 6 Speaker Assembly Replacement, Separate the bottom speaker's adhesive: étape 30, image 1 de 3 iPad Mini 6 Speaker Assembly Replacement, Separate the bottom speaker's adhesive: étape 30, image 2 de 3 iPad Mini 6 Speaker Assembly Replacement, Separate the bottom speaker's adhesive: étape 30, image 3 de 3
      • Insert an opening pick between the bottom speaker and the frame.

      • Insert the pick at least 9 mm to separate the center adhesive.

      Demander à FixBot

      Ajouter un commentaire

    5. iPad Mini 6 Speaker Assembly Replacement: étape 31, image 1 de 3 iPad Mini 6 Speaker Assembly Replacement: étape 31, image 2 de 3 iPad Mini 6 Speaker Assembly Replacement: étape 31, image 3 de 3
      • Slice along the perimeter of the bottom speaker to separate the adhesive.

      Demander à FixBot

      Ajouter un commentaire

    6. iPad Mini 6 Speaker Assembly Replacement, Remove the bottom speaker: étape 32, image 1 de 3 iPad Mini 6 Speaker Assembly Replacement, Remove the bottom speaker: étape 32, image 2 de 3 iPad Mini 6 Speaker Assembly Replacement, Remove the bottom speaker: étape 32, image 3 de 3
      • At this point, the perimeter of the speaker should be separated from the frame. If there's still resistance around the edges of the speaker, use an opening pick to cut the adhesive again.

      • Pry up with the opening pick to completely separate the bottom speaker from the frame.

      • Remove the bottom speaker.

      Demander à FixBot

      Ajouter un commentaire

Conclusion

To reassemble your device, follow these instructions in reverse order.

Compare your new replacement part to the original part—you may need to transfer remaining components or remove adhesive backings from the new part before you install it.

Repair didn’t go as planned? Try some basic troubleshooting, or ask our iPad mini 6 Answers community for help.

Annulation : je n'ai pas terminé ce tutoriel.

Une autre personne a terminé cette réparation.

Alex Diaz-Kokaisl

Membre depuis le 01/16/22

249 173 Réputation

1 203 tutoriels rédigés

Équipe

iFixit Membre de l'équipe iFixit

Staff

123 membres

86 246 tutoriels rédigés

0 commentaires de tutoriel

Ajouter un commentaire

Nombre de vues :

Dernières 24 heures : 8

7 derniers jours : 29

30 derniers jours : 76

Total : 3,090