Introduction
If your iPhone 12 Pro Max screen is cracked, not responding to touch, or not showing a picture when your phone is powered on, use this guide to restore your iPhone to working order with a new screen, a.k.a. display assembly. This guide only covers steps for replacing a full display assembly that comes with a shield plate preinstalled.
The combined earpiece speaker + sensor assembly affixed to the back of the display is paired to your individual iPhone from the factory, so you must transfer it from your old display to your new one during any display replacement. It contains the flood illuminator, which is part of the biometric Face ID security feature. If it is damaged or replaced, Face ID will cease to function, so take extra care not to damage any of these components during this procedure. If damaged, only Apple or an Apple-authorized technician can restore Face ID function.
Note: On iOS 17.6 and earlier, True Tone functionality is disabled after a screen replacement, even when using an original Apple screen. On iOS 18 and newer, you can calibrate your new screen using Apple's Repair Assistant to restore True Tone functionality on genuine screens purchased from Apple.
Ce dont vous avez besoin
-
-
Power off your iPhone before beginning disassembly.
-
Remove the two 6.7 mm-long pentalobe P2 screws at the bottom edge of the iPhone.
-
-
-
Measure 3 mm from the tip and mark the opening pick with a permanent marker.
-
-
-
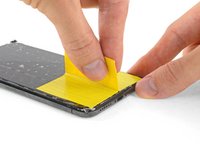
Lay overlapping strips of clear packing tape over the iPhone's screen until the whole face is covered.
-
If you can't get the suction cup to stick in the next few steps, fold a strong piece of tape (such as duct tape) into a handle and lift the screen with that instead.
-
-
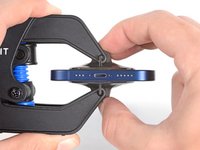
Outil utilisé dans cette étape :Clampy - Anti-Clamp$24.95
-
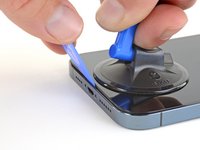
Pull the blue handle backwards to unlock the Anti-Clamp's arms.
-
Slide the arms over either the left or right edge of your iPhone.
-
Position the suction cups near the bottom edge of the iPhone—one on the front, and one on the back.
-
Squeeze the cups together to apply suction to the desired area.
-
-
-
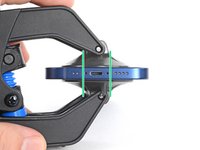
Support your iPhone on something sturdy such as a hardcover book so it rests hands-free and parallel to the ground; this makes it easier to work with in the following steps.
-
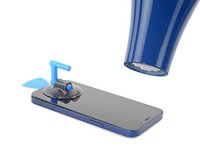
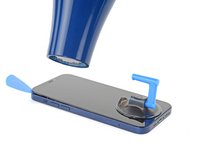
Use a hair dryer to heat along the bottom edge of the iPhone. The screen should feel slightly too hot to touch.
-
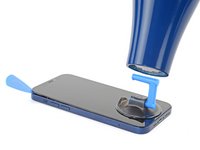
Wait one minute to give the adhesive a chance to release and present an opening gap.
-
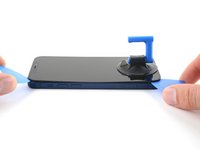
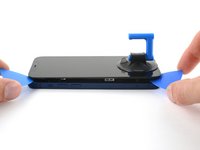
Insert an opening pick under the screen's plastic bezel when the Anti-Clamp creates a large enough gap.
-
Skip the next three steps.
-
-
-
Use a hair dryer or a heat gun to heat the bottom edge of the iPhone for 90 seconds or until the screen is slightly too hot to touch.
wenn man die Frontkamera nicht tauscht sondern nur anhebt und reinigt, funktioniert Face ID dann noch?
Wenn du beim Aus- und Einbau alles richtig machst, dürfte dabei nichts passieren.
-
-
-
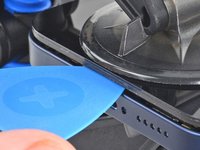
If you're using a single suction handle, apply it to the bottom edge of the phone, while avoiding the very edge of the glass.
-
-
-
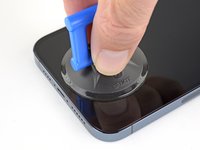
Pull up on the suction cup with firm, constant pressure to create a slight gap between the screen and the frame.
-
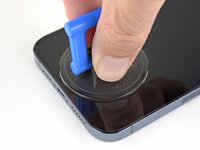
Insert an opening pick into the gap under the screen's plastic bezel.
Be very careful on this step to insert the pick as vertically as possible!!! I ended up separating the glass from the outer frame on this step and destroying the screen. Not a cheap mistake to make!
I just destroyed the screen as well. I try to read these comments for each step but missed this comment section due to skipping down a few steps for not having the opening tool. Really frustrated.
Anthony -
The glue as of the 12 series is incredibly strong. I'm definitely not new to the game and working only with a suction cup, I damaged the screen too, because I couldn't lift it far enough. Therefore, I too had to buy a new screen. 130€ poorer, I would opt for borrowing the display removal kit Apple sells at selfservicerepairs.com. It's around 50 or 60 Euros and worth it.
It must be emphasized that there's a sandwich here with the phone body, plastic bezel, and screen. The plastic bezel isn't visible as it's hidden by the phone's frame until you raise it with the suction cup -- and if the screen lifts off the bezel when you do this you won't see the bezel and you'll insert the pick between the screen and the bezel, destroying the screen. The instructions need to be much more detailed in this area as the consequences are not only expensive but result in long downtime for the phone (my current situation!). iFixit needs to do a much better job of anticipating what could go wrong and providing ways to avoid it!
-
-
-
Use a hair dryer to heat the right edge of the iPhone (the edge with the power button) for 90 seconds or until the screen is slightly too hot to touch.
-
-
-
-
Use a hair dryer to heat the top edge of the iPhone for 90 seconds or until the screen is slightly too hot to touch.
-
-
-
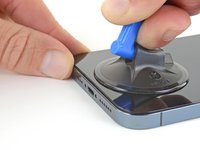
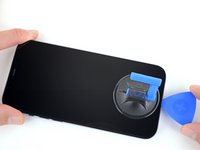
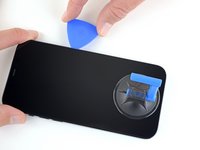
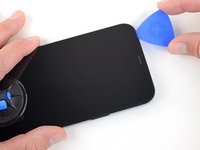
Slide the opening pick around the top right corner of the iPhone to separate the top adhesive.
-
Leave the pick in the top left corner before continuing.
-
-
-
Use a hair dryer to heat the left edge of the iPhone for 90 seconds or until the screen is slightly too hot to touch.
-
-
-
-
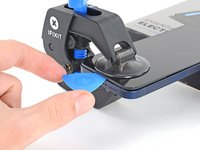
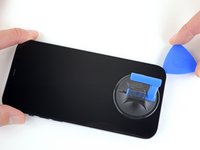
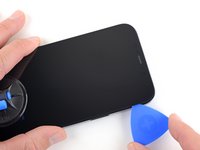
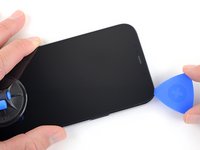
Insert a second opening pick in the bottom left corner of the iPhone.
-
Twist both picks simultaneously until the left edge clips release.
-
-
-
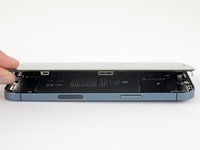
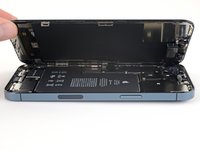
Rotate your iPhone so the right edge faces you.
-
Open the iPhone by swinging the display up from the right side, like the front cover of a book.
-
Lean the display against something to keep it propped up while you're working on the phone.
-
-
Outil utilisé dans cette étape :Magnetic Project Mat$19.95
-
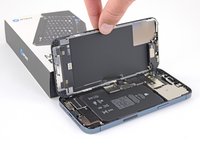
Remove four 1.1 mm-long Y000 screws securing the battery and display connector cover.
-
-
-
Remove the battery and display connector cover.
-
-
-
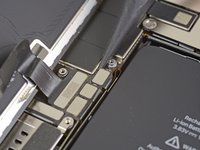
Use a spudger or a clean fingernail to pry the battery connector up from its socket on the logic board.
-
Bend the connector slightly away from the logic board to prevent it from accidentally making contact with the socket and providing power to the phone during your repair.
-
-
-
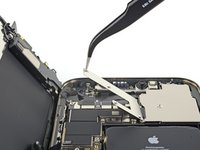
Use a spudger or a fingernail to disconnect the display cable connector.
-
-
-
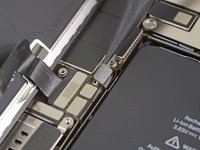
Use a Y000 driver to remove the four 1.1 mm-long screws securing the front sensor connector cover.
-
-
-
Swing the cover up from the left until the small clip on the right unhooks.
-
Remove the cover.
-
-
-
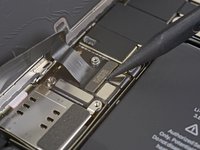
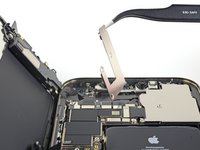
Use a spudger or a fingernail to disconnect the front sensor assembly cable connector.
when lifting up the front sensor assembly cable connector, you should use the flat end of the spudger. Using the pointed end as shown in the picture runs the risk of damaging components on the board and/or the cable connector itself.
-
-
-
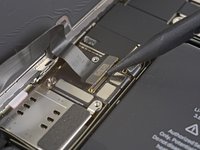
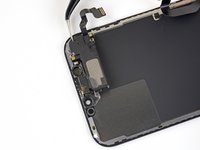
Remove the four screws securing the speaker/sensor assembly to the back of the display.
-
Two 1.3 mm Phillips screws
-
One 1.8 mm shouldered Y000 screw
-
One 1.1 mm Y000 screw
-
-
Outil utilisé dans cette étape :Tweezers$4.99
-
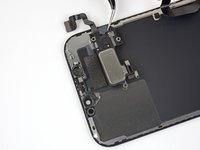
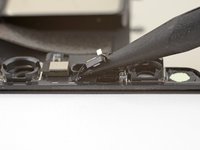
Use tweezers or the point of a spudger to gently pry up the top edge of the speaker.
-
Flip the speaker assembly over—down and away from the top edge of the display.
-
-
-
Prepare an iOpener and apply it to the top front of the display for 1-2 minutes, in order to soften the adhesive securing the sensors.
-
-
-
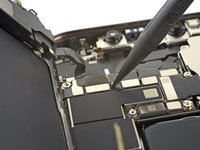
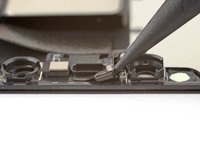
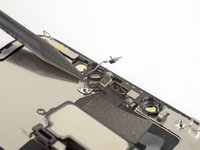
Use the point of a spudger to lift and separate the ambient light sensor from its notch in the front panel.
-
Continue sliding the spudger underneath the ambient light sensor and its cable to separate the adhesive securing the cable.
-
-
-
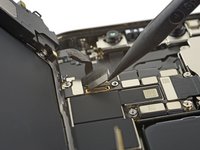
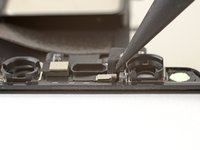
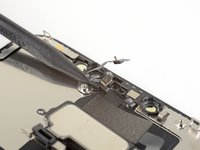
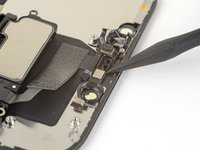
Use the point of a spudger to lift and separate the microphone from its notch in the front panel.
-
-
-
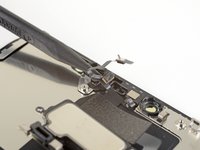
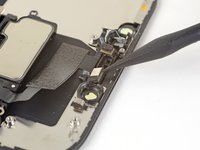
Use the point of a spudger to lift the proximity sensor and flood illuminator module out of its notch in the front panel.
-
-
-
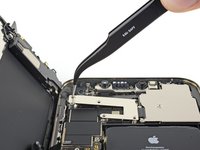
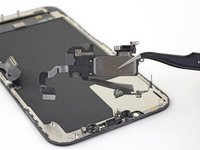
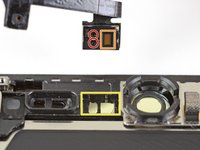
Remove the earpiece speaker and front sensor assembly.
-
Proximity sensor
-
Flood illuminator
-
The module must be positioned so that these components are not obstructed by any adhesive.
-


Compare your new replacement part to the original part—you may need to transfer remaining components or remove adhesive backings from the new part before installing.
To reassemble your device, follow the above steps in reverse order.
After your repair, depending on the replacement part, you may be able to calibrate it using Apple's Repair Assistant, available as of iOS 18. Update your device, navigate to Settings → General →About → Parts & Service History, tap Restart & Finish Repair, and follow the onscreen prompts.
Take your e-waste to an R2 or e-Stewards certified recycler.
Repair didn’t go as planned? Repair didn’t go as planned? Try some basic troubleshooting, or ask our iPhone 12 Pro Max Answers community for troubleshooting help.
Annulation : je n'ai pas terminé ce tutoriel.
59 autres ont terminé cette réparation.

7 commentaires
Thank you so much. how can I order fixit kit. Please I would like to replace my screen as soon as I could.
We don’t have a fix kit available for this yet, but at the top of this guide you’ll find lists of the necessary parts and tools. Good luck with the screen replacement!
that's an excellent explanation thank you!
Really nice explanation! Easy to follow for Newbies and Pro's!
replaced screen and also transferred the screen serial number to the new screen but still lost touch sensitivity and other functions. Is this a common problem?
Greetings, I have an iPhone 12 pro max that I need to change the screen because it is broken but my question is why do the replacements come with hooks in each corner if the original does not have them and it is very difficult for me to put in the new screen, what do I do?