Il est possible que cette traduction ne reflète pas les dernières mises à jour du tutoriel source. Aidez à mettre à jour la traduction ou bien consultez le tutoriel source.
Introduction
Utilisez ce tutoriel pour remplacer la nappe du connecteur Lightning et de la prise Jack.
Ce dont vous avez besoin
Vidéo d'introduction
-
-
Éteignez votre iPhone avant de commencer la réparation.
-
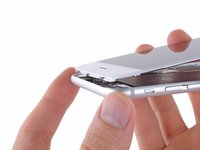
Retirez les deux vis Pentalobe de 3,6 mm situées près du connecteur Lightning.
-
-
-
Tirez la poignée bleue vers l'arrière pour débloquer les bras de l'Anti-Clamp.
-
Insérez le côté droit ou gauche de votre iPhone entre les bras.
-
Positionnez les ventouses près du bord inférieur de l'iPhone, juste au-dessus du bouton home : une sur le dessus, l'autre en dessous.
-
Appuyez sur les deux ventouses pour qu'elles adhèrent bien à l'endroit voulu.
-
-
-
Tirez la poignée bleue vers l'avant pour bloquer les bras.
-
Tournez la poignée dans le sens horaire, de 360 degrés ou jusqu'à ce que les ventouses commencent à s'étirer.
-
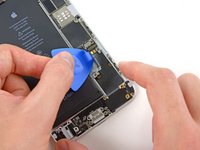
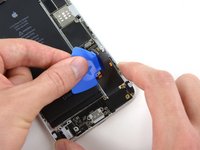
Insérez un médiator ou un outil sous l'écran dès que l'Anti-Clamp a créé un espace suffisant.
-
Sautez les trois étapes suivantes.
-
-
-
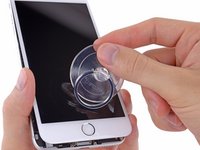
Si vous n'avez pas d'iSlack, utilisez une ventouse pour soulever l'écran :
-
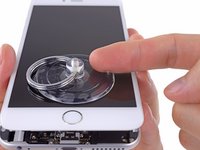
Posez une ventouse sur la vitre juste au dessus du bouton home et appuyez.
-
-
-
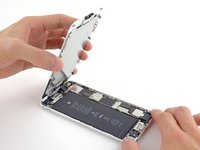
Soulevez la partie de l'écran avec le bouton home tout en utilisant la partie supérieure du téléphone pour faire charnière.
-
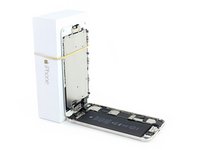
Ouvrez l'écran à un angle d'environ 90 ° et penchez-le contre quelque chose pour le garder calé pendant que vous travaillez sur le téléphone.
-
Ajoutez une bande adhésive pour maintenir l'écran bien en place pendant que vous travaillez. Cela évite une pression excessive sur les câbles de l'écran.
-
-
-
-
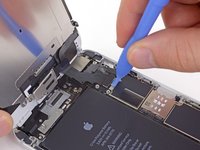
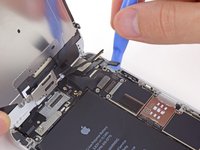
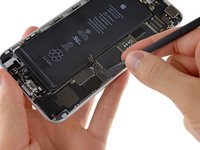
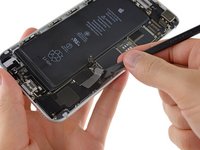
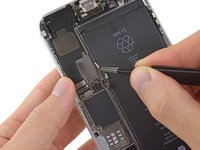
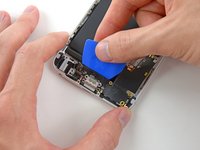
A l'aide de l'extrémité plate d'une spatule (spudger), faites levier sur le connecteur de la nappe du vibreur pour l'enlever de sa prise sur la carte mère.
-
-
-
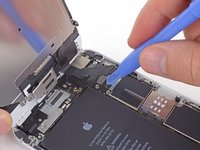
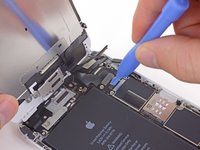
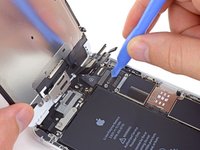
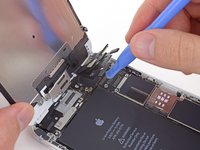
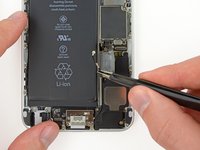
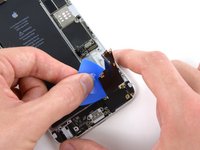
Saisissez l'interconnexion d'antenne avec des pincettes et commencez à la retirer soigneusement de son canal sur l'enceinte.
-
-
-
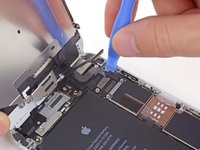
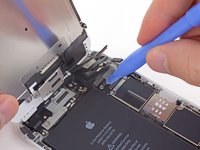
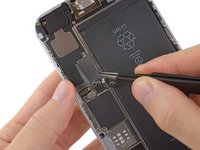
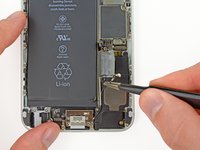
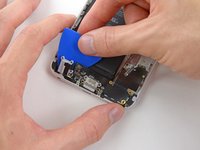
Retirez les deux vis cruciformes #00 de 3,3 mm fixant le support en métal à l'ensemble connecteur Lightning.
-


Pour remonter votre appareil, suivez ces instructions dans le sens inverse.
Pour remonter votre appareil, suivez ces instructions dans le sens inverse.
Annulation : je n'ai pas terminé ce tutoriel.
148 autres ont terminé cette réparation.
Merci à ces traducteurs :
66%


Ces traducteurs nous aident réparer le monde ! Vous voulez contribuer ?
Commencez à traduire ›

25 commentaires
I did this tonight, took about 45 min. I used my iFixit tool kit to all the work.
When putting it back together I had an issue with my screen going all "white lines", turns out it was just a loose connection on the digitizer cable, I lifted it and placed it again and all is good with the world.
I had to replace the assembly because I was getting feedback when making calls with headphones and no voice at all with headphones if the phone was plugged into power. Now I can do both.
Thanks so much iFixit for making this possible.
After fixing my headset jack successfully, people could not hear me clearly on the mic. I took it apart again today. The clip that holds the mic in place, next to the jack, had been put down too tight to the mic, which kept it from moving enough to pick sound up clearly -- everything was muddied. I only had to pull the case open a little, unscrew the mic assembly to loosen it, wiggle it back a bit, move the mic a little to align it better with the hole, and then tighten it back down. It works beautifully now and everyone says I sound better than ever. A really easy fix, but it could have been avoided if there were instructions on putting everything back together or at least tips for little things like this.
My iphone stuck into headphone,what can i do to fix it?please help me as soon as possible
Hi @Tannaz pourian
If you are stuck on headphone mode first thing you can do is a quick fix if it works for you. You first turn off your iphone and with a gentle hand you can pull out any dirt or particals inside your headphone jack with a pin then clean it with a cotton bud with a little acitone or alcohol ( Don’t use too much of alcohol only little would be fine otherwise it could damage you display if it gets into your phone). Then after completing this process let it dry for a while and turn on your phone. I hope it works for you:) orthewise you have to replace your whole cc flex pannel. Good luck
I recently replaced the headphone jack but when I tried it out after successfully replacing it, the headphones still gave a crackling sound. Less than before but still very noticeable. Anyone have any suggestions to fix this issue?