Introduction
Suivez ce tutoriel pour remplacer la batterie lithium interne des manettes PlayStation 3.
Ce dont vous avez besoin
-
-
Dévissez les cinq vis cruciformes (Phillips) de 7,2 mm qui fixent la coque arrière à la manette.
-
-
-
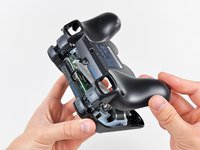
Appuyez sur la coque arrière entre les deux sticks analogiques et soulevez légèrement le bord inférieur pour le séparer du reste de la manette.
it’s not very clear but for this step you need to push where the yellow dot is shown on the picture. it’s rather tough. you kind of have to move the whole back plate a bit for it to work.
I’m stuck at this step because I can’t for the life of me undo the clip
Yeah I’m lost here too. I’m pushing where the dot is but nothing is happening. What am I trying to accomplish by pushing there? Is there a clasp on the inside I’m trying to undo or something? I really don’t want to break the controller by using too much force or opening it the wrong way.
Could it be that the sixaxis I have is constructed differently? Or is this just a difficult step?
Adding: I ended up getting the shell off but ended up breaking off a small piece which I'm guessing was securing the front and back shells together. The trigger buttons and pieces remained intact on one of my two controllers which is what I was worried about, though I did have to fit the small trigger pieces back in.
The one controller seemed to fit back together just fine without the small piece that broke off, and buttons seemed to feel and work fine too.Joe -
-
-
-
-
Pousser légèrement la coque arrière vers le bord supérieur de la manette pour dégager le bord avant des gâchettes #2.
-
Retirez la coque arrière du reste de la manette tout en faisant attention à ne pas faire sortir les cachettes #2.
the "trigger button guide" link links back to this page :o
I accidentally popped a trigger off, and both L1 and R1, because I skimmed and didn't read this step. Fortunately it's not hard. The tricky part with the triggers is that there's a little spring on them. You have to press the side of the spring that's pointing away from the trigger against the sloped surface of the controller (look at the other trigger for reference, if you only popped one off). Then you just slide the trigger on until the "handlebar" bits near the center click into place.
The reset button – a small mostly-rectangular rubberized piece – fell out as I removed the rear cover. It covers the hole near the middle screw and has a post that presses SW1 on the motherboard.
-
-
-
Soulevez la batterie de la carte mère afin de dégager suffisamment d'espace pour accéder au connecteur de la batterie.
-
-
Outil utilisé dans cette étape :Tweezers$4.99
-
Déconnectez la batterie de la prise sur la carte-mère avec précaution.
To safely remove the connector, you can slide a thin screwdriver inside two slots that can be found on top of the connctor housing (the beige colored one), which allow you to push on the connector. Do this slowly, prying first through one slot, then through the other, until the connector is out. This will allow you to remove the connector without pulling by accident on the wires.
Thanks Adriana. Good advice. My local battery replacement guy will not touch PS3 controllers.
Hi Adriana,
I have to say, that tip really saved me. I was pulling on the wires (this is my first time doing this) and wasgoing nowhere.
Thank you!
I highly, HIGHLY recommend that if anyone bought the protect toolkit, that they use the SIM bit as that is extremely helpful for this step!
Take note: The PS3 remote controller in this guide has some white plastic spacers shaped like ( and ) on the board which keep the battery from touching the chip. The PS3 remote controller I disassembled has no spacers on the board but rather the board has 6 holes - 4 small square corner alignment holes and two rectangular retaining holes. The battery was an LIP1472 but the battery pack casing had 4 alignment pins and 2 retaining tabs to fit into the board and hold the battery away from the chip. Why does it matter? It may or may not matter, however the fact that all designs include separation indicates that it might matter. Possible reasons are that the battery might touch the chip and cause electrostatic damage, the battery might touch the chip and not allow the chip to dissipate heat properly, or the battery might simply rattle a bit. I can not find any replacement batteries with pins and tabs. It may be necessary to create some standoffs from plastic similar to those shown above and attach to board.
My controllers new battery (ordered from ifixit) doesn’t have connectors on it like my dead battery. Help?
Its literally completely flat (the battery)
What's the battery's voltage?
The battery is 3.7 voltage 610 mAH from Sony's LIP1359 battery. Max charging is 4.2 V and 0.4A, but I found a better one from Digikey. It is still required to modify the battery's connector.
My new battery for the PS3 controller.
Yes, yes, yes brilliant suggestion! I broke the wires to the battery trying to wiggle the connector off using needle-nose pliers, but pushing through those slots on the top saved the day even after that little fiasco. Yay.
-


Pour remonter votre appareil, suivez ces instructions en sens inverse.
Pour remonter votre appareil, suivez ces instructions en sens inverse.
Annulation : je n'ai pas terminé ce tutoriel.
157 autres ont terminé cette réparation.
Merci à ces traducteurs :
100%

Ces traducteurs nous aident réparer le monde ! Vous voulez contribuer ?
Commencez à traduire ›

20 commentaires
Try Amazon Cody
whats is amazon cody?
Has anyone tried charging one of these batteries while it's still disconnected from the controller? I wanted to test one of my old ones to see if it still holds a charge or if the circuit board is damaged.
I was considering hooking it to a 5v line on my computer's power supply in series with a resistor or maybe using an old wall adapter.
Can you transplant the DS3 Battery into a DS4.
probably not Jaccob M, as a DS4 controller has more systems such as the lights and the touch pad than the DS3
Cut the wires off that connects my batter to the white clip how do I fix reconnect the wires to the clip?
Where can one purchase a replacement battery?
I have replaced the battery but when plugged in there is no lights coming on :( any idea as to why the controller isn’t charging even with a new battery? I have tried multiple different cables, different USB charging ports and no luck. Maybe I got a bad battery?
Any suggestions?
I recommend using Phillips #1 for all Dualshock 3 repairs. #0 and especially #00 have a lot of play with the screws. I nearly badly damaged one of the screws before I switched to #1. It seems to fit almost perfectly. Quite snug. There’s still a tiny wiggle, but only slightly. Hardly at all.
I suggest updating the guides with this information. If anybody has had the same experience as I have and has the ability to edit these guides, I think this modification would help a lot. Also, I’d like to here from anyone else who had the same experience and could second this suggestion.
Sorry for the repost. Just want to put this somewhere it’ll be seen.
Good advice !
token -
Have not yet completed the task since I just discovered one of my Dual Shock PS3 Game Controllers no longer charging. However, I was extremely thrilled to find this website as the instructions look super awesome & in my opinion, easy to understand. Therefore, I have saved it to my 'favorites' as I will be definitely be coming back after I purchase the 'battery'. Thanks in advance for your valuable assistance in providing this type of information!
Bonjour et pour avoir les commentaires en français on fait comment ??
Merci
My Controller contains a plastic cage to hold the battery in place. Also, the circuit board looks a little different from the images above. Mine has metal pins holding the cage and piercing the battery when no cage is used. Anyone else? Where did you find a battery that fits? Normal ones are too large for the cage…
I have 2 controllers I'd like to fix, and both have at least one stripped screw in them. Any tips for removing them?
Joe - Réponse
For me the PH #0 had too much play. I ended up using the PH #1 which was a perfect fit.
Yokocapolo - Réponse