Il est possible que cette traduction ne reflète pas les dernières mises à jour du tutoriel source. Aidez à mettre à jour la traduction ou bien consultez le tutoriel source.
Introduction
Ce tutoriel vous aidera à remplacer la nappe de votre disque dur ou à la resserrer si elle est lâche.
Ce dont vous avez besoin
-
-
Retirez les 10 vis suivantes par lesquelles est fixé le boîtier inférieur du MacBook Pro 13" Unibody :
-
Sept vis Phillips 3 mm.
-
Trois vis Phillips 13,5 mm.
-
-
-
Soulevez légèrement le boîtier inférieur et poussez-le vers l'arrière de l'ordinateur afin de désengager les pattes de fixation.
In the introduction you should link fixers to this excellent doc: https://www.ifixit.com/Misc/HD_Software_...
It is really critical, super easy, and free(!) to clone your existing drive onto the new one you will install. I ran into one error, but SuperDuper! support replied immediately on how to fix it...Thanks ifixit and SuperDuper! (I ponied up the $28 for the software anyway, I was so impressed!)
Long story short: I drank the AppleKoolAid back in 1984 and have always left the guts of my machines up to Apple - until recently when I needed to swap the SATAs from my original MacDaddy (2009 13" MBPro that I killed in 2018 - coffee + blackout = OOOOPS) into a pristine 2009 MBPro from a Goodwill in North Carolina through eBay. I need the files from iCal and MacMail that can't be opened in my newer machines.
Well . . . I ain't never done nuttin' like that, before!
Enter Luke Miani on YouTube. He raves about you guys! So, I watched everything I could, read your site, bought the right tools and at the ripe old age of 72, I sat down, this morning and did the work. Now my original MacDaddy lives in MacDaddy2.0.
Am I allowed to cry?
Seriously, I can't thank you enough for your bitchen site and killer tools. I wish I'd'a been turned on to this shizzle 30+ years ago.
IFIXIT - IDIGIT!
HAHAHAHAHAHAHAHAHAHA.
That was a brilliant read.
Yes, I came across ifixit a few years ago. Totally helped me out on several occasions.
Glad your Mac repair journey worked out.
:)
Cary B -
-
-
-
À l'aide de l'extrémité plate d'un spudger, faites levier sur le connecteur de la batterie pour le débrancher de la prise sur la carte mère.
How do you get that battery connector back on? Do you just press it in back in place after you're done?
yes. I usually plug it in before I screw it down so I can lift the battery a bit and have enough slack to be able to go straight down on the connector, otherwise it comes in on a bit of an angle, which can't be good (though not necessarily bad).
This step almost finished me, and I did extensive damage to the battery plug. Fortunately, I later replaced the battery, and the replacement came with a new plug! :) Newbies need to know - 1. The battery plug is like a thin lip on a thicker lip, so you need to pry BETWEEN 2 thin lips to get it off, else you are trying to yank out the socket. 2. Mine was initially VERY tight, and trying to get it out broke the plastic on all sides of plug, even though I was as careful as possible. Luckily, this didn't hurt functionality and I later replaced the battery. AFTER disconnecting once, it was never so tight again,
-
-
-
Retirez les deux vis Phillips par lesquelles le support du disque dur est fixé au boîtier supérieur.
-
-
-
-
Retirez le câble du disque dur en débranchant son connecteur du disque dur.
I guess it's probably my fault that I broke the SATA cable during this step (unless the cable was somehow already weakened), but for anyone reading this, be extra careful. My connector was fitted really tightly, and when it finally came out it ripped the cable, which is pretty expensive in its own right (although you can get a cheaper deal on eBay).
-
-
-
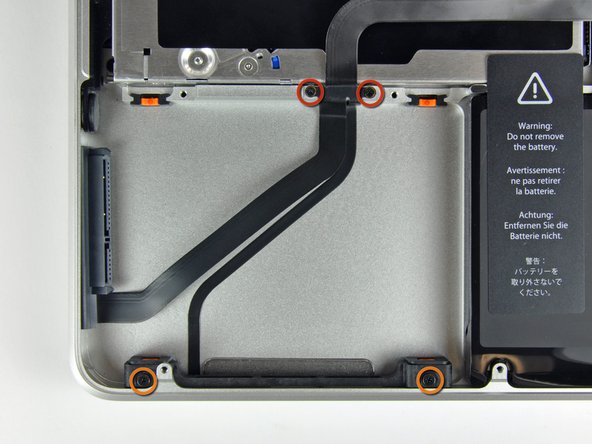
Dévissez les quatre vis suivantes, qui fixent la nappe du disque dur et du capteur IR au boîtier supérieur :
-
Deux vis cruciformes de 1,5 mm.
-
Deux vis cruciformes de 9,5 mm.
-
-
-
Soulevez l'ensemble nappe du disque dur/capteur IR hors du boîtier supérieur.
I had the same challenge with the ribbon cable clamp. There is a tiny orange ribbon, visible in the lower left corner of the photo for step 10, above, that needs to be connected to the new part using a tiny clamp, also visible right there in step 10. To open it, you flip up part of the clamp that is opposite the ribbon. That will release the ribbon, and enable you to slide the ribbon into the new clamp, which then you can adhere to the bracket. Hope that's helpful for future fixers.
Thank you, Bryony! Very helpful clarification on how to open the clamp. All set now.
Lucas -
To connect the orange ribbon for the IR sensor you have to have to lift the little handle on the back part 90 dregrees up of the black plastic terminal piece. So now its open.
After you did this its totally easy to insert the orange ribbon flat cable. After that close the little handle again - thats all!
-


Pour remonter votre ordinateur, suivez ces instructions en sens inverse.
Pour remonter votre ordinateur, suivez ces instructions en sens inverse.
Annulation : je n'ai pas terminé ce tutoriel.
292 autres ont terminé cette réparation.
Merci à ces traducteurs :
87%


Ces traducteurs nous aident réparer le monde ! Vous voulez contribuer ?
Commencez à traduire ›

7 commentaires
Used a Phillips #00 and a creditcard. It's an easy job, takes about 10 minutes. :)
In step #8 the two small screws were very tight in my computer. The Phillips #00 was too large and damaging the screws. I changed to a Phillips #000 applied substantial pressure and voila, the screws came off.
Reassembly: placing the IR sensor cable (the one you"peeled off" in step #9) is a bit tricky. Start from the side opposite the IR sensor (the side with the two small screws of step 8) and press first along the short vertical side and then across towards the IR section. There should be a little left for a vertical section at the IR sensor end.
if i change the HDD cable and get the same results what could be the the real problem , because the original problem as we all know was the we were getting the question mark on the white screen .
I’m also experiencing this issue after replacing the cable. Were you able to resolve it?
ANNA -
Did a combination of the hard drive replacement cable, a hard drive swap to SSD, and battery swap. Super easy. Great instructions! Thank ya!
Compare the short screws carefully before reinstalling them. The shouldered screws go in the holes on the front edge.
David Kilbridge - Réponse
Before I started removing any screws I took a piece of paper and drew the bottom of the laptop and put a piece of double-sided tape in the spot where each screw goes. That way when I took out the screws, I could put them on the tape so I knew exactly which screw went in which spot. I did the same thing for dismantling the inside on another sheet of paper, then a third sheet for the screen after getting the front glass off.
mastover - Réponse
I use a similar technique: I print out the iFixit manual for the job, and Scotch-tape down the screws/brackets/cables I remove at each step next to the component descriptions. That way, when I'm reassembling, the bits are taped right next to the photo of where they came from.
adlerpe -
That's exactly what I do for all my repairs! It's the best way to keep track of all of the parts ' original location and to make sure that you don't miss any parts during reassembly.
joyitsjennie -
Great idea and one I use often
Thomas Overstreet -
Excellent idea! Thanks for sharing it here.
Laura Sharkey -
I used a 00 that fit but the screws were very tight so I used a tiny paintbrush with some wd40 on it and put it around the edges of the screws. Worked like a charm
valentinedhdh - Réponse
I use a magnetic mat and place the screws in order on that :)
Cary B - Réponse