Cette version peut contenir des modifications incorrectes. Passez au dernier aperçu vérifié.
Ce dont vous avez besoin
-
-
Retirez les dix vis suivantes par lesquelles le boîtier inférieur est fixé au boîtier supérieur :
-
Sept vis Phillips 3 mm.
-
Trois vis Phillips 13,5 mm.
-
-
-
Retirez les deux vis Pentalobe P5 disposées le long du côté supérieur de la batterie.
-
-
-
Avec une spatule (spudger), faites levier sur le connecteur du ventilateur pour le déconnecter de la carte mère.
-
-
-
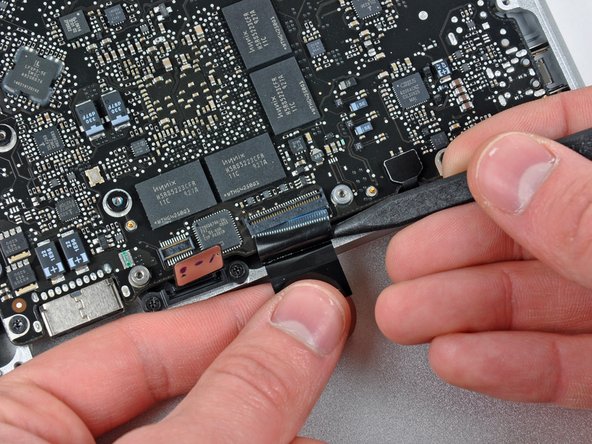
Maintenez le bout de la fixation de la nappe vers le bas avec un de vos doigts. En même temps, avec la pointe d'une spatule, soulevez légèrement l'autre bout et pivotez-le en l'éloignant du connecteur de la nappe de la caméra.
-
Déconnectez la nappe de la caméra en tirant l'embout mâle tout droit hors de sa prise.
-
-
-
Cette étape n’est pas traduite. Aidez à la traduire
-
Remove the two Phillips screws securing the hard drive bracket to the upper case.
-
Remove the hard drive bracket from the upper case.
-
-
Cette étape n’est pas traduite. Aidez à la traduire
-
Using its attached tab, lift the free end of the hard drive and pull it away from the edge of the upper case.
-
-
Cette étape n’est pas traduite. Aidez à la traduire
-
Pull the hard drive cable connector away from the body of the hard drive.
-
Remove the hard drive and set it aside.
-
-
Cette étape n’est pas traduite. Aidez à la traduire
-
Carefully peel the hard drive cable off the adhesive securing it to the right speaker housing.
-
-
Cette étape n’est pas traduite. Aidez à la traduire
-
Remove the following four screws securing the hard drive and IR sensor cable to the upper case:
-
Two 1.5 mm Phillips screws.
-
Two 4 mm Phillips screws.
-
-
Cette étape n’est pas traduite. Aidez à la traduire
-
Slide the hard drive and IR sensor bracket away from the edge of the upper case.
-
-
Cette étape n’est pas traduite. Aidez à la traduire
-
Carefully peel the IR sensor/sleep light ribbon cable off the adhesive securing it to the upper case.
-
-
Cette étape n’est pas traduite. Aidez à la traduire
-
Peel the camera cable off the adhesive securing it to the body of the optical drive.
-
-
Cette étape n’est pas traduite. Aidez à la traduire
-
Disconnect the Bluetooth cable by pulling the male end straight away from its socket.
-
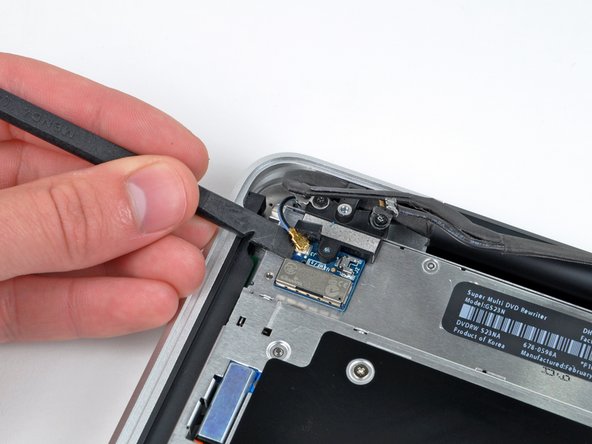
Use the flat end of a spudger to carefully pry the AirPort antenna off its socket on the AirPort card.
-
-
Cette étape n’est pas traduite. Aidez à la traduire
-
Remove the two 8 mm Phillips screws securing the Bluetooth/camera cable retainer to the upper case.
-
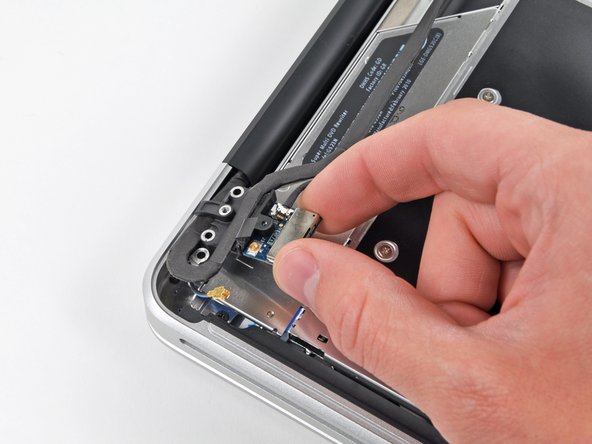
Lift the AirPort board/cable retainer assembly out of the upper case.
-
-
Cette étape n’est pas traduite. Aidez à la traduire
-
Remove the single 3.5 mm Phillips screw securing the inner side of the optical drive to the upper case.
-
-
Cette étape n’est pas traduite. Aidez à la traduire
-
Remove the two 3.5 mm Phillips screws securing the outer side of the optical drive to the upper case.
-
-
Cette étape n’est pas traduite. Aidez à la traduire
-
Lift the optical drive from its left edge and pull it out of the upper case.
-
-
Cette étape n’est pas traduite. Aidez à la traduire
-
Remove the following four screws securing the subwoofer and right speaker assembly to the upper case:
-
Two 3.2 mm Phillips screws.
-
One 2.6 mm Phillips screw.
-
One 5 mm Phillips screw.
-
-
Cette étape n’est pas traduite. Aidez à la traduire
-
Lift the subwoofer and right speaker assembly out of the upper case.
-
-
Cette étape n’est pas traduite. Aidez à la traduire
-
Remove the two 8 mm Phillips screws securing the camera cable retainer to the upper case.
-
Lift the camera cable retainer out of the upper case.
-
-
Cette étape n’est pas traduite. Aidez à la traduire
-
Remove the outer two T6 Torx screws securing both display hinges to the upper case (four screws total).
-
-
Cette étape n’est pas traduite. Aidez à la traduire
-
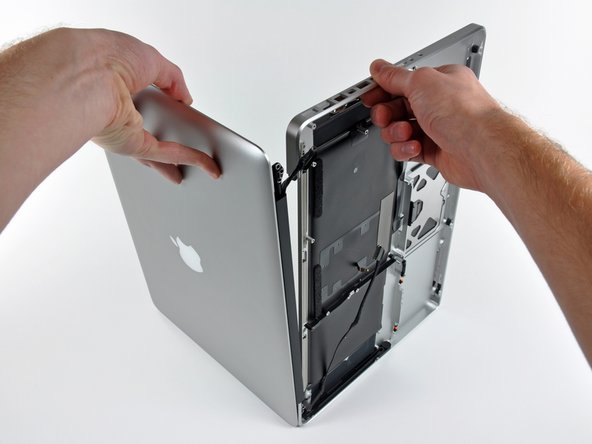
Open your MacBook Pro so the display is perpendicular to the upper case.
-
Place your opened MacBook Pro on a table as pictured.
-
While holding the display and upper case together with your left hand, remove the remaining T6 Torx screw from the lower display bracket.
-
-
Cette étape n’est pas traduite. Aidez à la traduire
-
Remove the last remaining 6 mm Torx screw securing the display to the upper case.
-
-
Cette étape n’est pas traduite. Aidez à la traduire
-
Grab the upper case with your right hand and rotate it slightly toward the top of the display so the upper display bracket clears the edge of the upper case.
-
Rotate the display slightly away from the upper case.
-
Lift the display away from the upper case, minding any brackets or cables that may get caught.
-


Annulation : je n'ai pas terminé ce tutoriel.
36 autres ont terminé cette réparation.

Un commentaire
Thanks for a fantastic guide! I needed to replace my track pad and this served me well. Also was the perfect opportunity to clean out all the dust. A couple minor mods and a trackpad guide could be published for all those like me.
Cheers!