Aller au contenu principal
Pour réparer ensemble - Je crée un compte

Alienware 17 R3 Battery Replacement

Ce dont vous avez besoin

  1. Alienware 17 R3 Battery Replacement, Battery: étape 1, image 1 de 1
    Outil utilisé dans cette étape :
    Anti-Static Wrist Strap
    $7.95
    • Turn the computer off.

    • Disconnect the charging cable from the computer.

    • Failure to unplug the charging cable could result in damaging the computer or seriously injuring yourself.

    • Wear the anti-static wrist strap to prevent any electrical shock to the components. Shocks may damage the components.

    Demander à FixBot

    Ajouter un commentaire

  2. Alienware 17 R3 Battery Replacement: étape 2, image 1 de 1
    • Unscrew and remove the two 4mm Phillips #1 screws from the cover.

    • Remember to put the screws in a safe place so you can find them all during re-assembly.

    Demander à FixBot

    Ajouter un commentaire

  3. Alienware 17 R3 Battery Replacement: étape 3, image 1 de 1
    • Pull up and slide the cover off.

    Demander à FixBot

    Ajouter un commentaire

  4. Alienware 17 R3 Battery Replacement: étape 4, image 1 de 2 Alienware 17 R3 Battery Replacement: étape 4, image 2 de 2
    • Unplug the black wire with the yellow tag to disconnect the battery.

    Demander à FixBot

    Ajouter un commentaire

  5. Alienware 17 R3 Battery Replacement: étape 5, image 1 de 2 Alienware 17 R3 Battery Replacement: étape 5, image 2 de 2
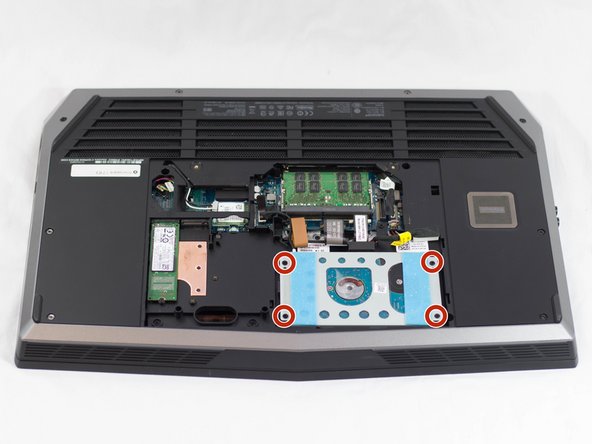
    • Unscrew and remove the four 3mm Phillips #1 screws holding the hard drive in place.

    Demander à FixBot

    Ajouter un commentaire

  6. Alienware 17 R3 Battery Replacement: étape 6, image 1 de 2 Alienware 17 R3 Battery Replacement: étape 6, image 2 de 2
    • Unscrew and remove the four 2mm Phillips #1 screws holding the casing together.

    Demander à FixBot

    Ajouter un commentaire

  7. Alienware 17 R3 Battery Replacement: étape 7, image 1 de 2 Alienware 17 R3 Battery Replacement: étape 7, image 2 de 2
    • Remove the plug from the hard drive.

    • Lift the hard drive out and set aside.

    Demander à FixBot

    Ajouter un commentaire

  8. Alienware 17 R3 Battery Replacement: étape 8, image 1 de 1
    • Unscrew the one Phillips #1 screw holding down the bottom of the M.2 chip.

    • Pull the M.2 chip straight out of its socket.

    Demander à FixBot

    Ajouter un commentaire

  9. Alienware 17 R3 Battery Replacement: étape 9, image 1 de 1
    • Unscrew and remove the eight 3mm Phillips #1 screws (located in areas labeled "P").

    Demander à FixBot

    Ajouter un commentaire

  10. Alienware 17 R3 Battery Replacement: étape 10, image 1 de 1
    • Carefully disconnect the four flex cables.

    • To unlock a ZIF connector, use the tip of a spudger or your fingernail to flip up the small, hinged locking flap. Carefully slide the unlocked cable out of the socket.

    Demander à FixBot

    Ajouter un commentaire

  11. Alienware 17 R3 Battery Replacement: étape 11, image 1 de 1
    • Remove the six 4mm Phillips #1 screws on the side and the two 10mm Phillips #1 screws on the top.

    Demander à FixBot

    Ajouter un commentaire

  12. Alienware 17 R3 Battery Replacement: étape 12, image 1 de 1
    • Flip over the laptop and open it.

    • Insert the spudger along the edges of the laptop and gently pry upward to lift the keyboard panel.

    Demander à FixBot

    Ajouter un commentaire

  13. Alienware 17 R3 Battery Replacement: étape 13, image 1 de 1
    • Remove the six 4mm Phillips #1 screws holding the battery in place.

    Demander à FixBot

    Ajouter un commentaire

  14. Alienware 17 R3 Battery Replacement: étape 14, image 1 de 3 Alienware 17 R3 Battery Replacement: étape 14, image 2 de 3 Alienware 17 R3 Battery Replacement: étape 14, image 3 de 3
    • Unplug the two sets of wires from the motherboard.

    Demander à FixBot

    Ajouter un commentaire

  15. Alienware 17 R3 Battery Replacement: étape 15, image 1 de 1
    • Lift out the battery pack.

    Demander à FixBot

    Ajouter un commentaire

Conclusion

To reassemble your device, follow these instructions in reverse order.

Take your e-waste to an R2 or e-Stewards certified recycler.

Repair didn’t go as planned? Try some basic troubleshooting, or ask our Answers community for help.

Annulation : je n'ai pas terminé ce tutoriel.

21 autres ont terminé cette réparation.

Jonathon Tschurwald

Membre depuis le 02/01/17

878 Réputation

4 tutoriels rédigés

Équipe

UW Tacoma, Team 1-1, Rose Winter 2017 Membre de l'équipe UW Tacoma, Team 1-1, Rose Winter 2017

UWT-ROSE-W17S1G1

3 membres

6 tutoriels rédigés

6 commentaires de tutoriel

Hi ! Nice DIY . Is it possible to disassemble the battery pack and change the cell inside ?

francois tremblay - Réponse Partager

Hi, please edit step 10. There a 4th ribbon has to be pulled.

Nevertheless a very good manual.

Steffen Bönisch - Réponse Partager

Hi Steffen,

Thanks for the tip! I edited step 10 to correct the mistake.

Arthur Shi - Réponse Partager

Very helpful and concise. Worked very well for me. Many Thanks

Ragufta Khan - Réponse Partager

After putting everything back together I found my didn't HDD work. It was simply that the other end of the HDD cable had become disconnected.

I'd recommend disconnecting this before removing the HDD housing so it doesn't snag (it's actually shown as disconnected in step 10).

Dom Parrott - Réponse Partager

Ajouter un commentaire

Nombre de vues :

Dernières 24 heures : 9

7 derniers jours : 38

30 derniers jours : 149

Total : 37,269