Introduction
Ce tutoriel de réparation a été rédigé par l'équipe iFixit et n’a pas été approuvé par Google. Apprenez-en plus sur nos tutoriels de réparation ici.
Utilisez ce tutoriel pour changer l’écran externe de votre Google Pixel 10 Pro Fold.
Ce dont vous avez besoin
-
-
-
Débranchez tous les câbles de votre téléphone et éteignez-le complètement.
 Demander à FixBot
-
-
-
-
-
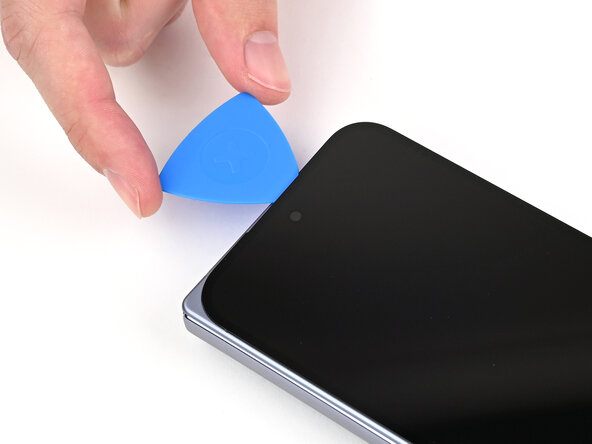
Appliquez une ventouse sur l'écran, aussi près que possible du centre du bord inférieur.
-
Tirez sur la ventouse avec une force ferme et constante pour créer un interstice entre l'écran et le châssis.
-
Insérez un médiator dans l'interstice.
-
-
-
Faites glisser le médiator autour du coin inférieur droit et le long du bord droit de l'écran pour séparer l'adhésif.
-
-
-
Faites glisser le médiator autour du coin supérieur droit et le long du bord supérieur de l'écran.
-
-
-
Faites glisser votre médiator le long du bord gauche et autour du coin inférieur gauche pour séparer l'adhésif restant.
-
-
-
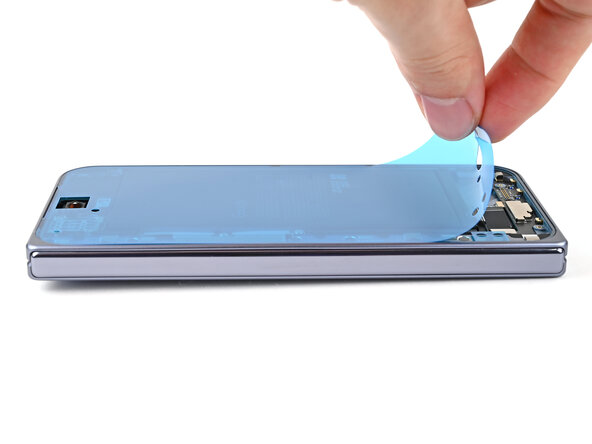
Soulevez le bord gauche de l'écran et faites-le basculer sur le bord droit du téléphone, comme si vous ouvriez un livre.
-
Calez l'écran avec votre ventouse ou un objet propre et rigide.
-
-
Outil utilisé dans cette étape :FixMat$36.95
-
Utilisez un tournevis Torx Plus 3IP pour retirer les trois vis qui fixent la bride de la nappe de l'écran :
-
Une vis de 1,8 mm de longueur
-
Deux vis de 2,5 mm de longueur
-
-
-
À l'aide de la pointe d'une spatule (spudger), faites levier pour soulever le support d'écran et détacher son clip du bord inférieur du châssis.
-
Retirez le support d'écran.
-
-
-
Avec la pointe d'une spatule, faites levier pour déconnecter le connecteur à emboîter de la nappe d'écran.
-
-
-
-
-
-
Félicitations, vous avez terminé le démontage ! Les prochaines étapes vous montreront comment remonter votre appareil.
-
-
-
-
-
Utilisez une spatule (spudger), ou vos doigts, pour retirer l'ancien adhésif de l'écran externe sur le châssis.
-
Utilisez de l'alcool isopropylique (>90 %) et un filtre à café ou un chiffon en microfibre pour retirer tout résidu d'adhésif.
-
Si votre nouvel écran externe possède un film de protection couvrant la découpe de la caméra frontale, retirez-le maintenant.
-
-
-
Avant de retirer les protections, vérifiez si l'adhésif de l'écran externe correspond bien au châssis.
-
-
-
Décollez la moitié supérieure de la nouvelle bande adhésive de son support transparent et gardez le support plié avant de continuer.
-
-
-
Alignez la moitié supérieure de l'adhésif sur le châssis, en utilisant les coins comme points de repère.
-
Placez l'adhésif sur le châssis.
-
-
-
Avec l'extrémité plate d'une spatule (spudger) ou vos doigts, appuyez sur le bord supérieur de l'adhésif pour le fixer au châssis.
-
-
-
Tout en décollant le reste du film protecteur transparent, posez lentement l'adhésif sur le pourtour du téléphone.
-
-
-
Avec l'extrémité plate d'une spatule (spudger) ou vos doigts, appuyez sur le reste de l'adhésif pour le fixer au châssis.
-
-
-
Avec la pointe d'une spatule (spudger), faites levier sur la languette segmentée située sur le bord inférieur de la grande protection bleue.
-
-
-
Soulevez la languette et décollez la grande protection bleue pour exposer la protection secondaire.
-
-
-
-
-
Soutenez l'écran avec votre main ou calez-le sur un support stable.
-
Reconnectez la nappe de l'écran externe connecteur à emboîter.
-
-
-
Placez le support de l'écran à son emplacement sur le châssis.
-
-
-
Avec la pointe d'une spatule (spudger), appuyez sur le support de l'écran et faites glisser son clip sous le bord inférieur du châssis.
-
-
-
À l'aide d'un tournevis Torx Plus 3IP, installez les trois vis qui maintiennent le support de la nappe de l'écran :
-
Une vis de 1,8 mm de long
-
Deux vis de 2,5 mm de long
-
Si votre nouvel écran extérieur est livré avec une bande adhésive pour écran préinstallée, retirez la protection pour exposer l'adhésif et passez directement ici.
-
-
-
Utilisez une pincette pour saisir la languette d'extraction de la protection secondaire dans le coin inférieur gauche du téléphone.
-
-
-
Décollez la protection du bord gauche et du bord supérieur du téléphone.
-
-
-
Tout en tenant l'écran au-dessus du châssis, décollez la protection du bord droit et du bord inférieur du châssis pour exposer l'adhésif.
-
-
-
Alignez l'écran extérieur sur le châssis et appuyez pour le mettre en place.
-
-
-
Appuyez le long du périmètre de l'écran extérieur pour le faire adhérer au châssis.
-
Laissez le téléphone reposer quelques heures pour que l'adhésif prenne.
-
-


Félicitations, vous avez terminé votre réparation !
Apportez vos e-déchets à un recycleur certifié R2 ou e-Stewards.
Votre réparation Google Pixel 10 Pro Fold ne s’est pas déroulée comme prévu ? Consultez nos conseils basiques de diagnostic ou notre Forum pour obtenir de l’aide.
Merci à ces traducteurs :
100%

Translation Bot nous aide à réparer le monde ! Vous voulez contribuer ?
Commencez à traduire ›
