Introduction
Votre batterie iPod Nano ne tient plus longtemps ? Remplacez-la (nécessite des soudures).
Ce dont vous avez besoin
-
-
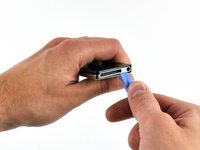
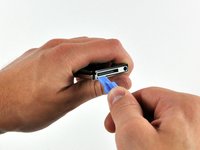
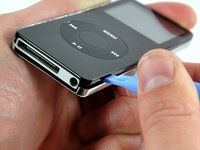
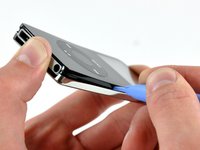
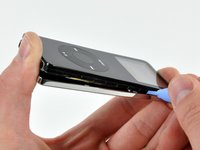
Insérez le grand outil d'ouverture pour iPod dans la jointure entre le boîtier avant et le panneau arrière de l'iPod, sous le connecteur de dock. Passez l'outil d'avant en arrière pour créer une ouverture. Le bord de l'outil doit être orienté vers le panneau arrière pour éviter de rayer accidentellement le boîtier avant en aluminium.
-
-
-
Retirez les 3 vis suivantes :
-
Deux vis cruciformes (Phillips) de 3 mm près du connecteur dock.
-
Une vis cruciforme (Phillips) de 4 mm le long du bord de la carte mère.
Note that the 4mm screw has slightly wider pitch; you'll need this when putting the unit back together.
-
-
-
-
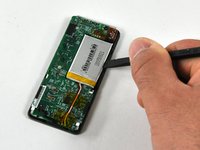
Insérez l’extrémité plate d’une spatule (spudger) entre la batterie et le côté prise jack du boîtier avant, pour retirer la batterie de l’adhésif qui la fixe au boîtier avant.
-
Retirez la batterie de l'iPod et posez-la à côté de l'iPod. La batterie est toujours soudée à la carte mère par trois câbles, ne la retirez donc pas entièrement.
-
-
-
Saisissez l’extrémité de la carte mère près du connecteur de la batterie d’une main et maintenez le reste de l’iPod avec votre autre main.
-
Faites glisser la carte mère hors de ses supports de maintien à l’arrière de l’écran.
During the disassembly of the board I somehow "delaminated" the display. The result was that the display (after the battery was changed and the device closed again) looked "cloudy". From some angle you couldn't see anything at all anymore. The solution was to heat up the hole device with a hair dryer and rest it on it's front side for about an hour. After that it looked absolutely perfect again. I am not sure whether the heating is really necessary (maybe just lying the ipod on the front side over night would have the same effect) and surely one should be careful to not overheat the device.
-
-
-
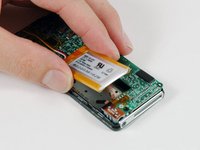
Utilisez une spatule pour relever la languette en plastique noir qui maintient la nappe orange de l'écran en place. La languette noire pivotera vers le haut de 90 degrés, libérant ainsi la nappe.
Both ribbon cables were especially difficult to put back in. I can't say I succeeded in getting the nano to work again. If you can avoid detaching the cables, do it. If you're replacing the clickwheel, there's no way of avoiding it unfortunately.
A little tip if you are replacing the screen: Reconnect this ribbon cable from the new screen BEFORE affixing the screen to the adhesive! It will make it much easier. Also be sure that the little black things are UP before trying to put the ribbon in, and make sure you put them DOWN before closing up! The black things on the receptacle "lock" the cable in place, so it is important that you have it STRAIGHT or it wont work. Good luck!
-
-
-
Utilisez une spatule pour faire glisser la nappe de l'écran hors de son connecteur.
Getting the display ribbon back in place is the most difficult maneuver in the whole fix. I actually broke the black plastic tab in half while trying to close it back down, (be very gentle with it!). Managed to put the broken half back in(tweezers and patience) and get that ribbon in and put it back down. This battery replacement was the most difficult/tedious repair I have ever done. Don't do it unless you are brave and stubborn.
You can leave out this steps with disconnecting the two cables.
Without disconnecting the two cables, one can separate the two pieces only 1/2 inch. This is enough to work carefully with the soldering iron and change the battery.
It's a little bit difficult to work with the needle to open the three holes after removing the old battery - but you can do it.
From the reading of the other notes it seems to me easier than to disconnect the two cables
-
-
-
Utilisez une spatule pour faire glisser la nappe de la molette cliquable hors de son connecteur.
Don't do this unless you have to. Getting this ribbon back in is nearly impossible.
Citation de daisystanton :
Don't do this unless you have to. Getting this ribbon back in is nearly impossible.
Try using tweezers or medical clamps to reach in that tight spot. Use these tools to also connect the click wheel ribbon back to the logic board.
Stamp tweezers worked great for the ribbon cable! (Search eBay or Amazon, or your local hobby store.) This would be a useful tool for iFixIt to add to their inventory.
-
-
-
Retirez la bande de kapton orange qui recouvre les câbles (ou fils) de la batterie.
-
-
Outil utilisé dans cette étape :Tweezers$4.99
-
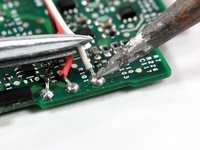
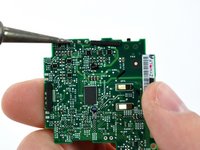
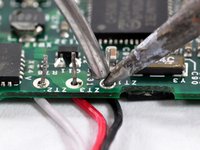
Commencez par chauffer l'extrémité du câble blanc de la batterie avec la panne d'un fer à souder, tout en retirant simultanément le câble de la connexion, en utilisant une pincette pour saisir le câble par la partie isolante.
-
Dessoudez le câble restant en suivant la procédure illustrée ci-dessus.
-
-
-
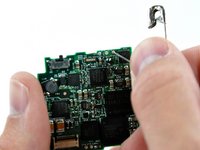
Pour les trous de soudure, utilisez une épingle de sûreté et poussez-la contre la soudure qui obstrue le trou, en même temps que vous chauffez le point de soudure de l'autre côté du circuit imprimé. Pour dégager complètement les trous, il faudra répéter cette procédure plusieurs fois en alternant les côtés du circuit imprimé.
A desoldering pump is helpful and makes this step much easier. You basically heat the solder up til it goes liquid, then hit the button on the desoldering pump and all the solder is taken off leaving the hole totally clean.
-
-
-
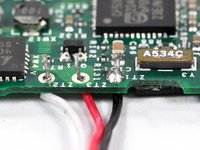
Placez le circuit imprimé à plat sur une table avec les contacts de dorés (indiqués en orange) vers le haut.
-
À l’aide d’une pincette, insérez les extrémités dénudées des câbles de la batterie dans leurs trous respectifs.
-
Insérez le câble noir dans le trou le plus proche de l’interrupteur (indiqué en rouge).
-
Insérez le câble rouge dans le trou central.
-
Insérez le câble blanc dans le trou le plus éloigné de l’interrupteur.
-
-
-
Pour souder le câble, placez momentanément la panne du fer à souder contre la connexion, faites fondre la soudure dans la connexion et retirez rapidement le fil de soudure et la panne du fer à souder de la connexion. La soudure doit s'écouler autour du nouveau câble de batterie, le connectant solidement à la pastille du circuit imprimé.
-
Soudez les deux autres câbles de la batterie de la même manière, en prenant soin de ne relier aucune des connexions entre elles.
-


Pour assembler de nouveau votre appareil, suivez les instructions en sens inverse.
Pour assembler de nouveau votre appareil, suivez les instructions en sens inverse.
Annulation : je n'ai pas terminé ce tutoriel.
109 autres ont terminé cette réparation.
Merci à ces traducteurs :
100%

Ces traducteurs nous aident réparer le monde ! Vous voulez contribuer ?
Commencez à traduire ›

12 commentaires
I skipped steps 8,9,11-17, and 21.
Step 19> when un-soldering the old battery wires, make sure to leave solder on the pads and in the holes.
I replaced steps 22-24 with Step 22-24> Very carefully and precisely:
-Place the black lead onto the pad nearest the hold switch (shown in red) with the end of wire pointing away from the battery.
-Place the red lead onto the center pad with the end of wire pointing away from the battery.
-Place the white lead onto the pad furthest from the hold switch with the end of wire pointing away from the battery.
Gently hold each wire in place on the pad while applying the soldering iron taking care not to touch the wire to any other pad or trace (note black wire). When the wire sinks into the solder, remove heat. Hold wire until solder has set.
Do step 25 and charge battery. Much simpler and less risk.
For all newbies, make sure that your soldering spots are neat and clean. Your workplace must be clean! Too hasty repair...and you'll reassemble your Pod once again.
Thanks for the neat repair guide! Much appreciated!" Now I can enjoy my "new Pod" for another 8years at least! No that's what I call environmental awareness! (built in 2005)
Well, how’s it going? It’s been 8 years…
Success! The instructions were clear and helpful. This was the third battery for my iPod, so the desoldering step took a fair amount of time. I am not very experienced with soldering, so I practiced on a little blinking christmas tree kit before attempting this, and I think that was useful.
MUCH easier than I expected. For me the hardest part was getting the rear cover back on. LOL!
First the iPod worked before I put the rear cover back on…then nothing works…the iPod ist dead. I think there must be a short circuit.
What can I do to rescue it?!
Why not cut the 3 wires and splice vs. soldering to PWA? Much less risk to board and easier to do.
I successfully replaced the battery on my iPod nano, the first iPod I’ve ever bought. The hardest part for me was to open the solder holes for the wires, I used a blood lancet for this, but it took a lot of time. While the three wires are glued together on the original battery, they are loose on the replacement battery, which required guiding them in the right position (and staying there) to prevent them from overlapping. After reconnecting the display (using tweezers), it only showed a white screen, but after resetting by pressing menu and middle button for 5 secs, the iPod was working again – and as nice side effect: the clicker is working again too.
For anyone else looking at this, use solder braid to get the holes open. It's the best way to do it in nearly every circumstance.
Öffnen und Ausbau der Hauptplatine ging mit geeignetem Werkzeug sher schnell. Eine Entlötpumpe würde ich nicht empfehlen. Besser geht es mit Entlötlitze und reichlich Flußmittel (z. B. No-Clean X32-10i Flux).
Am schwierigsten gestaltet sich das Wiedereinführen der Flachbandverbindungen. Ansonsten eine Superanleitung, danke.
Turn on the notes and READ thru all the steps and the notes, especially the ones involving the ribbon cables.
patjmccarthy - Réponse