Il est possible que cette traduction ne reflète pas les dernières mises à jour du tutoriel source. Aidez à mettre à jour la traduction ou bien consultez le tutoriel source.
Introduction
Consultez ce tutoriel pour changer le module du stick analogique gauche de votre Steam Deck. Le stick analogique fait partie d'un module complet et il va falloir le remplacer d'un bloc. Bien qu'elle soit quasiment identique, vous trouverez la procédure pour le stick analogique droit ici.
Souvenez-vous : respectez les consignes générales de prévention contre les décharges électrostatiques (ESD) pendant que vous effectuez votre réparation.
Des logiciels supplémentaires et des procédures de calibration sont peut-être nécessaires pour mettre votre stick analogique de remplacement en état de fonctionner comme souhaité.
Remarque : Chaque Steam Deck est livrée avec l'un de deux modèles différents de sticks analogiques, de type A ou de type B. Bien que les sticks soient presque identiques, les capacités tactiles capacitives dépendent du type correct à installer. Pour identifier les sticks de remplacement dont vous avez besoin, accédez à Paramètres → Système et vérifiez l'ID de votre console Steam Deck : si l'ID de la console commence par "MEDA", votre console utilise des sticks de type A ; si l'ID commence par "MHDA", cette console utilise des sticks de type B.
Ce dont vous avez besoin
-
-
Éteignez votre Steam Deck et débranchez tous les câbles connectés.
-
-
-
Avec un tournevis cruciforme, dévissez les huit vis qui fixent la coque arrière :
-
Quatre vis à filetage épais de 9,5 mm de long
-
Quatre vis à filetage fin de 5,8 mm de long
there should be a picture of the SD card slot at the start of every Steam Deck teardown. i know the note is there but i generally use the pictures to guide me and forgetting to remove the SD card is a very critical step
I agree, I just broke mine...
What is the the #1 philips used for? Only the #0 is mentioned in the instructions.
I wish they would specify which size to use for which screws.
Mark D -
I found it easiest to use a PH1 for the red screws, and PH0 for the rest (including the internals.)
I used the PH1 bit for this. You can use smaller bits but ideally there should be no play of the bit in the screw head.
I used the PH1 for the 9.5mm screws and PH00 for the 5.8mm screws. The PH0 wanted to strip one of the small ones.
Just a point for knowledge sake, the Four 5.8mm screws on this step are factory installed with a version of locktite. Not sure why but there will be slight resistance when removing the first time.
-
-
-
Insérez un médiator dans l'étroit interstice entre la coque arrière et la coque frontale, le long de la poignée droite.
-
Faites levier sur la coque arrière pour la détacher de ses clips.
I found it easiest to start this process at the top of the device near the fan exit.
second that and inserting the pick in the bottom middle and sliding the pick to each side
Sub -
I also found the top near the fan exit to be easier
Thank you for this tip, it definitely was easy starting at the top instead of by the bumper/triggers. After I opened the top I did the bottom and then it was way easier to gently open the sides. be very careful and go slowly to make sure that none of the clips are damaged
Luis B -
this as suggested above:
1. open the top
2. open the bottom
3.gently open the sides
I also started from the middle of the deck and worked my way out since I couldn't get a grip with the pick on the deck's side grips. Since this is a common step for pretty much all guides for opening the deck I think it's also worth noting that you should be careful not to bend the trims/seams where the front and back covers meet with the pick. When I first opened my deck you can definitely see where I nudged the pick in between the covers since I was probably using too much force on the pick itself.
It would be useful to note here that if you want to insert the little blue triangular iFixit opening picks into the right side along the edge, there isn't actually a gap as the directions say, at least not on newer Decks. You'll be making the initial gap using the pick. Brace it on something because you will need to use enough downward force that you're flexing the pick a bit and it'll probably be digging into the skin of a bare hand. With enough force suddenly it will make a click and go in just a bit, and then you're in business.
plastic picks didnt work for me but finger males did the job on prying this open
This step was the hardest by far. First I didn't find an opening at the sides, and it did take a really long time until I finally got it open... Then, when I had the one side opening open it didn't just pop out, I needed to slide all the way to the other side with the pick and open everything. I guess they made it even more drop resistant.
-
-
-
Saisissez la coque arrière au niveau de l'interstice que vous venez d'élargir et soulevez-la pour détacher les longs bords.
-
Enlevez la coque arrière.
If you have an SD card, you will want to take it out. I followed the guide and didn't think about the SD card I had inside. When I went to snap the case back on it clapped shut on the exposed SD card, shearing it in half and leaving the bottom half stuck in the SD card slot. I am still endeavoring to get it out.
you can use the case that comes with the steam deck to support it once the lid is removed
You can get the pry pick inserted easier if you start in the gap for the shoulder buttons. A lego brick separator works well here
-
-
-
-
Avec une pincette, retirez le morceau de film adhésif qui recouvre la vis cachée de la plaque de protection de la carte mère.
Use some heat here from a hairdryer to make this part easier.
If you screw up here you can replace the little aluminium square with some aluminium tape from Amazon. No less than 50 microns thick, slightly thicker is fine. and the square is 13mm both ways.
Thanks for that Matt, i destroyed the original tape and i had no solution since i read your comment.
You should not. This is EM shielding to protect your processor and ram from radio waves in the air
I found out my 3 Weeks new Steam Deck is a old Version... gg. Valve...
wenn ich aluminium foile benutze, womit soll ich sie dann verkleben?
If we have the new version with the black shield, how do we access the SSD?
I need this part, does anyone know where to get it?
-
-
-
Avec un tournevis cruciforme, dévissez les trois vis qui fixent la plaque de protection :
-
Une vis de 3,4 mm
-
Deux vis de 3,7 mm
The procedure ended here for me, used an ifixit PH 00 bit on the screw behind the aluminium tape, bit wouldnt bite too great, one wrong twist and the screw was stripped. Not sure who or what initially screwed in that particular screw as the rest of the screws on the shield were fine, but boy is it in there tight. So now i have a stripped screw and a botched ssd replacement, don't think valve will let me RMA for this, but i'll give it a try and update accordingly.
Any updates? Did they let you RMA?
I found one screw to be ridiculously tight too, managed to undo it without stripping thanks to reading your comment beforehand and going extra careful. Not going to lie, it was a tense moment :D
Andy HL -
I think the tendency is to go too small on the screwdriver bits because you're working on small electronics.
I used the PH1 bit on the screw under the foil and the PH0 bit for the two remaining screws without any problems.
What does this shield actually do? Some kind of magnetic protection?
if I had to replace the key (R2) and that's it, can I directly remove it or do I have to act here on the motherboard too?
have you gotten an answer yet? trying to change mines as well but dont wanna do too much to the deck
briaNN -
button Not key, i’m sorry
FYI there is a little pin on the cover that slots into the board. It is located near the top screw. I needed that to be inserted for the cover to go back down properly.
For anyone who may have stripped a 3.7mm screw, Steam Support states it's M1.6 diameter with a 0.35 thread pitch and a 3mm length. Hopefully that'll help anyone trying to locate a replacement screw. Hoping iFixIt can make an internal screws kit as they're kinda hard to find the right one online.
Did valve change the shield recently as my new 64gb deck has a black shield with no hidden screw.
Yes there's a new hardware revision out there that some people are getting. Consider stopping at this point and putting your deck back together if you have one of these new hardware revisions (the fan is quite different as well to the pictures) until iFixit has an updated repair guide.
There are only 2 screws now, but be careful taking the shield off, because there are still thermal pads under it sticking it to a heat pipe.
I need this piece, can someone help me where can I find it please?
-
-
-
Retirez la plaque de protection.
During reassembly, ensure that the fan cable lays on the side of the board shield and isn't pinched underneath.
Are you saying that the fan cable should be positioned above the board shield instead of being pressed down by it? Just like the image shows, where it 'lays on the side of the board shield'?
Necesito esta pieza la mía no la traía se ve que se la quitaro
-
-
-
Saisissez la nappe de la batterie Steam Deck et tirez-la dans la direction opposée à la carte mère, pour la déconnecter.
After fully reassembling my device I found that my battery was not showing any stats anymore. I couldn't start the device without being plugged in, however if I restarted it would stay on even if my power cable was detached. Battery showed 0%. It turns out I had not fully reinserted the battery cable at this stage during reassembly. MAKE SURE YOU PUSH IT ALL THE WAY BACK IN!
Awesome thanks for this tip!
It is helpful to lift up gently with a the tapered end of a spudger underneath the tucked-in portion of the battery cable, creating a bit of flex in the cable before pulling on the pull tab. I found that without doing so, the fabric pull-tab simply tore off of the cable under light-to-moderate force (the fabric itself ripped cleanly across, like a paper towel). Careful, gentle pressure with a spudger can be used to remove the plug by prying gently on the rear ridge of the plastic plug (not the wire!) if this happens.
This is exactly what happened to me. Maybe it was a pull tab previously, mine was a ribbon cable that tore - captured the image here: https://www.ianwootten.co.uk/2022/11/22/...
This was the best approach (and I feel safest for the wiring) for me. Mostly push pressure on the plastic ridge with some minor pull tension on the fabric.
Victor -
I found it less scary and easier to remove the battery connection by using a fingernail on the ridge and pushing it off the connector. I felt like pulling on the battery cable was too harsh.
Yeah, pulling cables like these is usually ill advice. They might be fine if it's a new device, but for old devices that have been sitting there for years, there's a good chance the connector has grown brittle and the cable might just come off separately (something I learnt the hard way).
skzm -
I second this approach. For me, the cable felt way to flimsy and the connector wouldn't budge even under moderate force. Except I used the flat end of a spudger to "scrape" it out.
Misza -
Upon plugging the battery back in, I found it easy to use two spudgers- one on each side- to pull/push the connector back into it's port. Be careful to not put any pressure on the battery wires themselves.
When reconnecting the battery cable, you'll know when it's inserted and power is restored, because the white LED will illuminate at the top of the Deck near the power button. You should be able to see it while you're reconnecting the battery cable
This is only true if you haven't put the deck into battery storage mode as directed.
Why not just let the battery discharge completely and then not have to disconnect it?
Completely discharging a battery reduces its lifespan. It's completely unnecessary.
Because no lipo battery is ever completely discharged -- you would not be able to recharge it if it was. There will always be enough power left in it to cause damage if shorted even if it isn't charged enough to power up the device it's connected to.
I would personally not recommend pulling the tab. It doesn’t apply force at the correct angle. You should revise these instructions to advise using a combination of pulling on the tab, and careful pressure on the connector towards the right of the mainboard to carefully work it out.
Using the pull tab alone could cause problems if not done extremely carefully.
This part was wayyyyy easier than I anticipated and I worried for nothing because I used the ifixit spudger to push it out a bit and then I literally used my finger nail and was able to slide it right off. Dont be afraid, its not that difficult and its not that delicate to break if you do it patiently
I inserted the cable very firmly with a spunger, being careful not to press down too hard on the cables, and even tried redoing it, but I don't see any LED illumination. I am now unable to boot the deck into the boot manager. Any additional tips?
What is the risk of not unplugging the battery? Just curious!
Once I was changing termal paste on my Windows based expensive tablet PC... And I was so scared to disconnect any cables (there was many of them), so I did it all with battery connected (I didn't even knew where is battery cable). When I tried to put board shield back... it didn't go right into needed place... and short circuit some small component. It flashed. That was the end of my repair. Dudies from repair service later told me that multiple components fried including CPU, so repairing is too hard. That's what can happen if you don't disconnect battery.
To pull the battery out I used my spunger, but the batter had actually not space to be pulled out completely. I needed to lift the cable up with the spunger to get the cable fully out. When plugging it in again I had to press the battery down kinda hard so it would fit again. This was really scary and I recommand using two spunger as someone said above.
Does it have to be a clean fingernail?
-
-
-
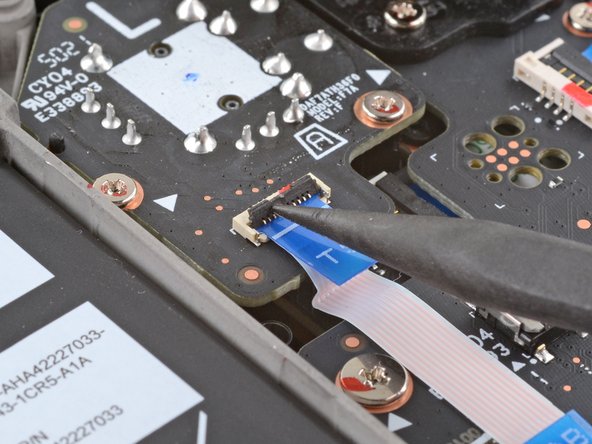
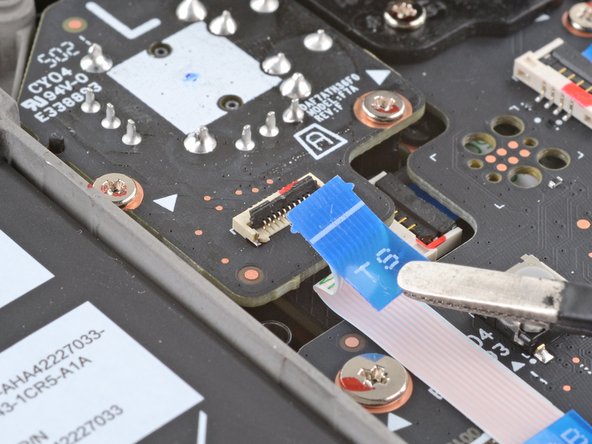
Utilisez la pointe d'une spatule pour soulever le petit clapet de retenue du connecteur ZIF de la nappe du stick analogique.
-
Faites glisser la nappe hors de sa prise à l'aide d'une pincette.
-
-
-
Utilisez un tournevis cruciforme pour retirer les trois vis de 5,2 mm qui fixent le stick analogique.
-
-
-
Ôtez le stick analogique gauche.
-
Pour identifier le modèle dont vous avez besoin, naviguez dans Paramètres --> Système et vérifiez le Numéro d'identification de la manette Steam Deck ou équivalent (Steam Deck Controller ID en anglais).
Are you kidding me!? You tell me there are different types of sticks on the very last step of the directions?! Hope I bought the right one........
-


Pour remonter votre appareil, suivez ces instructions en sens inverse.
Déposez vos déchets électroniques dans un point de recyclage certifié.
La réparation ne s’est pas déroulée comme prévu ? Consultez nos conseils basiques de diagnostic ou notre Forum pour obtenir de l’aide.
Pour remonter votre appareil, suivez ces instructions en sens inverse.
Déposez vos déchets électroniques dans un point de recyclage certifié.
La réparation ne s’est pas déroulée comme prévu ? Consultez nos conseils basiques de diagnostic ou notre Forum pour obtenir de l’aide.
Annulation : je n'ai pas terminé ce tutoriel.
26 autres ont terminé cette réparation.
Merci à ces traducteurs :
80%


Ces traducteurs nous aident réparer le monde ! Vous voulez contribuer ?
Commencez à traduire ›


8 commentaires
Requires a PH#00 not a #0
#0 worked best on the analog sticks for me. #1 for the external case screws. I've heard to always use the size with the snuggest fit in a screw to prevent striping the heads. Considering I only have these screws and no replacements. I'll opt to use the biggest bit that fits.
You need to start offering the ribbon cables, as they are pretty fragile.
I feel like my steam deck was partially made anti-repair, there was a glue like seal blocking the soldering iron from reaching the solder pad on my left joystick specifically, and the screw hidden by the tape on the shield would not unscrew even though my iFixit screwdriver worker for all the others fine and now I'm pretty sure the head is stripped I even tried a super glue hack a few times and in each case the glue gave before the screw did. I was still able to just barely access the battery connector, but reconnecting it is more work than I'd want.
I wonder if anyone else is seeing odd stuff like this...
Someone should ask valve why their sticks are so clicky. I’ve had multiple sticks all click in in the 6 and 8 positions but only on the left side. I’m tired of it so I’m gonna stop replacing it, after going through 5 sticks if you count my RMA for haptic issues, all left sticks have had this issue.
Ok so all of em pretty much do that? Jus got mine 2 weeks ago and it started doing that like a crunchy sound was woundering if I should rma but prob be same or worse outcome.
Mycelium -
Anyone know what the weird sticky water looking marks are on the back of the thumbsticks on the circuit board, I have it all over my thumbsticks am worried about touching it. Its shown in the ifixit video and you can kind of see it in the photos here.
Blood and sweat that went into making this wonderful device!
Misza -