Introduction
This repair guide was authored by the iFixit staff and hasn’t been endorsed by Google. Learn more about our repair guides here.
Follow this guide to remove and replace a broken screen for your Google Pixel 3 XL. This procedure is for replacement screens that are not pre-mounted onto a frame. Due to the Pixel’s design, you will have to remove the back panel in order to disconnect the screen connector.
Before you begin this procedure, be sure to have a set of replacement adhesives for both the back panel and the screen.
This procedure will destructively remove the Pixel 3 XL’s screen. OLEDs cease to work when exposed to oxygen or moisture, and are thus sealed in an airtight encapsulation (this is also why OLED panels turn black underneath a screen crack). It is very difficult to replace the front glass alone— the Pixel’s OLED layers are laminated to the glass.
Ce dont vous avez besoin
-
-
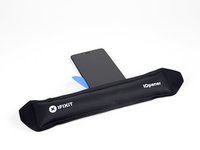
Heat an iOpener and apply it to the right edge of the back cover for a minute.
-
While you wait, note the following areas on the back cover:
-
Strong adhesive—there are large patches of adhesive near the bottom of the phone.
-
Fingerprint sensor cable—be careful not to slice through the cable as you pry
-
-
-
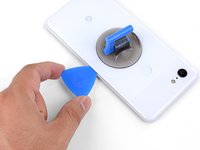
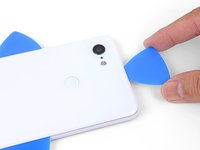
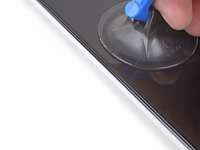
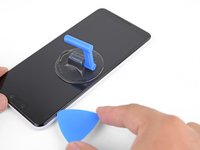
Apply a suction cup to the heated edge of the back cover, as close to the edge as possible.
-
Pull up on the suction cup with strong, steady force to create a gap.
-
Depending on the age of your phone, this may be difficult. If you are having trouble, apply heat to the edge and try again.
-
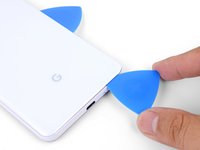
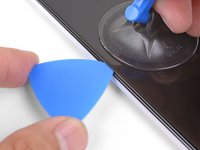
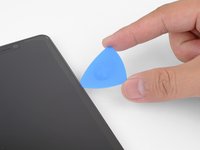
Insert the point of an opening pick into the gap.
Suction cup doesn’t work on severely cracked glass.
Step 1 - 2 took me about 50 minutes. Back and forth with heat and trying with suction cup. I could get my finger nail in but not the pick. Took two people, but we finally got a pick in. 2 year old phone.
I also struggled here for a while. I ended up working my way around the entire edge of the phone until I found one spot where I could pry up the back panel. I used a jimmy instead of the opening pics. I also used a hairdryer on lower heat instead of the iopener. 3 year old phone.
Took 30 minutes + to get the back cover off. Used another suction cup to grip from the busted screen and the ifixit suction cup for the back. A thinner Acoustic guitar pick was required opposed to the standard Blues picks provided in the kit (har-har). Would HIGHLY suggest getting a pick into both the back and the front before removing the panels as it will give you more surfaces to pry from. Made that mistake...
Over 2 hours of trying, I keep reheating the pouch and let it sit on the edge for sometimes up to 10 minutes since the directed 1 minute wasn't working. Physically cant get enough leverage on the back of the phone; picks are too thick to get under the crack, and the suction cup pops off before I can get enough force to see any gap open. Phone is 5 years old. I really need some help
Hey Grant!
I hear your pain—the adhesives on this phone are very strong. The initial gap is one of the hardest parts of the procedure. Here are some suggestions:
* If you have a hair dryer, give that a shot. Heat the edge until it is slightly too hot to the touch.* These adhesives separate not with extreme force, but with constant steady force and time. Try heating the edge and pull on the suction cup with firm force for about a minute to let the adhesive separate.
* If you have an opening tool, you can try this procedure to get the initial gap.
-
-
-
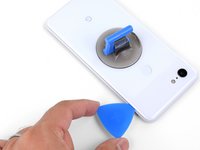
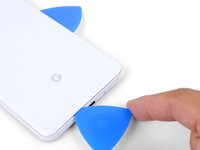
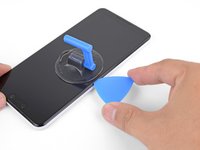
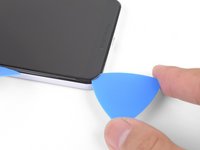
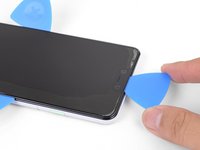
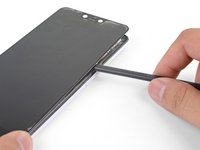
Slide the opening pick along the right edge to slice through the adhesive.
-
The adhesive gums up and becomes hard to slice once it cools. If that happens, re-apply heat to the edge to make slicing easier.
-
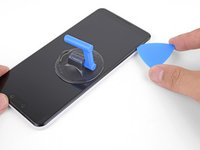
Once you have sliced through the edge, leave an opening pick in the seam to prevent the adhesive from re-sealing.
-
-
-
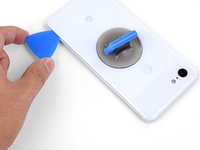
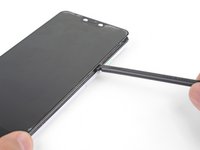
Apply a heated iOpener to the bottom of the back cover for a minute.
-
-
-
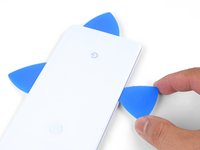
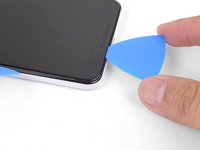
Use an opening pick to slice around the bottom right corner and continue along the bottom edge of the phone.
-
Leave a pick in the edge to prevent the adhesive from re-sealing.
-
-
-
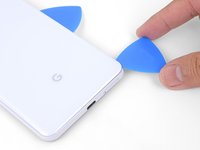
Continue heating and slicing the remaining edges of the phone.
-
Be careful as you slice along the left edge of the phone. If your pick feels like it's stuck near the top, you may have snagged the fingerprint sensor. Retract the pick out of the seam slightly and try again.
-
Be sure to cut through the thick portions of adhesive near the bottom and right edge of the phone.
The back cover is Glass!!!!. DO NOT PRY HARD, IT WILL BREAK!!!!!!!
You must go slowly and let the heat do the work, if you force the cover off, it will shatter.
-
-
-
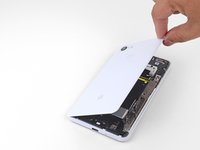
Gently pry up the right edge of the back cover.
-
Use an opening pick to slice through any remaining adhesive along the edges.
-
-
-
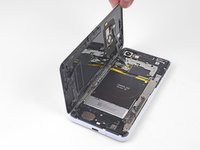
Swing the right edge of the back cover upwards and rest the flipped panel along the left side of the phone.
Reassembly is way harder. The adhesive guide is generic and not super helpful, so don't be surprised if things went smoothly until you get to this step and then everything starts sticking to things its not supposed to.
This is great but how you address that fact that the phone is tied to a particular fingerprint sensor and after replacing, the new sensor is not recognized by the original phone?
Hi Dave!
There's a software calibration tool that you can use to calibrate your new fingerprint sensor. I've updated this step to include a link to the tool.
I have a pixel 3 xl and I can't get the tool to work. I finally got the driver's installed after several hours and it says it's for pixel 6 and up basically. So I tried the other option and it's basically saying to do a factory reset? Did I mess something up on the install or what am I doing wrong here? Thanks
Uhhh
So, apparently the connector on the motherboard for the fingerprint sensor is just ridiculously fragile, because after plugging and screwing everything in (pretty much reassembled except for the adhesive), I closed up the phone and powered it on to test if everything was working, and when I opened it back up and let the top hang off to the side, it just snapped off. I didn't even have it tensioned that much, it was just hanging off to the side and snapped. So now I've traded a non-functional camera with a non-functional and irreparable (unless I get a new motherboard) fingerprint sensor.
The guide really ought to emphasize how delicate that connector really is. I have a google drive link here to a photo of the remnants of my poor fingerprint sensor connector :( link
Wasted a ton of time and effort (and money) trying to use this guide to repair my Pixel 3XL. Then I get to the software calibration tool and find:
Unsupported deviceThis is not a compatible device. Only Pixel 6, 6 Pro, 6a, 7, 7 Pro, 7a devices can install this software.
I cannot say how frustrating it is when a guide and website that tried to be so helpful ends up like this. Failure due to referencing tools not on the site and not suitable for the job.I too want to stress just how sensitive the fingerprint sensor cable is. Be sure you are only lifting the back away a very small amount until you are able to disconnect the cable. I thought I was being careful and ended up still putting a small tear in the cable!
The good news is that a replacement sensor is well under $10 shipped. Also, I'm not sure why this guide recommends the use of the software tool.
It is not compatible with the 3XL (and I'm not sure it ever was). I had some reservations when I read this when I had to replace my sensor, but I found comments else where stating that nothing was needed. Sure enough, when I got my new sensor installed, it worked with no issues. I didn't need to calibrate, or reset my device. I just needed to set my fingerprints up again.
-
-
-
Outil utilisé dans cette étape :Tweezers$4.99
-
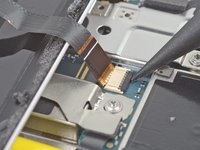
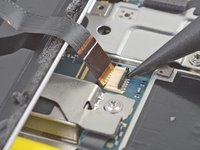
User tweezers to carefully peel up the yellow tape over the fingerprint sensor connector.
This step is utterly unnecessary. It achieves nothing, and the tape is there for a reason (I'm not sure why, maybe to prevent short circuits). I didn't remove this tape while disassembling and it didn't change anything.
The Kapton tape should adhere to both the cable and the connector. It helps prevent the cable from slipping out of the ZIF connector. You're right in that you don't have to completely remove the tape—I've adjusted the step to reflect this.
I just finished this guide, thank you. It would be nice to have a "before ribbon removed" reference picture that's also without the Kapton tape in place if possible. I was no longer certain how far back into the ZIF connector I had to place the ribbon cable as I simply forgot what it looked like before removing it. Basically, it "felt" like it was out too far, but since I had no reference I couldn't compare. Step 10 has good close up pics, but the ribbon cable is already out a bit so a bad reference.
-
-
-
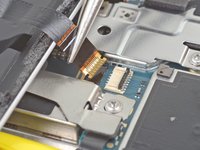
Use the point of a spudger to carefully flip up the black lock bar on the fingerprint sensor's ZIF socket.
-
Grasp the cable's tab with your fingers or tweezers and gently walk the flex cable out of the socket.
-
-
Outil utilisé dans cette étape :Magnetic Project Mat$19.95
-
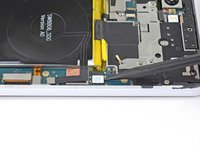
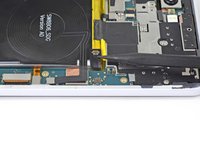
Remove the following four T3 screws securing the metal cover bracket:
-
Three 4 mm long screws
-
One 3 mm long screw
Be careful when putting the screws back in that you do not over tighten. This will cause you to destroy some pixels on your screen.
The long screw on my disassembly was adjacent to the lettering for the Qi inductive receiver, and not close to the silver exposed part of the battery as indicated
-
-
-
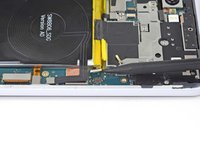
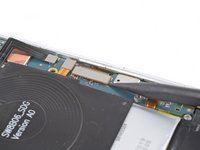
Insert the flat end of a spudger underneath the top right edge of the metal bracket and pry up to loosen it.
-
Remove the metal cover bracket.
There is a small adhesive pad under the metal bracket, between the two middle screws that will provide some resistance when lifting the metal cover bracket
-
-
-
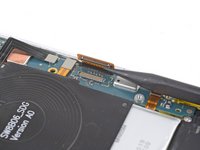
Use the point of a spudger to pry up and disconnect the battery connector from its socket.
-
Bend the battery cable such that the connector will not accidentally touch the socket.
-
-
-
Use the point of a spudger to pry up and disconnect the display cable from its motherboard socket along the right edge of the phone.
-
-
-
Flip the phone so that the screen is facing up.
-
Heat an iOpener and apply it to a long edge of the screen for two minutes.
-
-
-
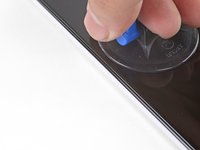
Apply a suction cup to the heated side of the screen, as close to the edge as possible.
-
Pull on the suction cup with steady force to create a gap between the screen and frame.
-
Insert the point of an opening pick into the gap.
So Im pulling up on the suction cup with enough force to pop it off and the screen is not budging. Ive heated the iOpener to max and let it sit for 2, 5, and 10 minutes. I cant seem to get the adhesive to release
I actually managed to snap part of an opening pick off trying to work it in there
Hey Alex,
The adhesive holding the screen is really tough. You may need to repeat the heating and pulling procedure multiple times to weaken the adhesive, or use a heat gun or hair dryer to weaken it.
Be sure to pry the top most layer only. there is a frame for the replacement kit that is meant to stay in tack that sits directly below the display. It cracks easily too if removed. Advise super glue...
-
-
-
Slide the opening pick along the edge of the screen to slice through the adhesive.
-
The adhesive gums up and becomes hard to slice once it cools. If that happens, re-apply heat to the edge to make slicing easier.
-
Once you have sliced through the edge, leave an opening pick in the seam to prevent the adhesive from re-sealing.
-
-
-
Apply a heated iOpener to the bottom edge of the screen for a minute.
-
Use an opening pick to slice through the adhesive.
-
Leave an opening pick in the seam to prevent the adhesive from re-sealing.
-
-
Outil utilisé dans cette étape :Plastic Cards$2.99
-
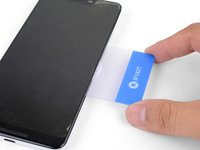
Insert a spudger or plastic opening card into the edge and press in to slice through the deeper adhesive.
-
Continue slicing until the screen is freed from the frame.
-
-
-
Flip the phone over so that the motherboard is facing up.
-
Push the display cable through its motherboard cutout. If you angle the cable such that one end slides under first, you can get it out easier.
I had to partially loosen the motherboard. That guide is a little confusing because its an extract from the full removal of the motherboard. I loosened the motherboard and connecters and gently lifted it with a spider to make space to the connector to pass between the midframe and the motherboard.
-
-
-
Flip the phone so that the screen is facing up.
-
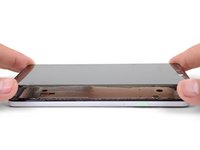
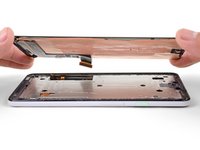
Lift the screen from the phone, cutting through any remaining adhesive.
-
Remove the screen.
-
Be sure to test your repairs before you affix the screen with adhesives.
-


If your Pixel won't turn on after replacing the screen, there is a chance that the phone has silently turned on when the battery is re-connected. Hold the power button for a few seconds until the phone vibrates off. Afterwards, re-connect the screen, and try again.
To reassemble your device, follow these instructions in reverse order.
Take your e-waste to an R2 or e-Stewards certified recycler.
Repair didn’t go as planned? Try some basic troubleshooting, or ask our Pixel 3 XL Answers community for help.
Annulation : je n'ai pas terminé ce tutoriel.
35 autres ont terminé cette réparation.


23 commentaires
What adhesive do you recommend for the screen? This would be my first time doing repair on a smartphone. The guide says to have adhesive for the screen and back, but only has a recommendation for the back adhesive.
Hi Vincent,
The screen itself has a large adhesive pad—what’s missing is the thin perimeter adhesive. For that, I would suggest using some Tesa tape (here are general instructions on how to apply Tesa tape). Some repair techs use E6000 adhesive, but doing so complicates further repairs, and it can get messy. As a reminder, be sure to thoroughly test your repair before you glue the screen in place! Good luck with your repairs!
Hi Arthur! Thanks a ton for putting this guide together, had no problem getting my old display out.
However, I’ve been having an issue I’m hoping you might be able to help with. When I plug the new display into the device, no amount of force-rebooting the device, or re-plugging the display and battery cables, will make the new display power on. I RMA’d the first display thinking it was the problem, but the replacement display I received is doing the same thing. The old display that was removed did work before removal, albeit with significant artifacting (due to the severely cracked display). Do you think there could be some step I’m missing? Perhaps the replacement display is also defective?
Thanks for your help!
Hey Taylor!
That is strange. I have heard scattered reports of other people having similar troubles over various Pixel models. I am assuming that you have the screen connected before you connect the battery. Did you purchase the screen from iFixit? If so, I can definitely check and test some of our screens to see if they are the culprit.
I replaced the screen but now I have 2 problems:
… wireless charging doesn't work
… fingerprint reader doesn't work
I am considering taking it apart again but don't know exactly what to look for.
Can anyone offer suggestions?
Hi Bryan,
The fingerprint reader is connected by a ZIF connector. Make sure that the fingerprint cable is fully inserted into the connector and properly locked down.
As for wireless charging, there is a chance that the connector was loosened during disassembly. Carefully pry up and re-seat the connector.
Hi I tried to change my display and the touchscreen is not working ,I don't no what to
Any help please
Hi Danny,
Does the display light up?
After completing this repair this past weekend I would like to comment on the removal of the back. I found it to be more difficult than expected. It worked better for me to use a blow dryer (hot) to heat the edges and then was able to pry the back off. I think I applied too little heat initially for fear of damaging the battery but found that I had to apply more than just the heat from an iOpener. Thanks for the great guidance! One other comment…The display connector is difficult to re-thread through the opening without moving the motherboard up to produce a bigger opening. Since I also replaced the USB connector at the same time I had loosened it and it was easier to thread it through.
Thanks again for all the pictures and the step by step!
Great tutorial, but I would definitely include (and not make it optional) motherboard removal as the display cable is extremely hard to slide out of that slot without doing that first. Luckily my display was shot so cutting the cable was the easiest way, but what if you wanted to save the part?
Hi Stephane,
Good point! I will adjust the step instructions. Situationally, I don’t think there is a reason to remove the display intact—the fragile nature of the Pixel displays usually results in damage when it is removed.
I’m Having the same issues where i bought a screen and it didn’t work so I bought a new one and that one isn’t working either. What are the steps to counteract that. I feel its not the screen at this point.
Very nice tutorial. After replacing the screen, I’m having an issue where the display doesn’t show anything, but the touchscreen portion is working as it provides haptic feedback on what I assume is the lock screen. The old sceen worked.
It’s possible the screen cable wasn’t seated properly. You could remove the back panel and reseat the cable. You can test whether it works without adding the rear panel.
Hi, If I buy your screen replacement (Item code: IF356-051-1), and Back Panel Adhesive (Item code: IF356-086-1) - do I need any further adhessive or Tesa tape to complete a screen replacement?
Thanks for the tutorial!
Hi Jason,
Unfortunately, you will still need some adhesive in order to reattach the screen to the frame. We currently don’t stock the custom adhesive for the screen, so a pre-cut adhesive card is the next best solution.
What about transferring the speaker and microphone screens from the old screen to the new screen?
Great tutorial. However, you missed a part about having to transfer speaker grilles to the new screen, as it does not come with them pre-installed. I did miss the step and realized that the speaker grilles are not installed after the screen was already glued back to the chassis.
Thanks for pointing that out! I’ll add a note in the last step.
Hey,
thank you very much for tutorial, it is well made. After I closed the phone everything is normal, but first it said that finger print hardware is not available and after wards, it doesn’t show the error but finger print sensor still not working. I tried to fiddle with ribbon cable to see if it is actually inside the socket and it was ok. I’m out of ideas. Thank you in advance,
I did this directions fully. It took me closer to 3 hours. This was my third screen replacement after my Pixel 1 and Nexus 5. Everything works great! The only issue is that there is about a 1mm gap between the screen and the frame at the bottom. I bought the ifixit screen kit, but the screen tape included just had nothing for the bottom, so I wonder if I did something wrong. Generally though, the screen and back cover both stick out which makes it uncomfortable to hold because those sharp edges dig into my finger pads as I hold it. I thought i did enough to remove the leftover old glue, but it seems there was still enough to cause a gap. It would be nice to include tips or links on how to best remove glue to reduce the chances of this.
The hardest part was warming the glue enough to remove the screen and rear cover. I had to use my Heaterizer XL-3000 Heat Gun to fully remove it- the iOpener wasn’t enough, but it did help to warm up the phone and limit use of the hot air gun, which is always scary.