Il est possible que cette traduction ne reflète pas les dernières mises à jour du tutoriel source. Aidez à mettre à jour la traduction ou bien consultez le tutoriel source.
Introduction
Accédez au combo ou au SuperDrive.
Ce dont vous avez besoin
-
-
À l'aide d'une pièce de monnaie, faites pivoter la vis de verrouillage de la batterie de 90 degrés dans le sens des aiguilles d'une montre.
-
-
-
Dévissez les trois vis cruciformes espacées régulièrement sur la paroi arrière du compartiment de la batterie.
While many guides here are good, this one is way more complex than needed. You can replace the inverter very easily by prising off the plastic bezel around the display, removing the three screws from the hinge cover, then prising off the hinge cover to expose the inverter. That is all that is needed.
Reference: "prising off the plastic bezel around the display, removing the three screws from the hinge cover, then prising off the hinge cover to expose the inverter. That is all that is needed."
Unfortunately putting it back an shred the cables to the airport card..
-
-
-
Saisissez le capot mémoire en forme de L, faites-le glisser vers la droite et retirez-le de l'ordinateur.
Hey iFixit, I was wondering would a Mac fail to boot if this cover wasn't on?
-
-
-
Retirez les 3 vis suivantes :
-
Une vis cruciforme #00 de 11 mm au milieu du boîtier
-
Deux vis cruciformes #00 de 14,5 mm.
-
-
-
Retirez les 3 vis suivantes de la paroi arrière du compartiment de la batterie :
-
Deux vis cruciformes #00 3 mm (A1181 a trois vis de 3 mm et une de 4 mm.)
-
Une vis cruciforme #00 de 4 mm du côté droit.
When putting the laptop back together, consider doing Step 5 before Step 6. The lower case will then line up on its own.
Otherwise, even pushing on the lower case, these screws are %#$#@$ for putting back in place.
When I reinstalled, I put the screws in the upper holes, which are for the battery cover. If you don't want to back track, be sure to use the lower screw holes at this step.
on my version the longer screw was in the middle
On my version the 3 mm screw (smaller of the three screws) was in the middle, which differs from the image.
i use iPhone screw driver
You could also use a small ratcheting bit driver and bit, or an angled ratcheting bit driver. Good bits and a ratchet can sometimes allow you to apply more torque than you could with a screwdriver. Useful if like me you might have “accidentally” overtightened something the last time.
-
-
-
Retirez les quatre vis cruciformes #00 de 3 mm indiquées de la paroi avant du compartiment de la batterie : En partant de la gauche, retirez les 2e, 4e, 7e et 9e vis.
Count carefully here. If you don't remove the right ones, you won't be able to separate the keyboard assembly later.
The srews are 3.3 mm
I have a screw that I think is stripped, any ideas on how to get it out?
-
-
-
-
Retirez les 4 vis suivantes à l'arrière de l'ordinateur :
-
Deux vis cruciformes de 7 mm à épaulement vers l'extérieur.
-
Deux vis cruciformes de 10,5 mm situées vers l'intérieur.
-
-
-
Retirez les deux vis cruciformes à épaulement #00 de 5,2 mm du du côté de l'ordinateur où se trouve le lecteur optique.
The screws are 5.4 mm
threads are on the tips
Found it necessary to remove the corner one.
-
-
-
En commençant près de l'écran et en vous rapprochant de l'avant de l'ordinateur, soulevez le boîtier supérieur en faisant levier. Il est maintenu par des clips sur le côté au-dessus du lecteur optique. Ceux-ci s'ouvriront sous l'effet d'une ferme pression de levier.
-
Faites attention en soulevant le boîtier supérieur. On se coupe facilement le bout d'un doigt. C'est le sacrifice que les dieux Mac exigent parfois de ceux qui tiennent à exécuter leurs propres réparations.
Danger Will Robinson!! My upper case did NOT want to come out on the right side. I just trusted to cameronmoll and kept lifting straight up. Finally, it came loose, but it wasn't easy. Meanwhile, while I was dealing with the cable -- just had to pull up a black tab hooked to it -- I somehow managed to chip the front, top edge of the upper case -- the edge farthest from the screen -- in two places, one on the right, one on the left. So, watch that edge, it is thin!
Regarding the right side, there is a series of 3-4 plastic snap in locks on that side along the optical drive, holding the case down in lieu of screws. It takes serious pressure to remove the snapped in pieces (just lift straight up). You should also make sure to line them up when you put the casing back on. Another picture might help show that portion better
My upper case also came off with a little difficulty. There are some plastic tabs that hold the case down (4 of them). They sorta "pinch" onto 4 little bars that are part of the upper case (note, the bars appear to be metal). I worked my upper case to the left a little and it came out easier. One of the these tabs was really tight. Note: if you do this, one or more of the tabs may stay on the upper case, you'll need to move them back in place before putting the upper case back on (pry it off the upper case with a spudger, or very carefully with a flat screwdriver as to not damage it). It will slide back into a slot on the body.
Citation de dougyfresh :
Regarding the right side, there is a series of 3-4 plastic snap in locks on that side along the optical drive, holding the case down in lieu of screws. It takes serious pressure to remove the snapped in pieces (just lift straight up). You should also make sure to line them up when you put the casing back on. Another picture might help show that portion better
Regarding the right side, I found that the 4 clips slide to the left more easily that pull out. However, the front right has a bar which drops into a slots preventing pulling to the left! So ... gently lift the front right (furthest from the screen), pressing just at the front end of the optical slot to bend the faceplate at that point, then gently rock the face plate back and forwards while pulling left, so the that the four clips slide out of their retainers - presto! Remember to bend the faceplate to reassemble.
Step 11 really needs a better description. I started undoing the tape that holds the case above the optical drive slot to the metal before I read the comments and realized what I needed to do. Once you start to pull the top case up from the front, you'll reveal enough of an opening to get a spudger all the way under the metal portion of the top case next to the first snap. Once you have the spudger in, it's easy to release the snap without worrying about bending the whole topcase. Just repeat for the remaining three snaps. Once I got this technique down, it really didn't feel like I was doing anything that might damage the case.
By the way... don't worry if you undo the tape. It will go right back together with a little pressure. I didn't even need to go out and buy some adhesive to fix it.
I recently replaced the inverter cable. Now the power button doesn't work anymore.. but the keyboard and trackpad still do work. I already replaced the uppercase cable with no success. Does somebody have an answer to this problem?
There are 4 plastic locks on the right side which prevent the keyboard from lifting up. They slide out easily if the keyboard is moved to the left. To move the keyboard to the left you first have to release the left and front side. On the left and front side there are metal strips that are snapped in. They should release when you push the metal strips with a spudger towards the center of the computer. We had much trouble releasing one metal snap as we didn't know how to do it.
When you reinstall the keyboard put the plastic bars in the frame at the right side of the case, then snap in the keyboard on the left and front side and finally snap the keyboard into the plastic snaps to the right. Be careful so they don't fall out before you snap them in.
A metal piece fell out of the computer. It was a shielding of a connector on the left side.
A tiny plastic disc (4 mm diameter) with a hole in the middle also fell out. I had little hope to find out where it belonged and it didn't seem too important, so I left it, but kept it in a minigrip bag. Does anyone know what it's for?
Be really careful! I broke the connector easily and had to replace it.
It is out of stock on iFixit. I found it there: https://www.amazon.it/gp/product/B01MSH3...
-
-
-
Tout en tenant le boîtier supérieur d'une main (par le bas ou le haut), débranchez le connecteur de la nappe orange du pavé tactile et du clavier à l'aide d'une spatule.
It lifts straight up.
Citation de cameronmoll :
It lifts straight up.
I'd suggest being careful and perhaps having help with step 12, as I have broken the connector piece at the end of the cable by pulling too hard/fast and having the connector stuck in the board and the ribbon dangling without purpose.
Does anybody know of a good way to repair such a ribbon, or am I stuck buying new upper case units?
An extra picture or warning should be added about this... The same as you, I broke the connector. I didn't even use any force, but the pins got off the cable and now I'm forced into buying a new one. Trying to buy one from ebay as we speak. It might have been due to metal fatigue after 7 years, but it got broken none the less.
The computer serial number and network IDs are on the underside of the top case (visible in the battery compartment.) In order to prevent misidentification in the future (for instance, while on the phone with Apple tech support), I print the info from the old top case on a sticker and affix it over the label on the new top case.
A lot of top case replacements are due to the front edge being broken by the bumpers on the lid of the MacBook. I stick a couple of felt dots on either side of these bumpers to absorb some of the shock when the lid is slapped shut, to prevent damage to the new top case.
I think that one extra picture should be added here. That is to say, the purpose of using the spudger (which I do suggest you should buy so that you don't risk ruining the orange cable), is to unplug a little connection. Basically your are "popping" it open. Had I known this it would have made th4e process feel a little less risky. In any case the mission was successful... Job completed in 45 minutes and my computer has wireless internet once again!!
The image is misleading. Don't pry it up from the front, but from the sides. Personally I used a small flathead screwdriver, but sadly - only after ripping apart the soldering on the wire/plug.
Also, be careful to lift the white plastic plug, not the circuitboard/wire attached to it
After reading everyone's comments, I used the narrow spudger and slid it around from the front to the right then the front to the left and it lifted up easily..
It is not clear from the repair description nor the comments if the brown cable connected keyboard is compatible with the silver cable connected keyboard. Can someone indicate clearly please what this difference means to us wishing to replace the keyboard? Does it mean there are two distinctly different keyboards, one with a brown cable and one with a silver cable?
This is the most critical stage of removing the cable either silver or orange. It is difficult to hold the keyboard away far enough to be able to reach in and with a spludger clearly see where to pry open. iFixit of course sell these cables but if the image of the cable being prized open then fewer people would rip the cable and have to order more parts from iFixit…..we have to keep our eyes on our own ranks, in case we are tempted to again take advantage of ‘inside knowledge’. Yes, I make a good photo but here there is no place to upload to help you all. I can imagine that that cable is the source of most keyboard problems, so take it out only when very well illuminated and everything is steady so you can get the spudger into the exact place to do its job. My next repair job is a MacBook Retina 12” early 2015 - the screen blisters when left in the sunshine leaving a large black hole which expands and contracts daily. 2019 02 16
If you have a better photo, click the ‘Edit’ button at the top right and add it to the step. iFixit guides are collaborative wikis.
Once you have the keyboard removed, check your inverter cable plug. Mine wasn’t seated properly (hardly at all), so I reconnected the display cable and keyboard, then I turned on the power. My display was back up! I didn’t actually need the new cable after all.
Before you move on to the next steps, just check that inverter cable plug. It’s in Step 31. It may save you some time and a big headache.
-
-
-
Saisissez la languette en plastique blanc attachée au disque dur et tirez-la vers la gauche pour ôter le disque dur de l'ordinateur.
I've done several of these without removing the optical drive, etc, and just gone directly to replacing the hinges from here.
Citation de bradleydad :
I've done several of these without removing the optical drive, etc, and just gone directly to replacing the hinges from here.
Agreed! There is no need to remove the optical drive to get the LCD out at this point.You do need to remove the hinge screws and retainers, but just long enough to pop off the plastic cover to expose the inverter. You do need to support the lid assemble a bit while doing this (an extra hand is nice if available) but it only take a second to remove the inverter cover. Then I'd put the hinges partially back together with two screws and proceed with removing the LCD panel from the frame at this point. Saves quite a bit of time and headache not having to remove the optical drive and everything in the remaining steps.
Important thing about this repair is to take your time, moveslowly and be very organized with all your screws and parts. I use a multi-compartment organizer for all my laptop repairs and label each compartment with tape (ie. LCD frame, hinges, Bottom Panel, Inverter cover...) Makes re-assembly easy and no leftover screws in the end!!
I have no need to remove the HDD. They probably suggest it so theres no data loss or something but that wont happen if the macbook has been powered off and the power supply is remove for about 2 minute. Like bradley i usually go for the hinges but usually i remove the disk drive or cd or cd rom drive. Then i unscrew all the pieces around the hinges supporting the LCD then go for the hinges. Basically thats how i replace the lcd
-
-
-
Dévissez les deux vis cruciformes du bord avant du lecteur optique.
had trouble getting the screw on the right back in, make sure the drive is sufficiently pushed back into the case when inserting the screw
The left screw is 3.3 mm, the right 3.8 mm
-
-
-
Décollez la bande adhésive alu entre le ventilateur et le lecteur optique.
-
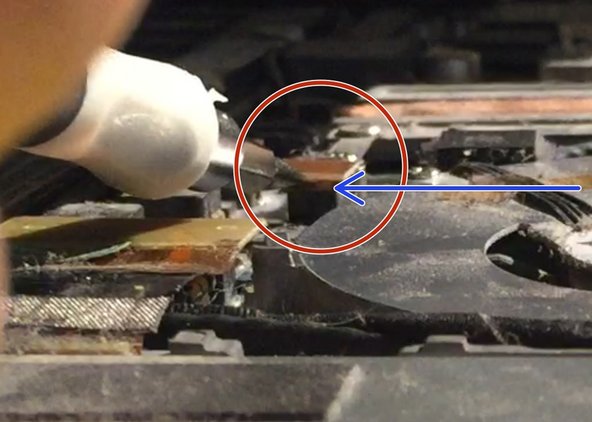
Dévissez la vis cruciforme de 8,5 mm fixant le câble de données de l'écran au châssis métallique.
The screw is 8.5 mm
-
-
-
Dévissez la vis cruciforme de 2,8 mm fixant le lecteur optique.
-
Après avoir dévissé la vis, poussez la languette métallique vers l'arrière, en direction du ventilateur, pour détacher l'avant du lecteur optique.
The screw is 2.7 mm
While trying to remove the screw with no luck I've though of turning the laptop upside down and use the power of gravity, a small black plastic item fell down and couldn't figure out where is belong (see link)
http://img18.imageshack.us/img18/566/353...
Any one have an idea where this belong to ?
Thanks
Citation de ahammadi :
While trying to remove the screw with no luck I've though of turning the laptop upside down and use the power of gravity, a small black plastic item fell down and couldn't figure out where is belong (see link) http://img18.imageshack.us/img18/566/353... Any one have an idea where this belong to ? Thanks
IT GOES ON THE RIGHT SIDE TO COVER THE DISPLAY CABLE.BY THE RIGHT HINGE.
Remember that the metal piece on the dvd-drive where the screw should go threw is moveable! Just move it into position with your screw-driver or the pointed end of your spudger.
Replacing the optical drive screw was the hardest step of the entire procedure for me. The eyelet for the screw can't be moved into position until the drive is in place, buried under cables, and in friction against the case. Sliding it into position makes a protrusion that has to be lined up with a little notch in the case at the mouth of the optical drive.
If anyone has tips on making this go smoothly, please add; it took me probably ten minutes of gentle wiggling, removing and replacing and trying again.
-
-
-
Enlevez la carte de l'antenne Bluetooth, placée à droite du lecteur optique.
pay attention of litting up the bluetooth antenna, there is one very thin cable ..
-
-
-
Soulevez le bord avant du lecteur optique et faites-le glisser vers le haut et hors de l'ordinateur.
When you put the drive back in, there is a sliding bar on the far edge of it (per perspective in photo) that goes into a notch in the computer case. The opposite end of the bar has the hole mount for a screw. So, if you're having trouble lining up that screw hole with the hole in the case, make sure the bar is sliding into place. (It's the drive screw that's covered in cables)
I couldn't get the optical drive screw hole under the cables (IE: eyelet which is part of the bar) to line up for about 15 minutes... Then I read your comment.
Be careful, if the eyelet doesn't line up, don't try to force the drive into position toward the opening. It's probably because the eyelet, which is not fixed, needs to be slid into position. It slides with the bar on the right side of the drive. Trying to push it in, I bent the bar slightly at the front so it would never line up properly. I gently straightened the bar and because of these instructions, understood how it was supposed to line up and fit - and it slipped right in. As long as you get the bar lined up right, you can gently push the eyelet forward and the bar will go into the slot and everything will line up properly. That is, you gently push the eyelet forward until it lines up with the screw hole.
My Mail -
Also mind the plastic grey clips that are on the "chassis". These clips are referenced in step 11 (the 1st bullet point). My clips fell out. I had no idea what they were at first or where they belonged. When sliding out the optical drive, the clips can fall out into the space that was previously occupied by the optical drive. They are easy to slide back into the "frame" of the computer. There are four of these plastic clips.
Found two gray plastic pieces loose when I got the Drive out, any idea what they are, where they go and if they are important? Great site, very helpful, love you guys.
-


Pour remonter votre ordinateur, suivez les instructions dans le sens inverse.
Pour remonter votre ordinateur, suivez les instructions dans le sens inverse.
Annulation : je n'ai pas terminé ce tutoriel.
2 autres ont terminé cette réparation.
Merci à ces traducteurs :
93%


Ces traducteurs nous aident réparer le monde ! Vous voulez contribuer ?
Commencez à traduire ›

This is a difficult project. It is imperative that you read the entire guide before you proceed. Have a system in place to keep track of the screws so you know what goes where. Budget several hours for this.
jonathan55 - Réponse
I found this to be the easiest upgrade I have ever done. New HDD and memory in ten minutes, start to finish. The hardest part was getting the #8 Torx screwdriver. Booted from the OSX disk, formatted the drive, (use the GUID scheme) and we're screaming along.
This is a great guide.
steve52 - Réponse
Brilliant guide from you guys. I tackled a cd drive replacement on my Dad's MacBook a little while ago, but my skills were really tested when I accidentally stood on my laptop - new LCD needed. A visit to Ebay (don't forget duties when importing!), and this LCD Display replacement guide are all I needed. Yes it took a while (2-3 hours), but as long as you remember you need to do everything backwards then it's straightforward. I wouldn't have known where to start without this guide so thanks for creating them.
Laurence
lglew - Réponse
The guide is fantastic and the Airport Extreme Card upgrade took me less than an hour to complete. It wasn't very difficult. Some pointers: read the entire guide before undertaking the project; keep the screws from each step separated in labeled containers; buy a spludger if you don't already have one; keep a tweezer handy for the tiny screws; and take your time separating the keyboard from the computer so as to not crack/break the plastic bezel.
bvancott - Réponse
Nonsense! Even a non-technical person could follow this guide and do the job in 15 minutes. Anyone who's done any work on any kind of computer will be able to do this in 5-10 minutes.
eflyguy - Réponse
i agree, me and my friend (both) 14, took this underway to clean out the inside of my computer for recreational purposes, piece of cake!
keeganmerom - Réponse
This nontechnical person took about two hours to get the optical drive out and stripped down enough to take it apart and look for fragments of a CD. and then reassemble it. I'm sure other people are faster than me, they usually are, but newbees should set aside the time just in case. Also, jonathan55 is right about those screws, keep track of them and the other in which they come out as there are several different lengths.
adamorth - Réponse
Umm, that's the ORDER in which they came out. Sheesh.
adamorth - Réponse
Great guide. Very easy to follow. I put in a replacement hard drive in less than 30 minutes.
prax5487 - Réponse
Extremely useful guide. Just replaced the topcase/trackpad/keyboard assembly in ~15 minutes. I've had a moderate amount of previous experience with computer repairs, but even so, anyone should be able to do this project successfully.
snharris - Réponse
The replacement takes about 10 minutes from start to finish. The longest part is the OS Backup/Restore...
BTW, you might want to know before you begin: if you have a similar size backup hard drive that you originally have in your computer, you should "Restore" the contents of the original hard drive onto it before starting this manual, using the Disk Utility. (Yes it's called Restore. You restore the original to the backup. lol.)
Your other alternative is to get an external enclosure for your SATA Laptop hard drive that has a Firewire port on it.
After the swap, you connect either the backup drive or the original drive in the external enclosure using Firewire, then boot while pressing the Option key. The backup drive will show up (possibly as the only boot option.) (In fact, now that I think about it, you might not even have to press the Option key, since the external drive should be the only boot option unless there is something in your DVD drive...)
Boot to the backup drive, then "Restore" its contents to the new internal hard drive using the Disk Utility. You should be set with your original OS, settings, etc.
Gyuri Ordody - Réponse
Overall I'd say this was easy if you've taken apart any computer-like device before. Total time was a little less than hour for me, and the most difficult part was getting all of the tiny screws back in; fan installation was a breeze.
paul46 - Réponse
There is a simpler way of installing the operating system than described in the notes. First do a time machine backup to a new external drive. This will force a total back-up and prevent problems of restoring everything as it was. Follow steps 1-8. Instead of quitting disk utility as described in step 9, go back into disk utility menu and on the very last line you will see the option to restore the operating system and all its files via the time machine option. It was a breeze, and I did not have to deal with steps 10-28
newsletter68 - Réponse
I am so grateful for this website! This is the first time I have opened a computer and the instillation is now done, 45 minutes later.
The key, as many others have written is the organization of the screws. It was very helpful for me to print out the individual pictures of the steps to follow. I then laid the screws, as I took them out, on the printed pictures that I placed on a table.
The key is a little mindfulness...relax... and it is fun! Enjoy!
juztino - Réponse
This is a terrific guide. Thank you very much for providing it.
Some of the screws may be different sizes in different 'books. Keeping them separated, or measuring as you remove them, helps. Also, a few of the rubber spacers, etc are not the same in mine as in the photos, and some connectors also differ. I found it helpful to take notes at each Step when they differed from the picture. A guitar pick helps when trying to get the top case free.
RichR - Réponse
Not quite sure what this guy is smoking, but he didn't share with the class. The hard drive replacement takes less than 5 minutes and is absolutely within the ability of anyone over the age of 7.
paul9 - Réponse
I'm not a super techy guy, but this as much easier than I expected it to be. Just make sure you've got the Torx and mini-screw drivers handy.
BillB - Réponse
The instructions were excellent and the job of removing & replacing the hard-drive went like clockwork. A novice could handle this task easily with modest mechanical skills. Someone previously suggested putting aside several hours to do this..... I disagree as I replaced the HD & both RAM chips in approx. 10 minutes & I was pacing myself. As far as hardware is concerned, I found a total of 7 screws to deal with! You don't have to be too anal to keep track of 7 screws especially when 3 of them are captive in the memory cover. Unless you are mechanically inept, go ahead and do this simple job!
RAIB - Réponse
Several HOURS?!? It took me 10 minutes.
Scott - Réponse
I just finished this installation, and it went very smoothly. Your instructions were excellent, as were your step-by-step pictures. I couldn't be happier....I saved alot of money because of IFixit, and really appreciate it!
Amy - Réponse
Muchas Grazias, i did the steps to replug the isight cable. And its working again. Maybe doing all the steps was a bit overdressed for my problem. My only tool was a knife. Now only two parts aren´t reassemled: a little screw and a magnet. Thanks a lot again, the camera is working again!
seb - Réponse
This was an easy installation. I am NOT a tech type, just a mom who wants a better hard drive.
I installed the new hard drive into the MacBook and moved the old hard drive into the new housing in less time than it took my husband to put the baby to bed. Yeah, his bedtime routine with her takes longer than mine, but it's still less than half an hour.
I just cleared off part of the dining room table, put down a towel to keep all the parts from rolling around and followed the step-by-step directions provided here. Sooo easy. Almost too easy.
I look forward to my next MacBook repair, and I will absolutely come back to ifixit.com to get the parts and learn how to do it. I'll be here for support on my iPhone and iPods, too.
momside - Réponse
Just did an LCD replacement on a white old model MacBook. Followed this guide to a the letter. IT WORKS! I'm commenting on my fixed mac now. Excellent guide. Things I would suggest are to read through everything first and keep a note of screws labeling etc. you'll be grateful on the return trip. Also watch the routing of the cables when working on the lcd housing and right hand side of the lower laptop. Not only have I fixed my problem. I've realized that customizing macs and doing your own repairs is relatively straight forward if you follow instructions.
This website really empowers the apple product user. Shop around for parts, ebay is a good place to start. I got my screen for £65 (UK).
Final word take your time and if you are replacing LCD screens expect it to take up to 6 hours.
Also if you are replacing Samsung LCD screen it has a test port (on left back) which most replacements do not. Don't worry about it, it is nothing to do with a Mac.
thanks again ifixit.com!
alex Bayly - Réponse
Best way I've found to keep track of the screws is to use an ice cube tray. Just make sure you don't knock it over by mistake ;P
maccentric - Réponse
thursday: made the order on ifixit.com for ldc, spudger, size 0 screwdriver.
monday: items delivered to my place in NY.
monday night: new LCD installed.
thank you ifixit. parts ordered were perfect LCD crisper than the original one. spudger came in handy. this manual was spot on.
thanks again.
-j
NY, NY.
jose - Réponse
The instructions were more than helpful. Very well written. I just need to be better about following them. It was a easy process, it took me about 20 minutes all together. The only thing I ran across it was putting the keyboard back in place. Make sure it's all line up before you start putting screws back in place.
pdeoliveira - Réponse
Thanks a lot for this guide. It would have been much more difficult without knowing what to do.
When I was done, the LCD backlight flickered somewhat occasionally. The owner said that had not happened before. I cleaned the LCD plug by blowing with a straw into it but the flickering still happened. Dunno if this was related to my work.
darsie - Réponse
Doe's anybody know if its possible to install a second generation logic board with the core 2 duo in the first generation MacBook?
off course I'm looking to upgrade my first gen MacBook 1,1 using the newer generation MacBook logic board, so may be one of you know whether this process is possible...
Thank you :-)
Dudi - Réponse
One note on the fan replacement, or really any MacBook repairs. If you fire your MacBook up and nothing happens but the sleep light is blinking then make sure your memory is seated correctly. I freaked out after installing my new fan but it turns out that all I needed to do was reseat the memory.
jeffbacher - Réponse
THANK YOU for that great guideline! I did it step by step with my iPhone next to the workbench and it went well. One hour to open, one hour to close for me as a complete beginner.
annokluss - Réponse
Jonathon55 was referring to the whole pram replacement. I tore apart an ibook years ago and it had less steps then this and I am quite technically adept. Going to pay for apple store to replace, not going to waste half a day doing.
Bill Conners - Réponse
Thank you for this guide. I appreciate the time you took to photograph this and document it.
Don't take notice of the I did it in 10 minutes brigade, replacing the HDd might take 10 minutes but the other jobs will take longer.
Also those that are dissing the author re screws etc. The screws are different lengths. Take the commentators hint and use an ice cube tray, label it 1, 2, 3, .... and put the screws in there. THe difference if 1-2 mm is enough to have a slightly long screw go through a component and kill it.
Again thanks.
Flugan - Réponse
The second time i replace the heat sink glue with new stuff.
Today, my over 10 year old mac is still running like a young rabbit. Maybe this glue replacement was helpful to keep it young.
Keep on running for some more years my friend and big thanx to IFIXIT for all these well-made tutorials!
Fabien - Réponse
Most of these comments DO NOT refer to the PRAM Battery Replacement — a process which does take two full hours and requires skill and patience to dismantle the MacBook to get to the point of flipping the logicboard to access (and swap out) the bizarre, old-fashioned battery.
The real question has to be: What is this battery? Specifically, does anyone have a part number/voltage specification for it?
If you know, please post the answer here.
Thank you so much!
Steve Arkwright - Réponse