Il est possible que cette traduction ne reflète pas les dernières mises à jour du tutoriel source. Aidez à mettre à jour la traduction ou bien consultez le tutoriel source.
Introduction
Consultez ce tutoriel pour retirer ou remplacer l'ensemble écran LCD et vitre tactile d'un Motorola Moto X Pure Edition.
Pour votre sécurité, déchargez la batterie en dessous de 25 % avant de démonter votre téléphone. Cela réduira les risques de déclencher un incendie dangereux si jamais vous abîmez accidentellement la batterie pendant la réparation.
Avant de vous lancer, allez à la dernière étape et assurez-vous que votre pièce de remplacement corresponde à la pièce montrée. Ce tutoriel documente le remplacement d'un écran déjà monté dans un nouveau châssis. Si vous avez juste un écran, vous devrez séparer soigneusement le châssis de l'ancien écran de votre téléphone puis coller le nouvel écran à l'intérieur. Ces étapes ne sont pas incluses dans ce tutoriel.
Ce dont vous avez besoin
-
-
Insérez un outil éjecteur ou embout de carte SIM, ou bien un trombone déplié dans le petit trou du tiroir de carte SIM.
-
Appuyez pour éjecter le tiroir.
-
-
-
Préparez un iOpener et faites chauffer le bord droit de la coque arrière du téléphone pendant environ cinq minutes. Cela contribuera à ramollir l'adhésif qui fixe la coque arrière.
-
-
-
Prenez une pincette coudée, serrez les pointes et insérez-les dans le petit trou du bord de la coque arrière, à côté de la fente de la carte SIM.
-
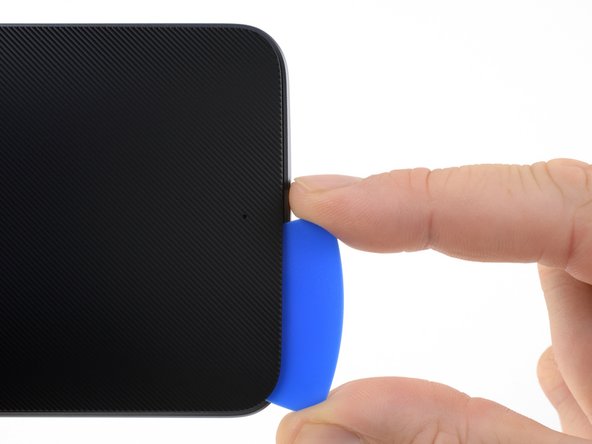
Soulevez légèrement la coque vers le haut avec la pincette et faites glisser un médiator dans l'espace créé entre la coque et le châssis.
Insert only one of the tweezers’ point into the hole. Once the rubber backing is lifted high enough, slip a corner of the opening pick under the rubber backing. Leave the first pick near the corner while you use a second pick as directed in Step 6.
-
-
-
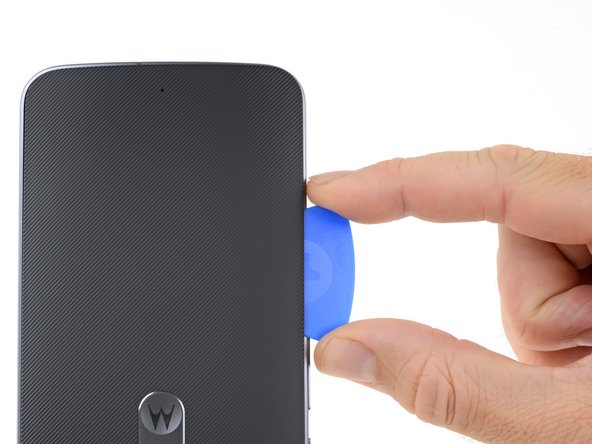
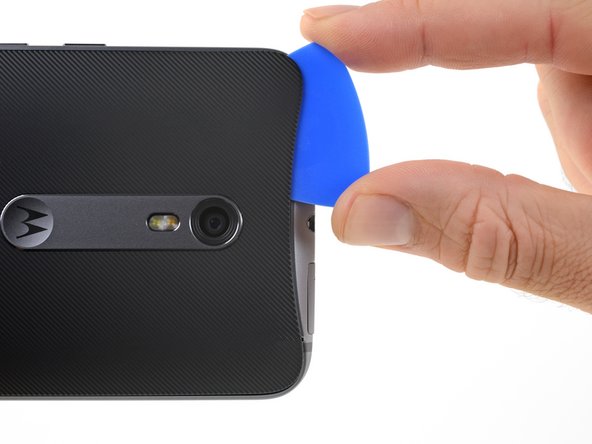
Parcourez le bord du téléphone avec le médiator pour trancher l'adhésif de la coque arrière.
-
Essayez d'insérer le médiator aussi profondément que possible sous la coque. Il faut faire céder une épaisse couche d'adhésif au milieu de la coque.
I did not have a pick, used a few old credit cards, leaving them in place to keep the phone back separated.
Used a hair dryer to heat up a little, one section at a time, was enough to remove. Pulled apart slowly.
Left adhesive on the back and on the phone, where possible, using a tiny screw driver to separate. Reused whatever adhesive remained to reattach.
-
-
-
Préparez un iOpener et faites chauffer le bord gauche de la coque arrière pendant environ cinq minutes. Cela aidera à faire fondre l'adhésif qui colle le reste de la coque arrière.
-
-
-
-
Écartez délicatement la coque du téléphone.
-
Prenez d'abord une pincette et une spatule (spudger) pour décoller et gratter les résidus d'adhésif sur la coque arrière et le châssis du téléphone.
-
Puis, nettoyez les zones d'adhésion avec de l'alcool isopropylique à haute concentration (au moins 90 %) et un chiffon non pelucheux. Frottez dans une seule direction, sans mouvements de va-et-vient. Cela prépare la surface pour la nouvelle couche d'adhésif.
-
L'adhésif de remplacement est livré sous forme d'une carte prédécoupée dont les contours correspondent à ceux de la coque arrière. Si vous n'en avez pas, vous pouvez utiliser du ruban adhésif double-face à forte adhérence, p.e. du Tesa 61395. Retirez la partie métallique avant de poser l'adhésif prédécoupé sur la coque arrière et remettez-la ensuite.
-
Après avoir posé la coque arrière, appuyez fortement et uniformément sur votre téléphone pendant plusieurs minutes pour que l'adhésif adhère bien.
Had the pre-cut adhesive sheet for reinstalling the Moto X Pure’s back cover. It seemed like the most “original” option at the time. I tried and tried to get it aligned inside the back cover, but found it virtually impossible to do. You pretty much have to get it perfectly aligned and then stick it down all at once. If it makes contact with the cover before it’s perfectly aligned, it’s all over. You’ll never get it back off without destroying it.
After failing with the pre-cut sheet, I resorted to the die-cut strips and corner pieces. This worked just fine.
-
-
-
Faites levier sur le connecteur de la batterie avec l'extrémité plate de votre spatule pour le débrancher.
Reconnecting the battery was difficult, did not align exactly. Note there are 2 slots that line up and 4 pins. Used a 10x magnifying lens with LED light, purchased to do this job. This step (reassembly) is where the magnifier came in handy. Had to move battery around a bit to get it to line up. Ended up removing adhesive tape from battery, so I could get in place to attach the connector. Battery held in place with screws and phone case, so far so good.
this is the difficult part. I find it is easier to remove this connector as the midframe and phone screen are separating (see step 19). Be also careful in prying this mine got broken luckily it is connected to the old battery which I replaced anyway
Broke the battery plug right off the motherboard! Trying to do a 2nd battery replacement. Only push up gently on the edge of the tab and straight up. Shopping for a new phone.
-
-
-
Dévissez les vingt vis de 2,4 mm avec un tournevis Torx T3.
Need to add a step for removing the bar holding the buttons in place. Step 5 from the tear down. Still can’t take the mid frame off though.
I stripped the threads on one of the 20 screws, had to drill it out. (Managed to do this without cracking the screen, completed battery replacement, all ok.)
Careful removing the screws, be sure of tight grip. I saw T4 torx suggested on another site for Moto X Pure, this might grip better? Try both.
I did not have to remove the screw holding the volume buttons bar in place. These stay attached, not needed for replacing the battery. Just the 20 screws shown.
DO NOT REMOVE THE SILVER SCREW HOLDING IN THE VOLUME AND ON-OFF BUTTON. If these buttons fall out there are 4 very small springs that will pop out and are very hard to reinsert. If they do pop out do not use tweezers to reinsert but use a magnetic screw driver bit to reinsert.
This is extremely easy to overlook. This screw is a different color (silver versus black) but when you’re in the swing of removing all the screws it’s tempting to just remove ALL the screws. I goofed, had the buttons fall out, could only find 3 of the springs. Put two back in the volume rocker and only one in the power button since it’s smaller, seems like it wouldn’t need two as much. Everything still works, maybe just slightly less tactile than before. Even without the the springs, there’s still some mechanical return to the buttons, so if you do lose them don’t despair.
This is not working, got two out. Most just strip.
Update. The driver provided is not the right size. I had some tools laying around and found one that fit. This allowed me to get all the screws out except the six I stripped using the driver provided by ifiixit. Turns out they come out pretty easy if you have the right size bit. Would have been an easy fix had I not bought the tools…. go figure.
What is the right size bit?
The T3 Torx Driver was bundled in the bag with the Alcohol Prep Pad, not with the rest of the drivers! So look before you there before you call support like I did.
T4 works better, T3 also works. Try both and proceed carefully, get a good grip before turning.
-
-
-
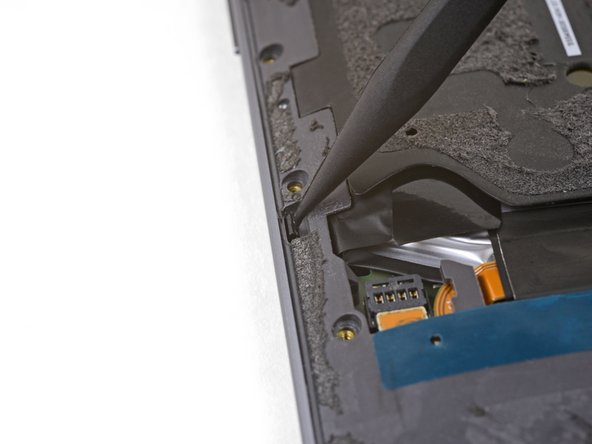
Détachez le petit clip qui fixe le côté gauche du châssis central en le poussant avec la pointe de la spatule vers le bord du téléphone.
On reassembly, these did not really click back in place. Held tight when reattaching the 20 (19 in my case) screws).
I had to push rather hard to release both clips. The tip of the spudger bent under the pressure I had to apply. But the the clips did finally release without damage.
-
-
-
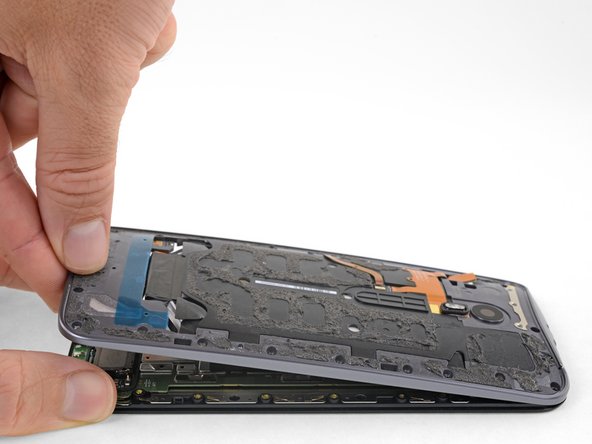
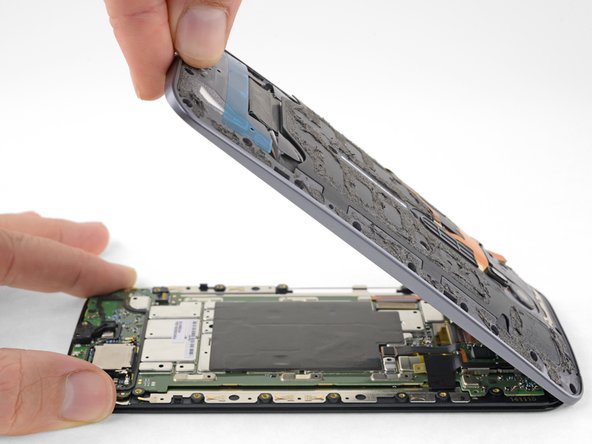
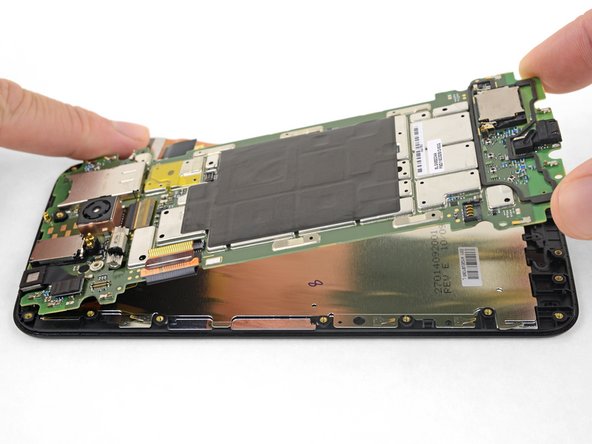
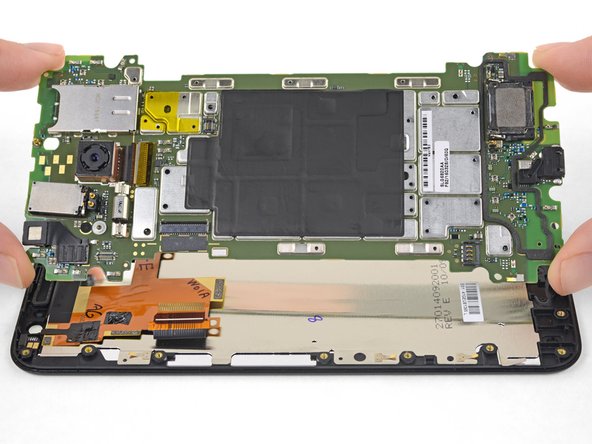
Saisissez l'écran par les bords et séparez délicatement le châssis central de l'écran.
-
Ôtez le châssis central de l'écran.
My mid-frame and display were separated on the long sides but seemed a little bit stuck on the top and bottom. I used the flat end of the spudger to carefully pry the two assemblies apart at either end.
In my case, stuck in the middle. Pulled apart very slowly, giving the adhesive a chance to separate, and not tearing whatever it was in there. Kept an eye on the inside middle, and very SLOW let it separate. Or was that the battery? In either case, go slow on all steps.
Yeah, everything went according to the guide until this step. I lifted the midframe away from the screen assembly as shown and something in the center didn’t separate at all. I spent a good half hour terrified that I had missed a step or a screw or that there was something different about my phone. In the end I read the comments and very slowly and patiently lifted the midframe until something uncoupled and the two parts cleanly separated. I was certain that permanent damage must have been done, but upon reassembling everything seems to be working perfectly.
Note to self - check that ALL (20) screws have been removed… especially if midframe is stubborn lifting up - i (almost) forgot about the one near the display cable (and it’s threaded into the motherboard instead of the frame) :)
In my unit, the midframe released from the display nicely just as described in the instructions.
-
-
-
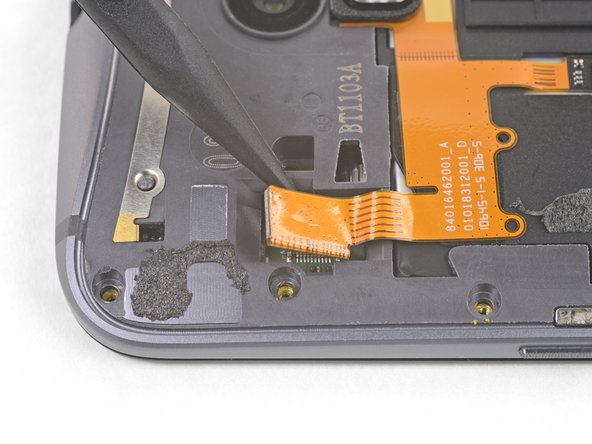
Décollez la bande adhésive qui recouvre le connecteur de la nappe de l'écran.
-
-
-
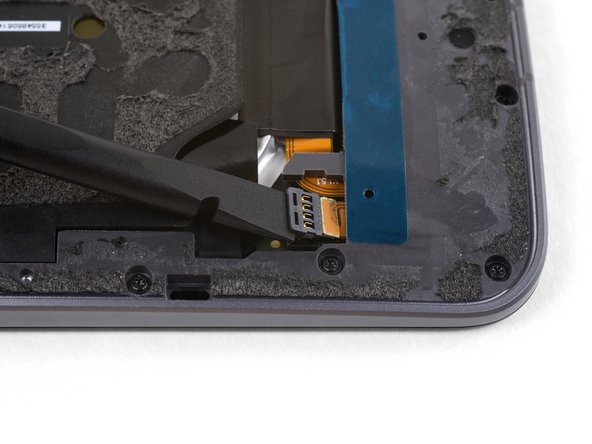
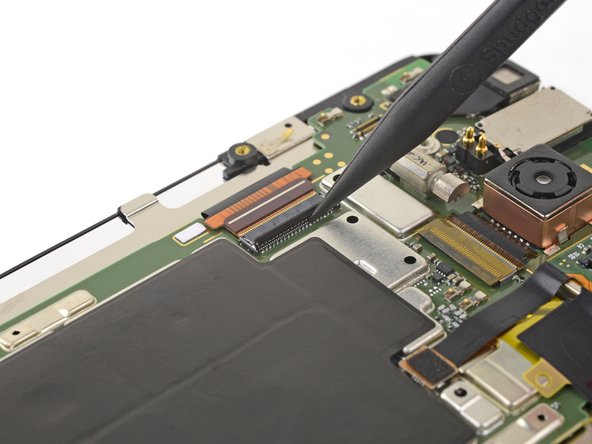
Prenez la pointe d'une spatule pour ouvrir le clapet de verrouillage du connecteur ZIF de la nappe de l'écran.
-
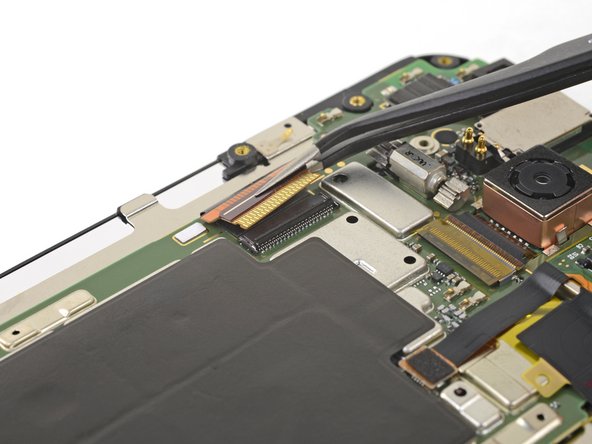
Tirez la nappe de l'écran tout droit hors de sa prise.
This step means straight in a flat or horizontal sense, as in move the ribbon cable toward the side of the phone, The image makes it appear that it was lifted up away from the back of the phone.
Thanks Chris!
I’ve adjusted the wording slightly to clarify the action.
-
-
-
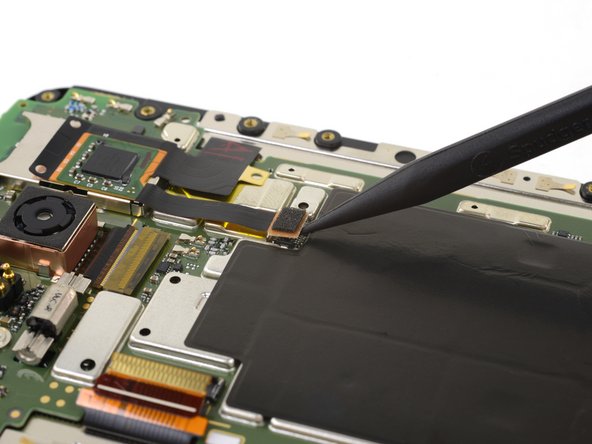
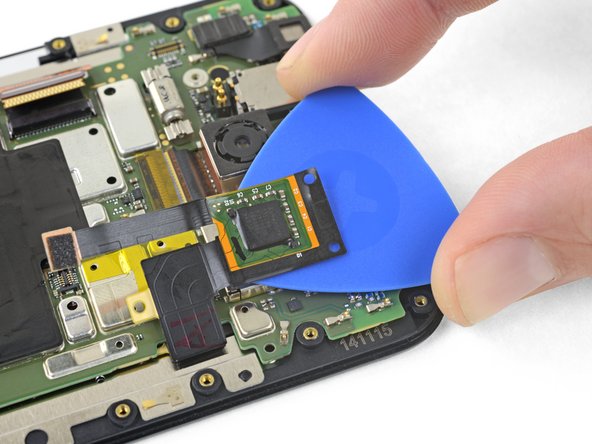
Préparez un iOpener et posez-le sur le petit circuit imprimé collé sur le compartiment de la carte SIM.
-
-
-
Il ne reste plus que l'ensemble écran LCD et vitre tactile (avec châssis).
-
Vérifiez soigneusement que votre pièce de remplacement correspond et que vous avez retiré les pièces nécessaires de l'ancien châssis pour les monter sur le nouveau.
-
Il est possible que votre écran neuf ne comprenne pas les petites protections métalliques des grilles des haut-parleurs avant. Si c'est le cas, consultez l'étape suivante. Si elles sont comprises, vous pouvez vous arrêter ici.
note to self - upon reassembly the battery low display flashed on - but the power button didn’t work … so after a hour, took the cover off and re-seated the ribbon wire that comes from the power button - then the power button worked normally (although still trying to get the speaker guards to snap in but those are probably cosmetic anyway)
also, mine was off for more than a year and had to reset phone by running recovery restart boot-loader … (reset) described in (volume down and power) https://support.motorola.com/us/en/produ...
-
-
-
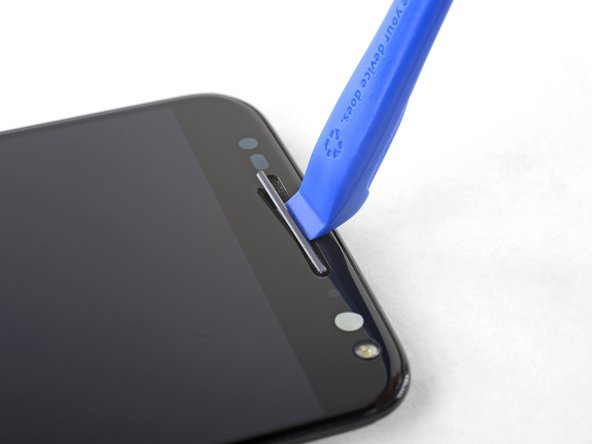
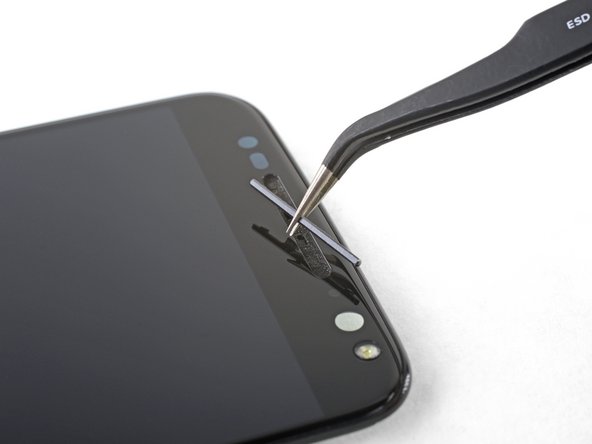
Répétez l'étape précédente pour retirer la protection du haut-parleur inférieur.
-
Pour installer les protections, alignez les petits dispositifs d'attache de la protection avec les trous dans la grille. Appuyez ensuite sur la protection à la verticale et vers le bas pour qu'elle s'encastre dans la grille.
I’ve cracked two screens attempting to reinstall the guards. Be REALLY careful doing this.
Any tips? I can’t get mine to go back in. They came out so easily!
Use the tweezers to hold the guard and also as a spacer to keep it centered up and down. Then press in one of the tabs and once its in move the tweezers out of the way and press in the other tab.
-


Comparez votre pièce de remplacement à la pièce d'origine. Il vous faudra peut-être transférer d'éventuels composants restants ou retirer des films adhésifs de la nouvelle pièce avant de commencer le remontage.
Pour remonter votre appareil, suivez les étapes ci-dessus en sens inverse.
Apportez vos déchets électroniques à un recycleur certifié R2 ou e-Stewards.
La réparation ne s’est pas déroulée comme prévu ? Consultez notre communauté de réponses pour obtenir de l’aide au diagnostic.
Annulation : je n'ai pas terminé ce tutoriel.
18 autres ont terminé cette réparation.
Merci à ces traducteurs :
85%

Claire Miesch nous aide à réparer le monde ! Vous voulez contribuer ?
Commencez à traduire ›

3 commentaires
what i needed to know how to replace speaker covers
I have Motorola moto x pure edition that the LCD screen went bad/ blacked out. I found a replacement screen. Now the left half of the screen works perfectly but the right half is scrambled. What causes this? Is there a bad component that I can replace to fix this? Has anyone else experienced this? Is it a bad motherboard?
I have 2 of these phones, but really needed to replace the screen on the latest one to get data off it. I thought I’d get the walnut back off the first phone, but I found it wasn’t as easy as the rubber backing, perhaps heat transfer issues, and super hard to get it started, I have a small crack at that point.