Introduction
Pour une réparation plus facile, choisissez notre kit de réparation et consultez ce tutoriel plus court pour remplacer l'écran complet de votre iPhone.
Les réparateurs avec plus d'expérience préfèreront remplacer juste l'ensemble écran LCD et vitre tactile de l'iPhone 8 Plus (soit le “panneau frontal“ à nu). Ceci nécessite de transférer plusieurs composants de votre écran d'origine sur la pièce de neuve avant de la monter, y compris la caméra frontale, le haut-parleur interne, la plaque de protection de l'écran LCD et l'ensemble bouton home.
Quelle que soit la réparation envisagée, il est important de transférer soigneusement le capteur home/Touch ID d'origine sur le nouvel écran pour en garder la fonctionnalité. Le bouton home statique est couplé à la carte mère en usine par Apple. Le remplacer le rendrait donc inutilisable.
Remarque : Si la fonction de mise à jour automatique de la luminosité de votre iPhone ne fonctionne pas correctement après la réparation de votre écran, assurez-vous que votre iPhone est mis à jour avec iOS 12. La fonction True Tone est désactivée après le remplacement d'un écran, même si vous utilisez un écran Apple d'origine.
Ce dont vous avez besoin
-
-
Éteignez votre iPhone avant de commencer le démontage.
-
Dévissez les deux vis Pentalobe de 3,5 mm sur le bord inférieur de l'iPhone.
-
-
-
Si la vitre de votre écran est fissurée, limitez la casse et évitez de vous blesser au cours de la réparation en recouvrant la vitre de ruban adhésif.
-
Posez des bandes adhésives transparentes se chevauchant sur la vitre de l'iPhone jusqu'à ce que toute la surface soit couverte.
-
Si, au cours des étapes suivantes, la vitre brisée empêche la ventouse de coller, essayez de former une poignée avec un morceau de ruban adhésif solide (comme du ruban adhésif en toile) pour soulever l'écran.
Tape doesn’t hold. suction cup doesn’t work. Tape folded over doesn’t work as a handle. I’ve used 3m’ s Gorilla duct tape. The glass is so shattered I cant get a point started to remove the glass. Phone has been in an otter box for years. dropped it and shattered glass while replacing case. Now what?
When all else fails, you can superglue your suction cup (or tape) to the display, wait for it to cure, and pull.
I had issues getting the suction cup to stick on my cracked screen, so I tried using scotch tape (only tape I had around), but it didn’t work. This best thing I did was to forcefully pry the screen off (I wasn’t worried about damages because it’s already cracked) with the spudger. I think its best to find something stickier (like Duct Tape) and used that to lift up the screen.
Definitely surprised how sticky the adhesive was.
It’s amazing how a heat gun or hair dryer makes life easier to soften up the adhesive. Then use a thin iSesame opening tool to get in under the screen (start @ 90 degrees/vertical either side of the home button & slowly go horizontal) the need to use suction cups. Run the opening tool along the front and down both sides to cut the adhesive before trying to lift the screen.
Cheers Wayne
I didn’t have a hair dryer so I (gingerly) used an iron over some wet coffee filters (I mean , it is waterproof) . Then, quickly dried i off with paper towels, used gorilla tape and my fixit metal splunger . worked like a charm .
What about baby cracks? skip to step 3 or not…
As others have mentioned, suction cup and tape doesn’t work. I used the blade of a box cutter (watch fingers) and inserted just below and right of home button. Then moved spudger along the crack to tear adhesive/seal. Easy peasy.
-
-
-
Recouvrez l'écran de bandes de ruban adhésif, qui se chevauchent, jusqu'à ce que toute la surface soit couverte.
-
Si la ventouse n'adhère pas au cours des étapes suivantes, pliez un morceau de ruban adhésif épais (du ruban adhésif toilé p.e.) pour former une poignée et soulevez l'écran de cette façon.
-
-
-
Les trois étapes suivantes sont consacrées à la procédure avec l'Anti-Clamp, un outil facilitant les procédures d'ouverture. Si vous n'avez pas d'Anti-Clamp, passez à la procédure alternative trois étapes plus loin.
-
Tirez la poignée bleue vers l'arrière pour débloquer les bras de l'Anti-Clamp.
-
Insérez le côté droit ou gauche de votre iPhone entre les bras.
-
Positionnez les ventouses près du bord inférieur de l'iPhone, juste au-dessus du bouton home, une sur le dessus, l'autre en dessous.
-
Appuyez sur les deux ventouses pour qu'elles adhèrent bien à l'endroit voulu.
-
-
-
Tirez la poignée bleue vers l'avant pour bloquer les bras.
-
Tournez la poignée dans le sens horaire, de 360 degrés ou jusqu'à ce que les ventouses commencent à s'étirer.
-
Vérifiez que les ventouses restent bien alignées entre elles. Si elles commencent à se décaler, détachez-les pour les réaligner.
-
-
-
Chauffez un iOpener et faites-le passer à travers les bras de l'Anti-Clamp.
-
Pliez l'iOpener de façon qu'il repose sur le bord inférieur de l'iPhone.
-
Attendez une minute que l'adhésif se ramollisse et qu'un espace s'ouvre.
-
Insérez un médiator sous l'écran lorsque l'Anti-Clamp a créé un espace suffisamment grand.
-
Sautez les trois étapes suivantes.
-
-
-
Utilisez un sèche-cheveux ou préparez un iOpener. Posez celui-ci sur la partie inférieure de l'iPhone pendant environ 90 secondes afin de ramollir la couche d'adhésif en dessous.
6/14/23 I did this repair but used a heat gun on low for 60 seconds. This allowed me to open the case as the instructions say, but in the end the Home button failed. I probably over heated it. I used this "go around" for a virtual Home button. I don't care about touch ID:
-
-
-
Posez une ventouse sur la partie inférieure de l'écran, juste au-dessus du bouton home.
Using just the single suction cup that is included in the battery replacement kit probably wouldn’t open the device. An iOpener and an iSlack should be the recommended method. However, you can get it open with just the single suction cup and iOpener, but does take a lot of time.
Get an iOpener and iSlack with the battery replacement kit.
I used a flat x-acto (#18) blade knife tool to gently pry back the screen enough to allow me to insert the pick near the bottom corner. I then worked the pick under the screen as mentioned in steps 5 & 6 below then. This worked really well for me.
I used the suction cup without heating the phone - the adhesive came away quite easily without applying any heat. Maybe due to age of phone (nearly 4 years old). Worth trying.
My screen was very shattered, and was quite hard to get suction, as my tape was very low quality. However, after pulling it up a little bit, I was able to insert a regular razor blade into the very small gap and used that as a lever.
Oh my goodness! Don't do that again. You can definitely damage something in the phone if you use a sharp metal razor blade..
cytur -
-
-
-
Tirez sur la ventouse de façon ferme et constante pour créer un petit interstice entre le panneau avant et la coque arrière.
-
Insérez un médiator ou tout autre outil de levier fin dans cet interstice sur quelques millimètres.
After multiple tries and using a very hot iOpener, it will not open.
In sheer frustration, I pulled out my trusty pocket knife and managed to lift the bottom of the screen slightly, but in the process, cracked the glass from the bottom to the home button. The case is open now.
-
-
-
Faites glisser votre médiator le long du côté gauche en commençant par le bord gauche puis en progressant vers les boutons de contrôle du volume et le bouton du silencieux, pour faire céder l'adhésif qui maintient l'écran.
-
Arrêtez-vous juste avant le coin supérieur gauche de l'écran.
Do not go over the top otherwise you can crack the screen. Sadly happened to me :(
The instruction should be:
“Stop near BUT BEFORE REACHING the top left corner of the display”
-
-
-
Réinsérez votre outil dans le coin inférieur droit de l'iPhone, faites-le glisser le long du coin, puis progressez vers le haut, le long du bord droit du téléphone, pour faire céder l'adhésif.
I had really good luck using a hairdryer on some of the more stubborn portions of adhesive.
-
-
-
Faites glisser un médiator sous l'écran, le long du bord supérieur du téléphone, pour faire céder le reste de l'adhésif.
Be very careful at this step. The glass at the top will break very easy when the display is lifted too much.
-
-
-
Ouvrez l'iPhone en faisant pivoter l'écran vers le haut en partant du côté gauche, comme s'il s'agissait de la couverture d'un livre.
-
Appuyez l'écran contre un objet afin qu'il reste bien calé pendant que vous travaillez sur les composants du téléphone.
Das “links” ist auf dem Foto rechts.
-
-
-
-
Dévissez les quatre vis cruciformes (JIS) fixant le cache de la nappe inférieure de l'écran à la carte mère :
-
Deux vis de 1,3 mm
-
Une vis de 1,4 mm
-
Une vis de 2,7 mm
The Phillips screwdriver bit is the PH000. The measurement refers to the screw length.
-
-
-
Avec la pointe d'une spatule (spudger), soulevez le connecteur de la batterie pour le débrancher de sa prise sur la carte mère.
-
Repliez légèrement la nappe du connecteur pour empêcher que celui-ci touche accidentellement la prise et que le téléphone soit alimenté pendant que vous réparez.
When I reassembled the iPhone 8 Plus, I had to plug it into a Lightning cable to wake it up (just pushing power button wasn’t sufficient).
-
-
-
Avec la pointe d'une spatule (spudger) ou un ongle, déconnectez le grand connecteur de l'écran inférieur en le soulevant tout droit hors de sa prise.
I got hold of a iPhone 8 Plus with cracked screen that I am planning to fix.
Here is my problem:
When I tried to take out the screen from my phone, (step 15-18) I was curious about the new screen, so I tried to connect it. It was completely dead! Then I tried the old cracked one, and suddenly that was dead to! This is a phone that some fool has been inside earlier and changed battery, but I suspect he has done some more really stupid things. The Taptic Engine is living its own life and vibrating every time I slightly touch the home button. (I have a new Taptic Engine) The phone is also full of dust and small particles that does not belong there. One tri-point Y000 screw (step 18) is even missing! Now the biggest problem is that both screens are black! I know the phone is on, because I hear voice command speak when I turn on the power. The screen worked before I tried to change it? And one last thing: My new LCD screen came with new flex cables. Is it possible to switch over, so I can use the old ones?
Hi,
Is your problem solved?
Be careful of damaging MOSFETs by the LH side of the large lower display cable. After replacing the battery and turning the device on, the phone showed low charge and didn't have a charging symbol even after plugging into multiple cables and chargers. Turns out I had damaged the logic board attempting to disconnect the connector.
-
-
-
Déconnectez le second connecteur de l'écran inférieur, qui se trouve juste derrière celui que vous venez de déconnecter.
I used the other end of the spudger on this connector and it seemed to work a little better for me. I came in from underneath the top-right edge instead of the bottom right.
-
-
-
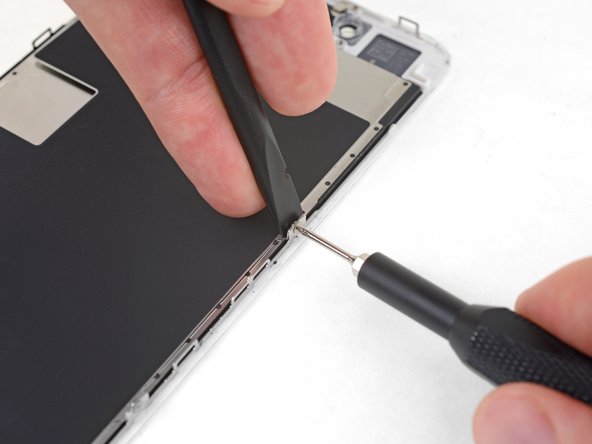
Dévissez les deux vis Tri-point Y000, qui fixent le cache recouvrant le connecteur de l'ensemble capteur du panneau frontal.
-
Une vis de 1,0 mm
-
Une vis de 1,2 mm
una vite da 1mm e due viti da 1.2 mm???
Ciao Matteo! Grazie per l’osservazione. Ho appena modificato il testo :) La traduzione è aperta a tutti. Hai quindi la possibilità di fare le tue suggestione direttamente nel testo e sei il benvenuto se vuoi usare di questa possibilità nel futuro. Grazie ancora per la vigilanza! Saluti, Claire
The tool kit does include a 1.0 or1.2mm screwdriver! How am I supposed to remove those screws?
Bought the screwdriver that supposedly fits these screws and it still doesn’t work.
My bracket looks different. Can’t get these screws out.
kit came with wrong bit. i received 2x P02 (penta tips) and no tri point y000.
-
-
-
Avec la pointe d'une spatule (spudger) ou un ongle, débranchez le connecteur de l'ensemble capteur du panneau frontal.
-
-
-
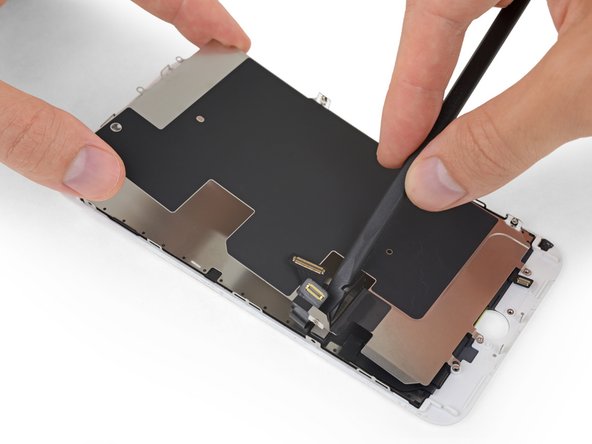
Retirez l'ensemble écran.
Should there be a step somewhere in here to point out when to remove the blue plastic from the new iFixit screen?
-
-
-
Dévissez les cinq vis cruciformes fixant le cache du haut-parleur interne :
-
Deux vis de 1,8 mm
-
Une vis de 2,3 mm
-
Une vis de 2,4 mm
-
Une vis de 2,8 mm
-
-
-
Repliez délicatement la caméra et la nappe qui y est fixée vers le bas de l'iPhone, afin d'accéder aux composants qui se trouvent en dessous.
-
-
-
Pour ramollir l'adhésif fixant les capteurs, servez-vous d'un sèche-cheveux ou d'un pistolet à air chaud ou bien préparez un iOpener que vous posez ensuite sur la partie supérieure de l'écran côté face pendant environ une minute.
-
-
-
Insérez le bord aiguisé d'un outil d'ouverture iFixit sous la nappe de l'ensemble caméra, du côté opposé de la caméra frontale.
-
Faites levier pour décoller le bord de la nappe du dos de l'écran.
FYI i think you should put up a warning on which side you should start the prying from. If you start prying from the top there’s a risk of prying apart the two parts of the flex cables that are soldered together. If you start from the bottom as pictured you should be safer, but I think it should be specified in text on this guide… because I managed to do this mistake and have to order the whole front cam/speaker/etc. assembly now. My own fault but still, haha!
-
-
-
Ôtez l'ensemble caméra frontale et nappe de capteur.
-
Un morceau de ruban adhésif isolant noir double-face se trouve entre l'écran et les trois rangées de contacts en cuivre au dos de la nappe caméra/capteur. Soit il restera collé à l'écran, soit il se décollera en même temps que la nappe.
Why is the insulating tape needed, and what other materials should I using instead of it if I loose the tape?
I moved the insulating tape from the broken screen to the new screen.
Don’t forget to check if your new screen assembly has the two plastic pieces for the camera and proximity detector. You’ll need to move them from the old screen if it doesn’t have them.
Hi, is it possible for the flex cable to work without placing he tape over the contacts?
Thanks
I forgot to add move the double sided tape over and I’m wondering if that was why my ear speaker wasn’t working. I opened it back up and put the tape on the new screen but the speaker is still not working. Any ideas? Did the speaker “short” out?
Mine the same , did you solve the problem? Thank you
I bought the ifixit tool kit iPhone plus 8 screen. Do i need to skip this step ? (not sure)
Whenever I had my camera unit and speaker in, it prevented my phone from charging or finding my sim. Any explanation for this? seems really strange to me
-
-
-
Dévissez les quatre vis Y000 fixant le cache recouvrant le capteur home/Touch ID :
-
Une vis de 1,2 mm
-
Trois vis de 1,3 mm
The 1.2mm screw on the home button stripped for me. I ended up bending the bracket on each side in order to remove the home button. I then bent it back as best I could during reassembly and screwing it down.
-
-
-
Faites levier sous le bord gauche du connecteur de la nappe du bouton home pour le débrancher de sa prise.
I accidentally severed the cable, now my sensor is disabled. So far this was the most delicate cable I encountered because it was so small.
-
-
-
Retournez l'ensemble écran. Servez-vous d'un sèche-cheveux ou préparez un iOpener. Posez celui-ci ensuite sur le bord inférieur de l'écran pendant environ 90 secondes afin de ramollir l'adhésif en dessous.
-
-
-
Avec un médiator, séparez délicatement l'adhésif fixant la nappe du capteur home/Touch ID à l'arrière de l'écran.
This did not work for me…. ended up breaking the connector from the home button. Most likely messed up the customer’s iPhone… the adhesive would not pry up with just pick… does iFixit offer a home button replacement?
did not work for me either, also ended up breaking the connector, just use the tweezer to separate it. do not use opening pick!!!!! it’s too thick for it!!
Isopropanol and heat will loosen the adhesive and its possible to gently remove with plastic pick, metal tweezers risk damaging the Home button cable and disabling the Touch facility.
Pretty easy to follow instructions if you have patience and careful hands. If you have clumsy hands you will not succeed in fixing any small electronics. There are some small things you should use to help you succeed at fixing small electronics, like some scotch tape or other clear tape to hold some of the cables in place while you work on small electronics items, also a small heavy bottle or object to propped the iPhones cases against to hold them from falling over so that your hands can be free to perform your tasks. Great job you are doing iFixit personel and I am with you all the way with fighting for our rights to fix our electronics equipment.
Isopropanol in conjunction with the heat really did the trick here. Heat up first, then use plenty of the alcohol to pry it up carefully using the pick.
Heat dryer on high worked for me.
I heated the tip of a thin knife with a hot air gun and slide it under the flexible cable. When I hit resistance I reheated the knife. Keeping it parallel to the board while doing this. After 4 heatings the knife moved the rest of the way and the cable lifted easily off of the iPhone back. This method left enough glue on the cable that it restuck fine when moved to the new iPhone.
Apple loves to make this the most difficult thing. I've been successful many times, and not so on other repairs. I just finished a repair and everything was in tact, but sadly it didn't work. Took a part and put back. So I turned on the assistive touch home button. They will be getting a new phone soon, so not a big issue except Pride.
-
-
-
Décollez la partie supérieure rectangulaire de l'autocollant recouvrant la plaque de protection de l'écran LCD pour l'enlever de la nappe qui se trouve en dessous.
Not sure what this sticker is for exactly. It broke during reassembly. So far, so good.
-
-
-
Soulevez la plaque de protection de l'écran LCD en appuyant sur la nappe qui se trouve au centre.
-
Faites passer la nappe à travers l'encoche dans la plaque de protection de l'écran LCD tout en faisant attention à ne pas la déchirer.
My new LCD screen came with new flex cables. Is it possible to switch over, so I can use the old ones?
When I tried to take out the screen from my phone, (step 15-18) I was curious about the new screen, so I tried to connect it. It was completely dead! Then I tried the old cracked one, and suddenly that was dead to! This is a phone that some fool has been inside earlier and changed battery, but I suspect he has done some more really stupid things. The Taptic Engine is living its own life and vibrating every time I slightly touch the home button. (I have a new Taptic Engine) Now the biggest problem is that both screens are pitch black! I know the phone is on, because I hear voice command speak when I turn on the power. What could this be? The screen worked before I tried to change it?!…
-


Comparez votre pièce de remplacement neuve à l'originale. Il se peut que vous deviez transférer des composants manquants ou retirer les films adhésifs de la pièce neuve avant de l'installer.
Pour remonter votre appareil, suivez les instructions ci-dessus en sens inverse.
Amenez vos déchets électroniques à un recycleur certifié.
La réparation ne s'est pas déroulée comme prévu ? Consultez notre communauté Réponses pour recevoir de l'aide au diagnostic.
Annulation : je n'ai pas terminé ce tutoriel.
86 autres ont terminé cette réparation.
Merci à ces traducteurs :
100%


Ces traducteurs nous aident réparer le monde ! Vous voulez contribuer ?
Commencez à traduire ›


8 commentaires
I got hold of a iPhone 8 Plus with cracked screen that I am planning to fix.
Already got all new part that I think I need.
Here is my problem:
When I tried to take out the screen from my phone, (step 15-18) I was curious about the new screen, so I tried to connect it. It was completely dead! Then I tried the old cracked one, and suddenly that was dead to! This is a phone that some fool has been inside earlier and changed battery, but I suspect he has done some more really stupid things. The Taptic Engine is living its own life and vibrating every time I slightly touch the home button. (I have a new Taptic Engine) The phone is also full of dust and small particles that does not belong there. One tri-point Y000 screw (step 18) is even missing! Now the biggest problem is that both screens are pitch black! I know the phone is on, because I hear voice command speak when I turn on the power. What could this be? The screen worked before I tried to change it?!…
Hi smikalsen,
Did you disconnect the battery when you swapped the screens? If not, there is a chance that the screen backlight circuits are damaged as a result of disconnecting/reconnecting to a powered phone. With a screen connected and the phone powered on, shine a bright light directly at the screen. If you can faintly see the screen, it means that the LCD is working but the backlight is broken.
Thank you Jeff for these very clear instructions, and for the warnings on cautions to take in the delicate steps. This guide was helpful in replacing my broken screen on an iPhone 8 Plus. Every step was successfully accomplished, and now my iPhone is back to life. Of course, as a caution I did a backup before starting all the procedures. Thanks again. Saul
Okay can I bring it in
Thanks Jeff for this really helpfull instruction.
I have a question about the colors displayed on the new display. I heard that you can restore TrueTone function using light sensor programmer. But before I invest another $40 in something I will use only once, I would like to ask if darker and very saturated colors on display is the fault of lack of TrueTone function or the fault of display itself?
what do I do about super stripped screws?
Ean Palacios - Réponse
I’m sorry, your comment slipped past my radar earlier. For future fixers that might see this and ask the same question, you can check out our stripped screw guide for some detailed advice.
Adam O'Camb -
Do you need a toolkit like the essential toolkit
Adam Palmer - Réponse
Hi Adam. Having a tool kit with all of the listed parts above is best. The screw heads are very small and each set of screws needs a very specific type of driver to remove them without stripping any of them.
Kyle Luksa -