Introduction
Consultez ce tutoriel pour réparer ou remplacer la batterie morte ou usée d'un ordinateur Asus ROG G751JL.
Ce dont vous avez besoin
-
-
Prenez un outil d'ouverture pour soulever le cache en caoutchouc dans le coin supérieur droit de la trappe d'accès de la RAM.
-
-
-
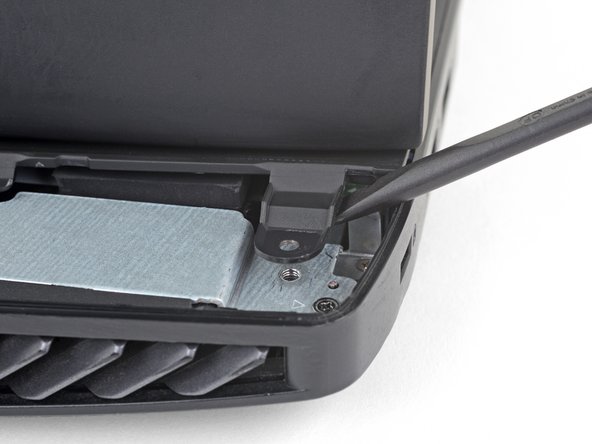
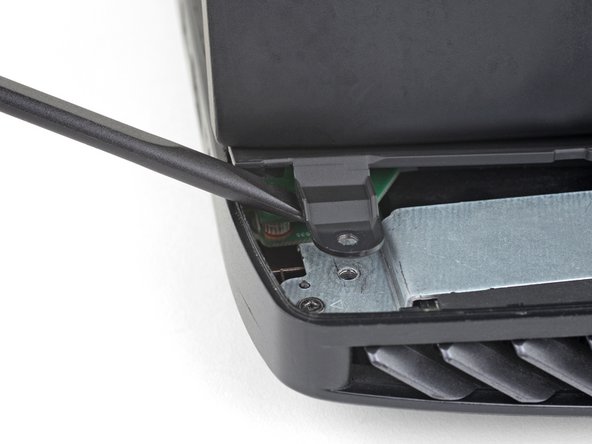
Insérez la pointe d'un médiator dans la jointure à côté du coin supérieur droit de la trappe d'accès de la RAM et faites délicatement levier pour soulever légèrement la trappe.
-
Elle est maintenue en place par des petits clips le long des bords. Faites levier jusqu'à ce que les clips environnants se détachent.
-
-
-
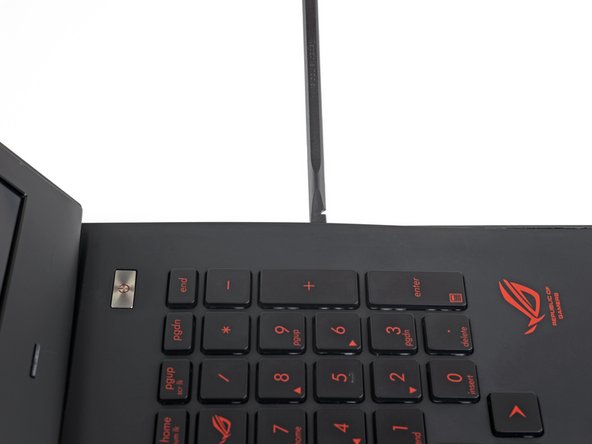
Dévissez la vis cruciforme #00 de 5,2 mm qui fixe le lecteur optique.
-
-
-
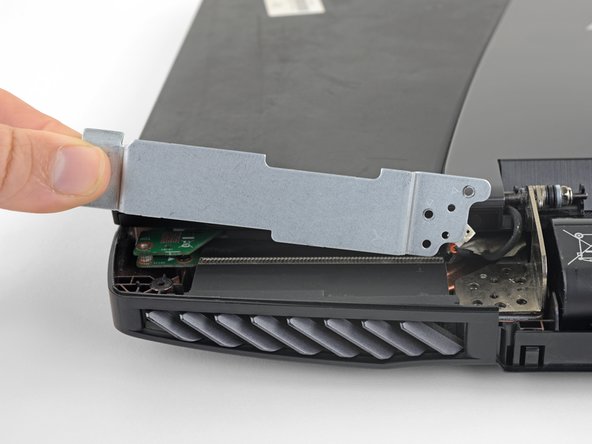
Prenez la pointe d'une spatule (spudger) pour soulever les onze caches en caoutchouc qui recouvrent les vis en bas de l'ordinateur.
-
-
-
Dévissez les 18 vis cruciformes #00 aux longueurs suivantes :
-
Huit vis de 8,8 mm
-
Sept vis de 5,2 mm
-
Trois vis
Step 9: on my model the 2 lower left most red 8.8 mm screws appear to be 5.2 mm orange screws.
-
-
-
-
Retournez vote ordinateur.
-
À l'aide d'un médiator, soulevez les bords gauche et droit du cache de la batterie suffisamment pour pouvoir attraper le cache avec vos doigts.
-
-
-
Tirez sur les connecteurs du haut-parleur pour débrancher la nappe du haut-parleur.
-
-
-
Ouvrez l'écran à un angle de 90°.
-
Prenez une spatule pour faire levier contre un des supports pour vis au dos de l'ensemble boîtier supérieur.
-
Répétez la procédure pour l'autre support.
-
-
-
Prenez la pointe d'une spatule pour soulever le petit clapet de retenue du connecteur ZIF de la nappe du rétroéclairage du clavier
-
Faites délicatement sortir la nappe de sa prise.
-
-
-
Répétez l'étape précédente pour les nappes du clavier, des boutons du trackpad et du trackpad, également maintenues en place par des connecteurs ZIF.
Gently pry up onwards each of the white plastic connector just above the ribbon cable (or near the gray rib on the wider ribbon cable).
-
-
-
Sortez la nappe de la batterie de sa prise en tirant dans la même direction que le faisceau des câbles reliés à la batterie.
-
-
-
Saisissez le ruban adhésif attaché à la nappe de l'écran et tirez à la verticale pour débrancher celle-ci.
Before trying to remove the display connector, gently lift tape holding speaker cable and temporarily push cable aside to allow more access to the tape holding the display cable. Then proceed to lift the display cable.
-
-
-
Soulevez l'écran à la verticale et ôtez-le.
Please add the step to unplug both wifi antenna cables and the display connector before removing the monitor. Both just pop up.
Hi this comment is correct. This guide completely skips the important step of removing and replacing the wifi cables. Without this step the computer is unable to retain its wifi functions
ggrinste -
How to replace the lcd?
I have to agree with Sam Torres on this. I reached the same spot where the screen was off, but then which wire goes to which connector. The picture is too fuzzy to be completely clear. It looks like the one further to the back (lcd screen) might be the white one and the one closer to the front of the laptop (touchpad) might be teh black one but the only way to tell is to assemble everything and then get the bad or good news.
-
-
-
Dévissez les deux vis cruciformes #00 de 5,7 mm qui sécurisent la batterie.
Gently rotate the battery toward the front (circuit board) to clear the back tabs. Then lift the battery out of its compartment. On replacement, roll the new batter into the compartment from front to rear. It may require some pressure for the rear side to clear the circuit board.
-
-
-
Soulevez la batterie hors de son compartiment et ôtez-la.
VERY important. The guide doesn't mention detaching the display cable or the two small cables I assume is for the display's power. Please revise because I could have broken something if I wasn't paying attention.
I agree, what saved me is that I was watching someone’s video in YouTube, if not I wouldn’t have know what I broke haha
Thank you for the wonderful instructions. The only improvement would be a close up picture of one of the ribbon connectors with the hinged fastener in release position. This was a bit daunting for me until I stumbled on the release.
-


Pour remonter votre appareil, suivez ces instructions dans l'ordre inverse.
Apportez vos déchets électroniques à un recycleur certifié R2 ou e-Stewards.
La réparation ne s’est pas déroulée comme prévu ? Consultez notre communauté de réponses pour obtenir de l’aide au diagnostic.
Pour remonter votre appareil, suivez ces instructions dans l'ordre inverse.
Apportez vos déchets électroniques à un recycleur certifié R2 ou e-Stewards.
La réparation ne s’est pas déroulée comme prévu ? Consultez notre communauté de réponses pour obtenir de l’aide au diagnostic.
Annulation : je n'ai pas terminé ce tutoriel.
33 autres ont terminé cette réparation.
Merci à ces traducteurs :
100%


Ces traducteurs nous aident réparer le monde ! Vous voulez contribuer ?
Commencez à traduire ›
Équipe

USF Tampa, Team 2-1, Sullivan Fall 2016 Membre de l'équipe USF Tampa, Team 2-1, Sullivan Fall 2016
USFT-SULLIVAN-F16S2G1
4 membres
20 tutoriels rédigés
14 commentaires
A few steps in this guide are in the wrong order. Could get confusing for and unexperienced technician. Steps 10 - 12 should be before step 6. Other than that this was a very good guide.
Good catch! This guide was made by combining a few other guides ( we call prerequisite guides) and they were combined in the wrong order. I went ahead and fixed it. Thanks for the feedback!
This guide skips a very important step, without which the laptop is unable to connect to wifi networks at any reasonable range. You must reconnect the two cables on the left side of the monitor to the wifi chip. These must be in the order of white toward the monitor, black away from the monitor. I have taken pictures I would be happy to share for this step. Please contact me so I can share these pictures to remedy this oversight
Still not added,! Also the removal of three tiny screws under the lip of the CD Bay is completely unnecessary and they are very very difficult to put back in.
If you don't remove the three tiny screws on the edge of the CD bay, you won't be able to remove the upper case assembly without damage on that side, so they are in fact necessary to remove.
Was able to complete with little issue thanks to this guide! I did, however, run into one problem: After the battery is unscrewed, it still has small tabs to lock it into place on either side. In the pictures, it comes right out with no issue but mine was caught pretty well where the circuit board extends down. It took a nerve-wracking amount of careful prying to finally get the battery tabs clear of the silicon. Still highly doable, and this was extremely helpful!
Very great instructions! I went step by step through them and all went well. I didn't even put a new battery in and I'm happy to report it runs perfect without it.
It gave me issues with the battery such as random shut downs, mouse lag and keyboard lag.
I would love an added instruction set on how to replace the thermal compound in this laptop as well!
I found this to be an excellent guide! The pictures are extremely helpful as well. I agree with Alex (10/10/2019), the battery is diabolically secured by locking tabs on both sides. It eventually comes out, but you have to shift it back and forth a bit to get it out.
Why are screws listed in decimals of millimeters instead of the usual m2 or m5 or similar size? Is the American model actual different screws the the usual standard ones?
Excellent tutorial. Very clear. Took me (complete novice) less than an hour to complete. Thanks
Are random shut downs normal after replacing the battery? I replaced it per this instructed guide and charged it appropriately last evening. Today, I went to start using it to “drain” it completely to fully calibrate it but it keeps shutting down on its own.
Thoughts?