Introduction
Suivez ce tutoriel pour remplacer la batterie de votre Samsung Galaxy S10e.
La batterie est maintenue en place par un adhésif résistant. L'usage d'alcool isopropylique à haute concentration (de plus de 90 %) peut simplifier énormément le retrait de celle-ci.
Veillez à votre sécurité et déchargez votre batterie en dessous de 25 % avant de démonter votre téléphone. Cela réduit le risque d'accidents thermiques si votre batterie est accidentellement endommagée au cours de la réparation.
Si votre batterie gonfle, prenez les précautions appropriées et ne chauffez pas votre téléphone.
Ce dont vous avez besoin
-
-
Veiller à éteindre complètement votre téléphone avant de commencer cette réparation.
-
Préparez un iOpener et chauffez le dos du téléphone le long du bord droit pendant environ deux minutes. Cela contribuera à ramollir l'adhésif qui fixe la coque arrière.
-
-
-
Au cours des étapes suivantes, vous allez trancher l'adhésif qui fixe la coque arrière.
-
Vu de l'extérieur, vous allez faire céder l'adhésif dans les zones entourées de rouge et de jaune.
-
L'adhésif est plus fin du côté droit du téléphone, juste en dessous du bouton Bixby.
My S10e was two years old so the adhesive was really weak, and it was really simple to open. Still, this guide was totally useful.
That's encouraging, hopefully the older-than-2 years S10e I'm looking to do proves as easy to open-
Gee Foe -
-
-
-
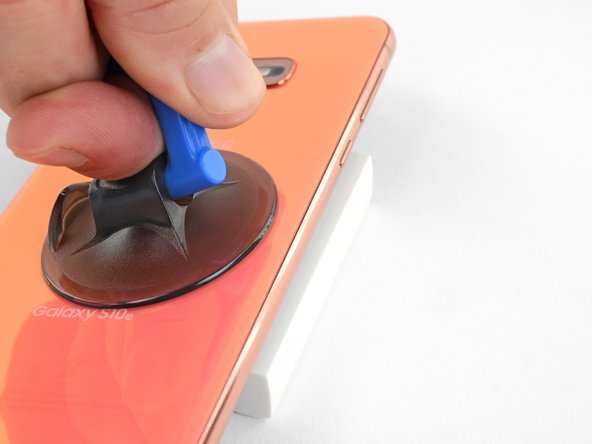
Fixez une ventouse sur la coque arrière, le plus près possible du bord chauffé, juste en dessous du bouton Bixby, là où l'adhésif est plus fin.
La ventouse n'adhérera pas correctement sur la partie incurvée de la vitre ,
Sur la partie incurvée de la coque.
-
-
-
Surélevez le côté chauffé du téléphone en le posant sur un objet d'environ 13 mm (0,5 pouce) de haut. Il sera plus facile d'insérer l'outil d'ouverture dans le téléphone sous cet angle.
-
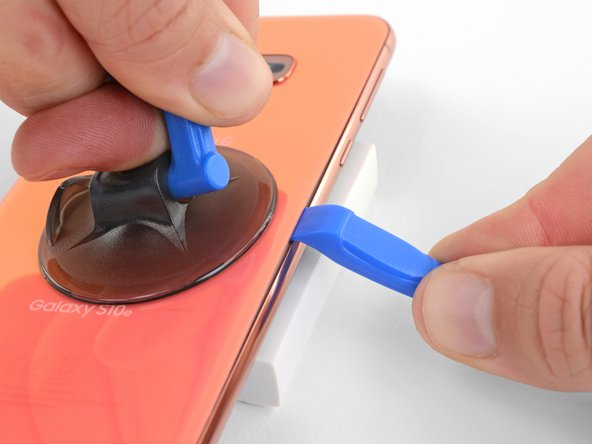
Soulevez le bord droit de la coque arrière avec votre ventouse pour ouvrir un léger espace entre la coque arrière et le châssis.
-
Cela nécessitera de forcer quelque peu. Si vous avez du mal, faites chauffer plus pour continuer à ramollir l'adhésif et recommencez. L'adhésif refroidit très vite, vous devrez donc peut-être vous y reprendre à plusieurs reprises.
-
Introduisez le bout d'un outil d'ouverture dans l'espace.
-
-
-
Faites glisser l'outil d'ouverture le long du bord droit du téléphone pour faire céder l'adhésif qui fixe la coque arrière.
I found that using opening picks for the entire repair was much easier then the pry tool, but that could just be me
You are criminals! This "tutorial" is full of destructive instructions. And whenever trying to make a comment, iFixid admin hides behind the bot personality telling: "Your comment was marked as spam"
People, do not trust them! They tell you everything to break your phone so you will need to bring it to service!You are criminals! No one ever should use the triangular "mediator" pick for iPhones, or planar connector picks! The back cover is NOT gorilla-glass, and it will crack in multiple places immediately! Only very thin "watchmaker" opening plates(initial pickup) and 0.1mm rigid PP stripes (cut from cheap tool packages, or 7-eleven food packs) may be used there. Before that the side rim - not the cover itself should be heated to boiling point and constantly re-heated while tearing the two-sided scotch. The opening strip may be replaced 2-3 times while reaching the opposite side, because it collects the torn glue. This instruction from iFixit is a pure sabotage for tricking non-expecting users to repair-shops.
The same goes to battery, if you don't risk using solvents, which may damage the screen and the circuit. Only rounded PP strips may tear off the battery scotch. It should be preheated from the screen side, until the battery becomes hot.The commenter who keeps saying "you are criminals" over and over may have been using this guide to repair a different phone, so he or she is confused. On the Galaxy S10e, I had no trouble heating and lifting the cover as described (though I had to reheat the iOpener several times). If you heat it gently with the iOpener and long enough, you're not stressing the back cover because the glue will come loose almost immediately. (I could have almost lifted it with a fingernail).
-
-
-
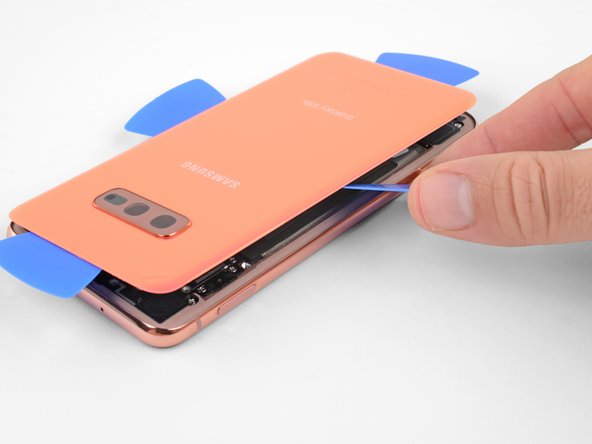
Insérez un médiator à côté du coin supérieur droit du téléphone et faites-le glisser le long du coin et du bord supérieur du téléphone.
-
Laissez le médiator en place pour empêcher que l'adhésif colle de nouveau.
-
-
-
-
Posez un iOpener chauffé sur le bord gauche du téléphone pendant deux minutes.
-
-
-
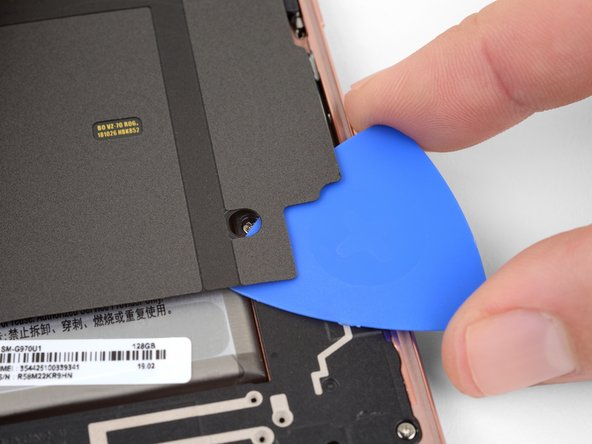
Soulevez très soigneusement la coque arrière à l'aide des médiators.
-
Si vous sentez la plus légère résistance, arrêtez de faire levier et prenez un médiator pour couper les restes d'adhésif.
-
Enlevez la coque arrière.
-
-
This should be the very last step in the guide, but the edit button seems to only allow editing the content, not the positioning in the guide. Not sure how to fix this.
The photo seems to show someone lifting the old glue off with tweezers. That certainly wasn't true for my glue! I scrubbed it off with isopropyl alcohol and fabric. (Don't use a paper towel or Kleenex because they fall apart. I used a postage-stamp-size square cut from an old athletic sock. With this and the alcohol I was able to get the cover and the phone as clean as they were at the factory.
When doing this, hold the phone at an angle in your other hand so any alcohol dribble to the outside and not to anywhere important.
-
-
Dévissez les huit vis cruciformes de 3,9 mm qui fixent le châssis supérieur au téléphone.
Again, criminal lies! These screws have different length! Take notes which are where! There are at least 4 versions of antenna/coil modules, so each time it may be a little different.
Interesting observation! I did not see this comment until after I reassembled the midframe and closed everything, so I can not confirm. If true, I either got lucky or it didn't matter.
WL1 -
I'll note this and see about maintaining the same order for reinstallation -
Gee Foe -
The screws on my SM-G970F/DS were all identical.
-
-
-
Insérez la pointe d'une spatule (spudger) dans la petite encoche du côté droit de la partie en plastique du châssis supérieur, à côté du bouton Bixby.
-
Faites levier avec la pointe de la spatule pour séparer le châssis central du châssis du téléphone.
Criminals! These instructions are given for breaking your phone! Never use the puncher-picker! The antenna module, after gently unglued in the single spot, is pulled down! Not up! DOWN, I said! And it comes off without any force. Minimal force will be required to push it back (after putting it flat on place).
-
-
-
Saisissez le châssis central par sa partie en plastique et retirez-le du téléphone.
In my phone there was a lot of residual adhesive on the top section, so I initially just flapped it over like a hinge while I finished the other steps. For me, I found, and it should be emphasized, for the reinstall, the top edge needs to be placed flat and snapped UP into the chassis for it to fit.
-
-
-
Servez-vous du bout plat d'une spatule pour soulever le connecteur de la batterie tout droit vers le haut et le débrancher de sa prise.
This manual is a pure SABOTAGE! Never pick up the connector from the camera side! You risk damaging the camera, and the connector itself. Pick it up gently in two steps from left first, then from right, if it does not jump up immediately.
-
-
-
Surélevez le bord inférieur du téléphone pour l'incliner de façon que le dissolvant coule de bas en haut sous la batterie.
-
Appliquez l'alcool isopropylique ou le dissolvant pour adhésif le long du bord inférieur de la batterie. Laissez agir quelques minutes pour que l'adhésif ait le temps de ramollir.
Advice: DO NOT USE TO MUCH ISOPROPANOL! This will damage your display and you will most likely have to replace it. If you know that you won't use this battery anymore just lever it out of the case. It is fairly easy to do with the ifixit Jimmy ( Item # IF145-259-1 ) or the metal spudger. Use these tools with much sensitivity as you could damage the battery case or the display that is right below the battery ( See Step 22 for additional pictures where the frame ends and the screen begins ). Good Luck!
Very valuble tip, thank you! I was going to douse it with probably way more than needed.
I started just with some moderate force jimmying it with the black plastic spudger. I then applied just a few drops of isopranol 90% and the bottom section loosened very easily.
WL1 -
I found the black levering tool did not provide enough force and damaged the tool. I found the blue picks gave me wider and safer leverage to get the battery out.
Also a couple of passes with isopropanol was required before I could make any progress. Note that while you are prying from the bottom, I applied the isoproponal all around the battery as the glue is located all the way around.
better to use a length of fishing line or dental floss and slide it under the battery .. very smooth
Good tip! I put a bit of 99% isopropyl alcohol on the floss as well. Took a bit of finagling with the pointy end of the spudger to get it around the bottom end of the battery (opposite end of the battery connector), but the floss combined with the 99% IPA worked very well with ungluing the battery.
Defi -
Do not use alcohol or other liquids! This way I completely ruined my phone. The screen doesn't work. The motherboard is damaged.
I have used iOpener on screen and it allowed to remove battery without damage to phone. Just heat the iOpener, place it on screen on side where the battery is, and leave it for a few minutes. Check with blue pick on bottom side if battery budges, if not repeat everything. I needed around 4 times to finally take out the battery.
-
-
-
Faites délicatement levier avec le bout plat d'une spatule pour soulever la batterie hors du téléphone.
-
Si la batterie résiste ou commence à se déformer, répétez l'étape précédente pour que l'adhésif continue à se dissoudre.
That spot at the bottom was the only point with enough clearance for me to start prying, and just allowing it to slowly start separating got the battery out. A very slow process as I was seeing the adhesive come off in a continuous strip, so I did it slowly enough for it to remain intact for reuse, which I did.
-
-
-
Ôtez la batterie.
Some final tips for anyone else about to attempt this:
It was unclear just how much of the residual adhesive to remove from both the back plate and the phone frame. Would leaving just a little affect the seal? I eventually realized (probably later than most) the back plate adhesive is a large cutout sticker, exactly the same as the ifixit provided one. If you can pull up a small edge and have access to some small clamping forceps (hemostat for medical folks), you can use this to slowly peel off the sticker all the way around. There are 2 small 'islands' of adhesive you will need to peel off separately. Removing all of this from the backplate is definitely needed, otherwise attaching a sticker of adhesive onto the old one will be too thick.
For the phone frame, I used the spudger to push around some adhesive but didn't worry too much about it. It is harder to aggressively work on this side as all the adjacent electronics are sensitive.
Con't:
When placing the ifixit backplate adhesive, you must be VERY precise when setting down your first edge. The backplate has some curvature, and you want the edge of the first edge to be JUST inside that curve. Then slowly press down the sticker until the other long end seats down. You want to make sure you push from the middle to the other edge, so that it will align on that curvature instead of just straight down.
The instructions are correct--you really only get 1 chance to place it. You can game this, though, by only gently pressing on the thin strips at first. If you push on the top end near the camera, any large surface area adhesive will stick down and you will not be unsticking it!
Con't:
For the battery adhesive and replacement:
It was unclear just how tightly the battery needed to be re-adhered. Is it really going to shake around that much? But I figured we don't want anything jostling or pulling on the thin battery connector cable.
I used a spudger to VERY gently work the old adhesive off all 4 sides. It looks like there are wires/trace running through the underlying foil-like surface, so you probably do not want to damage that in any way. Also the screen is right underneath that!
I cut 2 strips only of the included tesla tape and stuck that on the 2 long sides. I did not expose the battery side tape yet.
VERY IMPORTANT: Put the battery in and connect the wire. The ifixit battery is smaller than the OEM, so there is a lot of possible movement. The wire also wasn't exactly perpendicular. In fact, it took some finagling to get the wire to actually connect. I found that in my case, the battery was seated right at the bottom/base of the compartment for the wire to sit properly.
One more thing:
Water resistance testing
There is an app that may be a safe way to see if your reassembly is good enough to quality for water resistance: https://play.google.com/store/apps/detai...
Basically it uses the barometer in the phone to determine this. If your phone is a closed system, pressing on the screen should cause the pressure to increase from baseline, as there are no gaps for air to leave.
If your phone is an open system with a leak, pressure on the screen will be released through the leak in the phone's side, meaning water could easily enter from that same spot. The air pressure will not change with a leak.
This app was in fact the way I discovered my adhesive was splitting. I ran it for fun before going to the beach, where to my surprise it showed a failure. Previously it did not! I have no financial interest in this app, I just like it and I purchased the add-on which is not necessary for the app to function. I use it to test any refurb.
Very helpful pointer to that water resistance test app, I actually just reused all the original stickem of the back cover and the battery, because I went the lowest cost option of just buying a new old stock battery from eBay for $11, which came with nothing in the way of replacement adhesive.
The water resistance test showed a failure, which passed before the replacement, so it does give a good indication of air tightness.
I then used Kapton tape to seal around the whole perimeter, and now the test passes again. It doesn't look elegant in the least, but I prefer being able to change the battery quickly and easily if the need should ever come up again.
Testing with Accurately showed an increase in health percentage from 71 to 86 percent, which rolled the clock back by two years based on the prior history, which I'm satisfied with.
Gee Foe -
Dust warning:
The only part where dust would be very annoying would be on the camera lenses. When reassembling, I made sure that there were no dust particles on the inside of the backplate or on the camera lens itself. You won't be able to clean that out once you seal your phone again!
-


Pour remonter votre appareil, suivez ces instructions en sens inverse.
Pour des performances optimales, calibrez votre nouvelle batterie après avoir terminé votre réparation.
Déposez vos déchets électroniques dans un centre de recyclage certifié R2 ou e-Stewards.
La réparation ne s’est pas déroulée comme prévu ? Consultez notre Forum pour obtenir de l’aide au diagnostic.
Annulation : je n'ai pas terminé ce tutoriel.
39 autres ont terminé cette réparation.
Merci à ces traducteurs :
100%


Ces traducteurs nous aident réparer le monde ! Vous voulez contribuer ?
Commencez à traduire ›

12 commentaires
I was going to publish this guide but somebody did it already for me. Thanks!
By the way the color of that phone in the guide is hideous in my opinion.
When you say “moderate” difficulty, how what’s making it difficult or where is the risk coming from? With the right tools, patience, and even a small bit of experience replacing a screen in an admittedly easy Nokia Lumia phone, what could go wrong, and what would you recommend?
Hi Mark, the hardest part of this guide is dealing with all the adhesive without damaging anything. The back cover and the battery are both heavily glued down. To get the back cover off without cracking it, I’d recommend plenty of heat and very patient and gentle prying. If the prying gets really tough, try heating the back a little more. Removing the battery can be tough as well, but using adhesive remover helps a lot. Follow the steps in the guide and make sure you give the adhesive remover a few minutes to soak in. If prying gets difficult, add a little more adhesive remover and wait a couple minutes before continuing. Hope that helps!
If I buy the kit from ifixit, are the battery going to be relatively new? or the batteries have been seating in shelves since OEM days.
Yes, I bought a kit about a month ago and the manufacting date of the s10e replacement battery was 28 August 2022.
For future reference, I purchased mine in late 7/2023 and the date stamped on the battery was 5/19/23.
WL1 -
The OEM replacement I got from eBay, admittedly cheap at $11, actually had a manufacture date a month before the one I took out, but maybe less cycle time on it, so I'll see how it performs. It measured 4.16V out of the box, so I don't know if the seller charged it up before shipping it out or if it could actually retain full charge for that long.
Gee Foe -
Hello. After 3+ years of using S10e, I would like to replace the battery. I live in Europe and the battery replacement kit is not available on the EU store website. I cannot order the kit from the States because of shipping restrictions.
Can you please tell me where can I buy the replacement kit for my device? Is it possible to order one to EU store somehow?
And why is one not available in the EU store? I'm not being entitled, just puzzled and curious.. I see kits for devices older than mine so I can only guess.
I also have this phone for 3+ years. Battery is overheating a lot, especially with high screen brightness in summer, and does not last so much anymore. I am also looking into ordering a new battery, back cover, and repair kit for my Samsung S10e in Europe (Belgium).
where I could buy samsung galaxy s10e battery?
Just finished battery replacement, worst part was taking out the battery. What helped me was putting iOpener on screen and checking every few minutes on battery if it will give up.
Also, battery from iFixit is not as good as I would think. Connector has a slight difference with original. Barely visible difference, yet plugging it was a challenge. I have brut forced it a little, but in the end it sits. But then another issue - cable is a little too long, which means that instead of lying flat, it bends a little. I had to squash it, I hope it will be fine for a time being. I am writing all this here because for some I can't give battery a review.
Cool from iFixit to provide fundamentals, but there are some details which unfortunately lay flat.
L'écran OLED et la la batterie
Isidore LECHAT - Réponse
My s10e is 4 years old now and I found glue had weakend and heating was uneccissary.
ervan.hady - Réponse
I purchased my S10e refurbished, so the exact age and prior repairs are unknown. I believe it had ~200 charge cycles. After 2.5 years, the side adhesive started to fail and there was a noticeable slit under the rear cover. It was unclear if the lithium battery was starting to swell, which would have been a more dangerous thing. As such, 3 out of the 4 sides were easy to open just with sliding the pick.
I heated the iOpeners for 30s in my 1000W microwave and it reached a temp of 180oF. I placed this on the final corner and it released fairly easily.
WL1 - Réponse
Is 180 degrees a good temperature to set the air temperature to if a heat gun is used?
Gee Foe -
Mine released without heat, just caught the edge with a fingernail and was able to work it free without any tools.
Gee Foe - Réponse
I would definitely NOT use a heat gun; the iOpener is the right thing to use. I've repaired many devices and I have lots of heat guns, but a heat gun puts out a tremendous amount of heat, and spreads it everywhere instead of in a controlled manner. The iOpener is about 150 F -- just getting uncomfortable to touch -- and the heat is all in a thin strip. You want to gently heat the edges of the cover, not cook the battery and electronics. Smart phones are expensive and the iFixit tools are cheap. Don't risk your phone to save a few bucks.
MikeT-NYC - Réponse