Introduction
Un guide pour remplacer l'écran ou l'écran LCD sur un LG VX9200, également connu sous le nom enV3. Implique un peu de soudure et un peu de micro-travail fastidieux, mais pas assez pour être impossible pour le nouveau venu.
Oups ... ça arrive à presque tout le monde. Lâché, piétiné, tordu, envoyé à travers le mauvais cycle dans la vie. Votre écran LCD s'est brisé. Eh bien, pour beaucoup, cela consiste à dépenser quelques centaines de dollars sur un nouveau téléphone, ou à mettre au rebut un téléphone pour un modèle différent et moins. Plus maintenant. Pour moins de 50 $ et environ une heure de travail (peut-être une demi-heure si vous êtes rapide), vous pouvez remplacer cet écran cassé! Préparez-vous à vous salir les mains ...
Ce dont vous avez besoin
-
-
Le évidences! Éteindre le téléphone. Impossible de voir l'écran d'arrêt par le fait évident que ... c'est cassé!
-
Enlever la batterie.
-
-
-
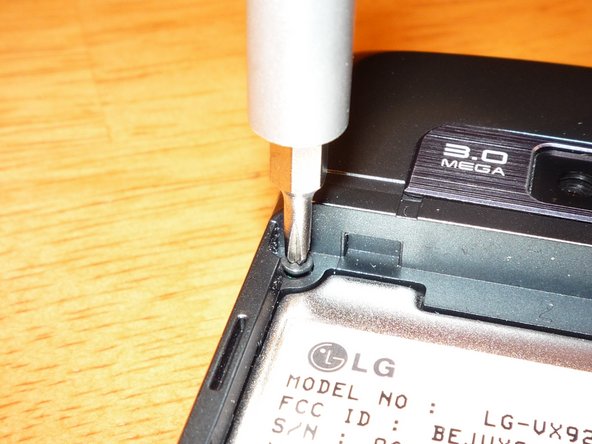
Retirez les 3 couvercles de vis du bord de la charnière du téléphone en utilisant le bord d'une lame de rasoir ou similaire. Ils sortent juste.
-
Lors de la réinstallation, notez que le couvercle central va avec le divot vers la batterie. Les deux autres ne peuvent s'adapter que d'une seule façon et sont interchangeables.
-
-
-
Préparez-vous pour l'étape suivante en retournant toutes les couvertures ouvertes. Aide à éviter qu'ils ne restent coincés lorsque le boîtier est ouvert.
-
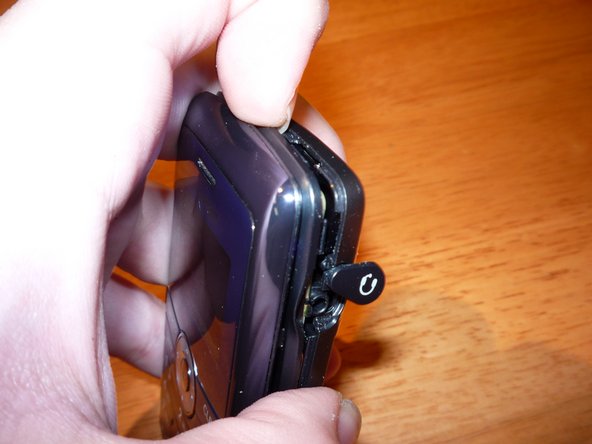
Utilisez un ongle ou tout autre objet non métallique (pour éviter de bosseler / marquer le plastique) pour séparer le boîtier autour du bord. Le bord entier est maintenu avec des boutons qui se séparent avec juste un petit claquement.
-
-
-
-
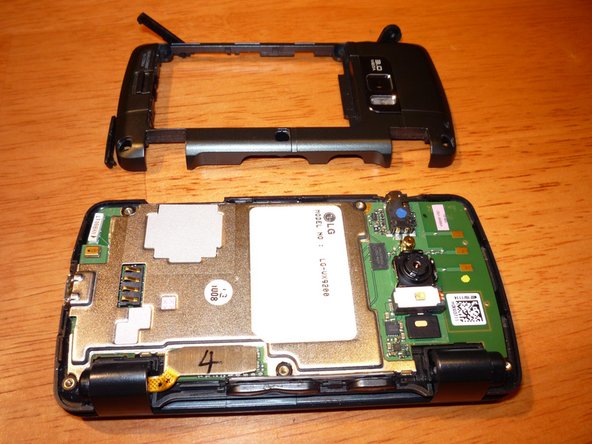
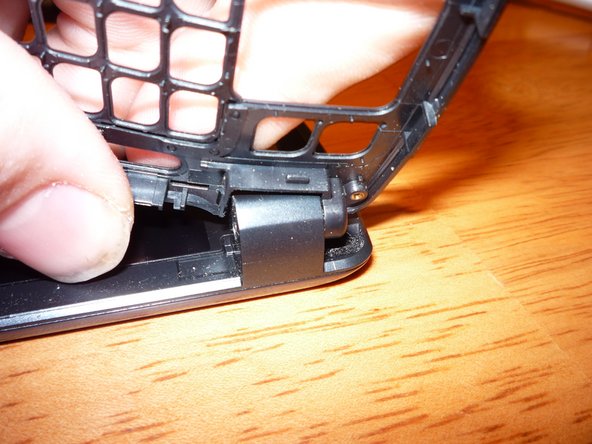
Le boîtier sort de l'écran avant en pliant le cadre autour des clips dans les charnières. Sur le côté avec le câble, pliez le bord extérieur vers l'écran pour l'enrouler autour d'un poteau.
-
Pour retirer le mécanisme, il faut un peu plus de force de flexion. Pliez le bord gauche (d'où le reste du cadre) vers l'extérieur vers l'écran pour l'enlever, et il va libérer autour du mécanisme de charnière en métal.
-
-
-
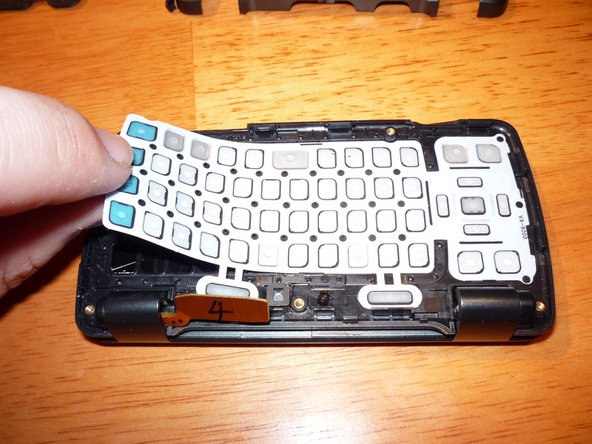
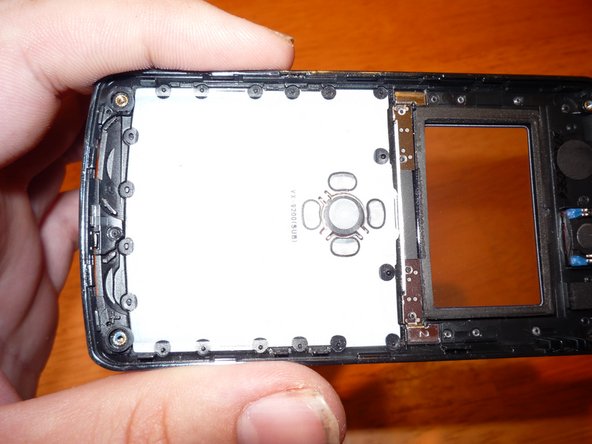
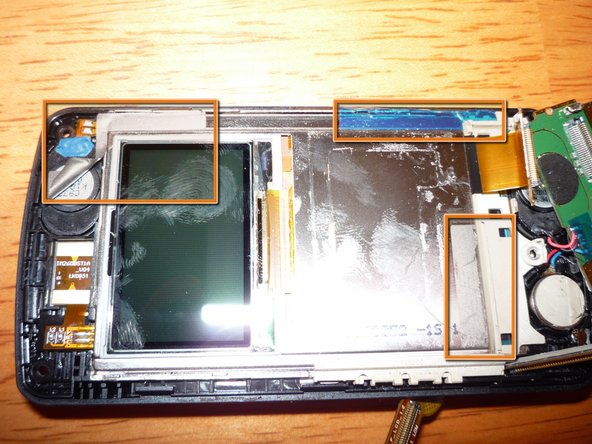
Voici la partie amusante. Tu vois ça? LG a décidé de souder les connecteurs à pression sur l'écran et le clavier. C'est votre travail de les déconnecter ... d'une manière ou d'une autre.
-
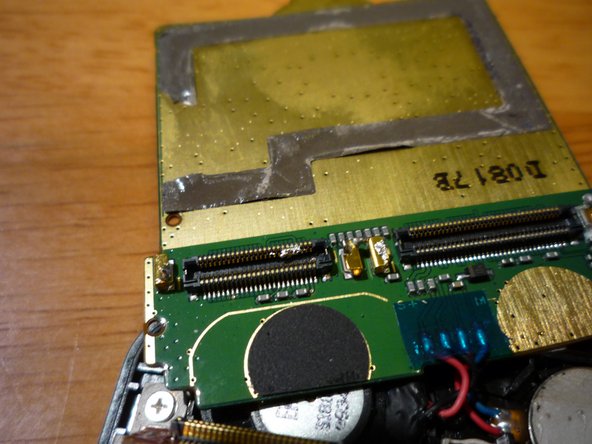
Pour les déconnecter, j'ai appliqué une pression vers le haut sur le bord du connecteur (qui tenait également le panneau d'une main) et j'ai appliqué l'extrémité du fer à souder sur le bord que je tirais. Quand il a fondu, il a sauté, laissant l'autre côté. Répétez l'opération de chaque côté jusqu'à ce que les deux câbles soient déconnectés.
-
Lorsque j'ai déconnecté le câble LCD il a éclaboussé un peu de soudure sur les contacts. Heureusement, il faut de la chaleur pour préparer le métal à adhérer à la soudure, de sorte qu'il a simplement effiloché avec le bord de la lame de rasoir. N'utilisez PAS le fer à souder pour essayer de nettoyer les bulles accidentels, cela serais un désastre.
-
Lors du remontage, assurez-vous de ne pas garder la chaleur trop longtemps. Le plastique aime fondre.
-
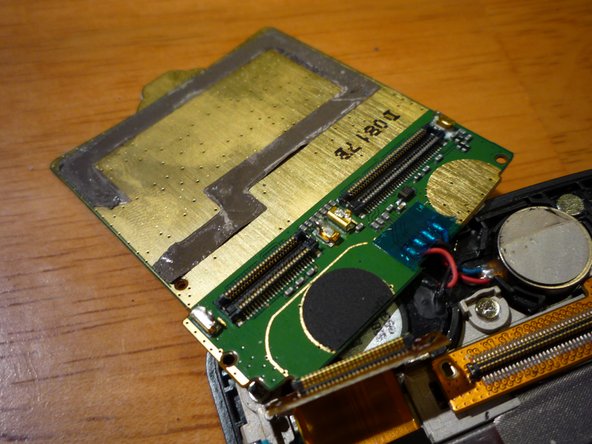
Une fois l'écran LCD retiré, vous devrez dessouder la connexion qui maintient le petit haut-parleur (?) Dans le coin supérieur. La façon dont cela est assemblé est qu'il y a deux couches prises en sandwich. Il suffit donc de chauffer les deux raccords en les tirant légèrement et ils se dégageront lorsque la soudure fondra.
-
-
-
En utilisant le bord de la lame de rasoir ou un autre dispositif approprié, décoller le connecteur de l'écouteur du panneau et le laisser tomber libre.
-
Enfin, l'écran LCD peut être retiré! Vous pouvez aider le retrait de l'écran LCD du dessous, il n'y a pas de couvercle sur le chemin.
-


Pour réassembler votre appareil, suivez ces instructions dans l'ordre inverse.
Pour réassembler votre appareil, suivez ces instructions dans l'ordre inverse.
Annulation : je n'ai pas terminé ce tutoriel.
10 autres ont terminé cette réparation.
Merci à ces traducteurs :
100%

Ces traducteurs nous aident réparer le monde ! Vous voulez contribuer ?
Commencez à traduire ›

12 commentaires
Great writing, thanks for showing how to fix your phone!
Citation de Luke Soules :
Great writing, thanks for showing how to fix your phone!
Hey, I learned from the best... I didn't have a nice clean white background to work with, but I did what I could :) Thanks for the comment! More to come as I end up with more things to fix...
Do you know where a small black rectangular piece (has another small rectangle w/a tab on top & a light grey outline of a rectangle underneath) goes inside of the env3? It popped out sometime between steps 4-6 and I can't figure out where I should put it. Any help would be great. Thanks!
Citation de J S :
Do you know where a small black rectangular piece (has another small rectangle w/a tab on top & a light grey outline of a rectangle underneath) goes inside of the env3? It popped out sometime between steps 4-6 and I can't figure out where I should put it. Any help would be great. Thanks!
Hmm, without a picture I really couldn't tell ya. All I can do is look at the pictures and take a stab guess... you can click the pictures in the guide to get a bigger version, maybe that'll help?
Heck, at either rate, thanks for posting! I know for every 1 person having a problem there's at least 10 other people that ran it all the way through without a problem :)
has another small rectangle w/a tab on top & a light grey outline of a rectangle underneath...
Wait... that could be the earpiece, although that'd be further down than step 6, that's for sure. That's the only thing I had pop out of mine...
Citation de Matt Falcon :
Wait... that could be the earpiece, although that'd be further down than step 6, that's for sure. That's the only thing I had pop out of mine...
Earpiece...um, I'm not sure, but I'm gonna say probably not, although I could be wrong. I tried to look @ your larger photos to see if I could see it somewhere in the pictures, but I couldn't. I'm thinking it's maybe somewhere between where the flexible keyboard & the other side of the battery unit? I'm new to this website; do you know if there is somewhere I can post the picture of the piece?
Citation de J S :
I added a step 13 so that you can see pictures of what the piece looks like (you can delete it afterwards if you'd like). Any help you might have on where to put it would be much appreciated. Thanks!
Aha! Just as I suspected... picture really helps :) I yanked my phone apart for the first few steps to get the cover off, and sure enough, it's the microphone guide. It slips into a slot in the bottom cover (with the battery area cutout) on the other side of the mic hole next to the USB port cutout. Grey part goes up. Don't think it's an absolutely essential part, but it might be used to provide good mic quality (probably doesn't pick up well without it). But that's definitely it :)
Thank you!!! I wasn't sure about where it went and I was definitely looking in the wrong place, even after reading your comment (I think I wasn't quite awake), but after re-reading it, yes, I've figured out where it goes & it fits perfectly there :)
Do you happen to know what type of screw/clip/metal object is inside of the left hinge of the plastic for the keyboard in step 6, by the front clip pictured with the #4 that was written on the metal piece that you detach from the logic board? I think somehow in the process of disassembling & now reassembling the phone, the screw/knob (?) fell out (I didn't think that was possible) and now when trying to put the plastic of the keyboard back on, I have nothing to pull over the left hinge (by the # 4 metal) so the keyboard frame doesn't want to close/open smoothly without bending.
J S -
Hmm, couldn't tell ya there, then. I do know there was only one hinge/tension mechanism on the phone, not 2, so it'll flex/bend when the whole phone isn't assembled. There's one keyed side (with the tensioner), and one round side (that has the screen cable going through it). Left/right is kinda ambiguous... they reverse when you flip the phone around so I have no point of reference ;)
It's the one on the round side that has the screen cable going through it. Maybe a regular screw would fit inside of it?
J S -
Ah. Well, that side has a small plastic insert that has the "nub" on it which holds the screen in place, and can probably slide out pretty easily. I dunno where you'd be able to fit a screw in it... but if you're referring to a hole in the screen side, yeah, that's probably where the plastic insert should be sticking out. It's kind of an A-shaped thing. It can slide back and get in the way of putting it back together... when the frame is assembled, both sides hold it in place. Jeez, you sure do lose a lot of parts... lol