Aller au contenu principal
Accu-Chek Guide Diabetes Meter Battery Replacement

Accu-Chek Guide Diabetes Meter Battery Replacement

Syed Ahmed

Syed Ahmed et 3 autres contributeurs

Dernière mise à jour le January 29, 2025

2 - 5 minutes
Facile

Is your Accu-Chek Guide Diabetes Meter out of power? Follow these easy instructions to change the battery and maintain accurate continuous monitoring of your blood glucose.

Changing the battery is a necessary maintenance activity. Maintaining the Accu-Chek Guide Diabetes Meter's power supply is essential for reliable blood sugar readings, as it plays a critical role in tracking your health.

Before you begin this guide, be sure to turn off your device.

Ce dont vous avez besoin

Pièces

Outils

  • Small Plastic Spudger
    Small Plastic Spudger

Afficher plus…

  1. Accu-Chek Guide Diabetes Meter Battery Replacement, Battery: étape 1, image 1 de 2 Accu-Chek Guide Diabetes Meter Battery Replacement, Battery: étape 1, image 2 de 2
    • Press the OK button to make sure the meter is turned off.

    • Turn the device over and look for the latch on the back of the battery compartment.

  2. Accu-Chek Guide Diabetes Meter Battery Replacement: étape 2, image 1 de 2 Accu-Chek Guide Diabetes Meter Battery Replacement: étape 2, image 2 de 2
    • Push the latch toward the battery door to release the lock, then lift the battery door to remove it.

  3. Accu-Chek Guide Diabetes Meter Battery Replacement: étape 3, image 1 de 3 Accu-Chek Guide Diabetes Meter Battery Replacement: étape 3, image 2 de 3 Accu-Chek Guide Diabetes Meter Battery Replacement: étape 3, image 3 de 3
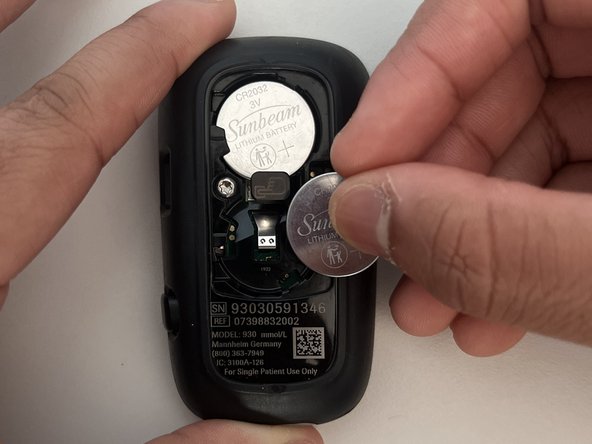
    • Use a plastic spudger near the middle right side of the top 3V battery to pry it from the battery holder.

    • Press down on the middle of the battery holder to eject the bottom battery.

  4. Accu-Chek Guide Diabetes Meter Battery Replacement: étape 4, image 1 de 2 Accu-Chek Guide Diabetes Meter Battery Replacement: étape 4, image 2 de 2
    • Slide the new 3V battery in the top slot, then press down to secure it in place.

    • Replace the 3V battery in the bottom slot.

    • The plus sign on the 3V batteries should face down when placed in each slot.

  5. Accu-Chek Guide Diabetes Meter Battery Replacement: étape 5, image 1 de 2 Accu-Chek Guide Diabetes Meter Battery Replacement: étape 5, image 2 de 2
    • Carefully slide the cover back into place and push it down to lock it securely.

  6. Accu-Chek Guide Diabetes Meter Battery Replacement: étape 6, image 1 de 2 Accu-Chek Guide Diabetes Meter Battery Replacement: étape 6, image 2 de 2
    • Press and hold the OK button for 5-7 seconds to reactivate the meter.

    • Observe the display to confirm the successful reactivation before using the Accu-Chek Guide Diabetes Meter.

    • If you are reactivating the meter after a period of inactivity, it may take a few extra seconds to initialize.

Conclusion

With the successful replacement of the batteries and reactivation of the Accu-Chek Guide Meter, the device is fully operational, ready to provide accurate and reliable readings.

4 autres ont terminé cette réparation.

Syed Ahmed

Membre depuis le 02/03/24

208 Réputation

1 tutoriel rédigé

Équipe

York University, Team M-1, Allen Winter 2024 Membre de l'équipe York University, Team M-1, Allen Winter 2024

YORK-ALLEN-W24SMG1

3 membres

1 tutoriel rédigé

0 commentaires de tutoriel

Ajouter un commentaire

Nombre de vues :

Dernières 24 heures : 4

7 derniers jours : 20

30 derniers jours : 84

Total : 630