Aller au contenu principal
Acer Aspire Switch 10 SW5-012-18MY Docking Connectors Replacement

Acer Aspire Switch 10 SW5-012-18MY Docking Connectors Replacement

Grecia Corrada

Grecia Corrada et 3 autres contributeurs

Dernière mise à jour le June 8, 2018

10 - 15 minutes
Modérée

If the tablet and keyboard of your device are not connecting properly, then you may need to replace the docking connectors on your device. Before attempting to replace the docking connectors, please visit the troubleshooting page, follow the directions under the heading Keyboard Does Not Dock Properly, and attempt any recommendations listed. If you have followed all of the instructions on the troubleshooting page and still have sporadic or non-existent communication between the tablet and keyboard, you can follow this guide to replace the docking connectors on your device.

Ce dont vous avez besoin

Outils

Afficher plus…

  1. Acer Aspire Switch 10 SW5-012-18MY Docking Connectors Replacement, Docking Connectors: étape 1, image 1 de 3 Acer Aspire Switch 10 SW5-012-18MY Docking Connectors Replacement, Docking Connectors: étape 1, image 2 de 3 Acer Aspire Switch 10 SW5-012-18MY Docking Connectors Replacement, Docking Connectors: étape 1, image 3 de 3
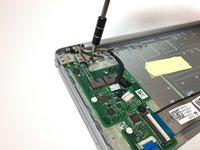
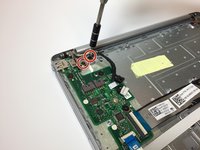
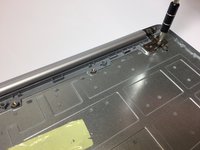
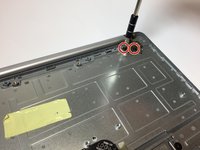
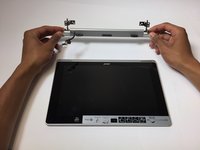
    • Remove the 8, 5.25 mm screws on the back cover using the screwdriver.

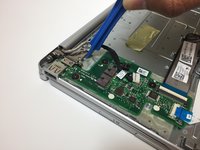
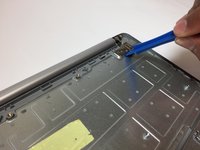
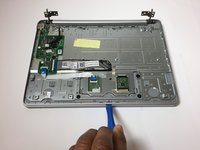
    • Insert the opening tool into the USB port.

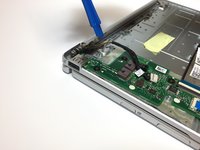
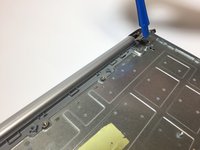
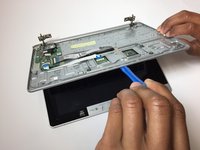
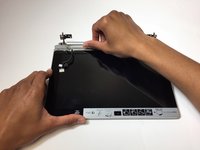
    • Carefully remove the back cover using the opening tool.

  2. Acer Aspire Switch 10 SW5-012-18MY Docking Connectors Replacement: étape 2, image 1 de 3 Acer Aspire Switch 10 SW5-012-18MY Docking Connectors Replacement: étape 2, image 2 de 3 Acer Aspire Switch 10 SW5-012-18MY Docking Connectors Replacement: étape 2, image 3 de 3
    • Remove the yellow tape from the board cables.

    • Carefully unplug the two board cables from their connectors by pulling on them.

  3. Acer Aspire Switch 10 SW5-012-18MY Docking Connectors Replacement: étape 3, image 1 de 2 Acer Aspire Switch 10 SW5-012-18MY Docking Connectors Replacement: étape 3, image 2 de 2
    • Remove the 2, 4.25 mm screws on the left hand tab that are securing the dock in place.

  4. Acer Aspire Switch 10 SW5-012-18MY Docking Connectors Replacement: étape 4, image 1 de 3 Acer Aspire Switch 10 SW5-012-18MY Docking Connectors Replacement: étape 4, image 2 de 3 Acer Aspire Switch 10 SW5-012-18MY Docking Connectors Replacement: étape 4, image 3 de 3
    • Lift up the metal tab on the left side using the opening tool.

    • Using your fingers may be easier than using the opening tool for this particular step, although both can be used.

  5. Acer Aspire Switch 10 SW5-012-18MY Docking Connectors Replacement: étape 5, image 1 de 2 Acer Aspire Switch 10 SW5-012-18MY Docking Connectors Replacement: étape 5, image 2 de 2
    • Remove the 2, 4.25 mm screws on the right hand tab that are securing the dock in place.

  6. Acer Aspire Switch 10 SW5-012-18MY Docking Connectors Replacement: étape 6, image 1 de 3 Acer Aspire Switch 10 SW5-012-18MY Docking Connectors Replacement: étape 6, image 2 de 3 Acer Aspire Switch 10 SW5-012-18MY Docking Connectors Replacement: étape 6, image 3 de 3
    • Lift the metal tab on the right side up using the opening tool.

    • Using your fingers may be easier than using the opening tool for this particular step, although both can be used.

  7. Acer Aspire Switch 10 SW5-012-18MY Docking Connectors Replacement: étape 7, image 1 de 2 Acer Aspire Switch 10 SW5-012-18MY Docking Connectors Replacement: étape 7, image 2 de 2
    • Insert the opening tool between the two sections of the device.

    • Lift up the keyboard section using the opening tool.

  8. Acer Aspire Switch 10 SW5-012-18MY Docking Connectors Replacement: étape 8, image 1 de 3 Acer Aspire Switch 10 SW5-012-18MY Docking Connectors Replacement: étape 8, image 2 de 3 Acer Aspire Switch 10 SW5-012-18MY Docking Connectors Replacement: étape 8, image 3 de 3
    • Carefully pull up on the keyboard section using your hands to remove it from the screen section.

  9. Acer Aspire Switch 10 SW5-012-18MY Docking Connectors Replacement: étape 9, image 1 de 3 Acer Aspire Switch 10 SW5-012-18MY Docking Connectors Replacement: étape 9, image 2 de 3 Acer Aspire Switch 10 SW5-012-18MY Docking Connectors Replacement: étape 9, image 3 de 3
    • Pull the docking connector off of the screen section.

Conclusion

To reassemble your device, follow these instructions in reverse order.

2 autres ont terminé cette réparation.

Grecia Corrada

Membre depuis le 03/19/18

1 155 Réputation

6 tutoriels rédigés

Équipe

Baylor, Team S3-G3, Williams Spring 2018 Membre de l'équipe Baylor, Team S3-G3, Williams Spring 2018

BU-WILLIAMS-S18S3G3

3 membres

7 tutoriels rédigés

1 commentaire de tutoriel

Where do you get the docking ports or whatever it is called? With the magnets

Michael - Réponse

Ajouter un commentaire

Nombre de vues :

Dernières 24 heures : 0

7 derniers jours : 0

30 derniers jours : 23

Total : 3,101