Aller au contenu principal
Acer Iconia Tab A501 Battery Replacement

Acer Iconia Tab A501 Battery Replacement

Trey Bazinet

Trey Bazinet et 6 autres contributeurs

Dernière mise à jour le May 16, 2024

5 - 15 minutes
Facile
Tutoriel étudiant vedette

Batteries tend to lose capacity over time as they are used and eventually fail. If your battery won’t hold a charge or can’t power your device, you may decide to replace the battery. This guide will demonstrate battery replacement for the Acer Iconia Tab A501.

Ce dont vous avez besoin

Outils

Afficher plus…

  1. Acer Iconia Tab A501 Battery Replacement, Back Cover: étape 1, image 1 de 3 Acer Iconia Tab A501 Battery Replacement, Back Cover: étape 1, image 2 de 3 Acer Iconia Tab A501 Battery Replacement, Back Cover: étape 1, image 3 de 3
    • Turn off your device before opening it.

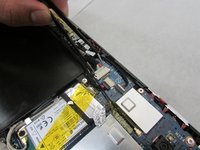
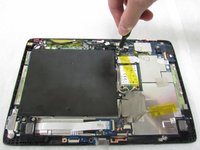
    • Use a plastic opening tool to carefully separate the back cover, starting at the volume buttons.

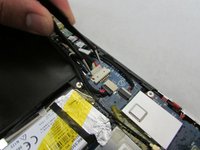
    • Continue separating the back cover along the short side closest to the camera and around the device.
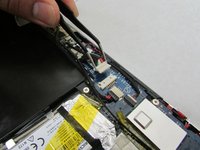
  2. Acer Iconia Tab A501 Battery Replacement: étape 2, image 1 de 1
    • When separated enough, a little more than halfway around the device, the back cover will be easy to take off.

  3. Acer Iconia Tab A501 Battery Replacement, Battery: étape 3, image 1 de 1
    • Take off any tape covering the battery or black battery-motherboard cable.

  4. Acer Iconia Tab A501 Battery Replacement: étape 4, image 1 de 3 Acer Iconia Tab A501 Battery Replacement: étape 4, image 2 de 3 Acer Iconia Tab A501 Battery Replacement: étape 4, image 3 de 3
    Outil utilisé dans cette étape :
    Tweezers
    $3.99
    • In the next step, be careful not to squeeze too hard or scratch the motherboard.

    • Use the angled tweezers to disconnect the white motherboard-battery connector in the middle of the side opposite the docking port.

  5. Acer Iconia Tab A501 Battery Replacement: étape 5, image 1 de 2 Acer Iconia Tab A501 Battery Replacement: étape 5, image 2 de 2
    • Use a Phillips #1 screwdriver to remove the four 4.0 mm Philips head screws connecting the battery to the motherboard.

  6. Acer Iconia Tab A501 Battery Replacement: étape 6, image 1 de 1
    • Take out the battery.

Conclusion

To reassemble your device, follow these instructions in reverse order.

Une autre personne a terminé cette réparation.

0 commentaires

Ajouter un commentaire

Nombre de vues :

Dernières 24 heures : 0

7 derniers jours : 19

30 derniers jours : 22

Total : 683