Aller au contenu principal
Alcatel One Touch Pop 7 Volume Button Assembly Replacement

Alcatel One Touch Pop 7 Volume Button Assembly Replacement

Riley Cooper

Riley Cooper et 3 autres contributeurs

Dernière mise à jour le May 7, 2024

8 minutes
Facile
A besoin de meilleures images

If your volume and/or power button is not working and you have already cleaned away debris this guide will show you how to replace the assembly to fix the problem.

Ce dont vous avez besoin

Outils

Afficher plus…

  1. Alcatel One Touch Pop 7 Volume Button Assembly Replacement, Volume Button Assembly: étape 1, image 1 de 1
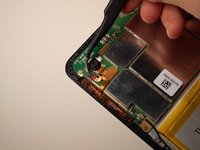
    • Begin working by using the plastic opening tool to remove the back cover of your Alcatel One Touch Pop 7. Opening the flap as shown in the picture will give you an easier start.

  2. Alcatel One Touch Pop 7 Volume Button Assembly Replacement: étape 2, image 1 de 3 Alcatel One Touch Pop 7 Volume Button Assembly Replacement: étape 2, image 2 de 3 Alcatel One Touch Pop 7 Volume Button Assembly Replacement: étape 2, image 3 de 3
    Outil utilisé dans cette étape :
    Tweezers
    $4.99
    • With the back cover removed you will now want to disconnect the battery. Use the tweezers and gently pull the wires as shown in the second picture.

  3. Alcatel One Touch Pop 7 Volume Button Assembly Replacement: étape 3, image 1 de 2 Alcatel One Touch Pop 7 Volume Button Assembly Replacement: étape 3, image 2 de 2
    • The volume button assembly is in the top left corner of the tablet. To begin, you will have to pull the small black tab of the ZIF connector, shown in the second picture, to be able to remove the assembly. The tab is on a hinge so it should not be pulled off completely.

  4. Alcatel One Touch Pop 7 Volume Button Assembly Replacement: étape 4, image 1 de 3 Alcatel One Touch Pop 7 Volume Button Assembly Replacement: étape 4, image 2 de 3 Alcatel One Touch Pop 7 Volume Button Assembly Replacement: étape 4, image 3 de 3
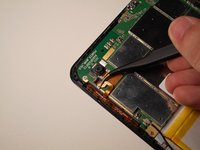
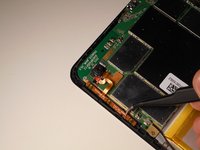
    • Pull the copper ribbon cable from the tab. It should be easily removed, as the ZIF connector is the only thing holding it in place.

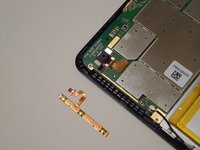
    • Next up is removing the volume button assembly. Another easy removal, simply pull the assembly away from the device and you're done with the removal process.

Conclusion

To reassemble your device, follow these instructions in reverse order with the new volume button assembly replacing the old one.

Une autre personne a terminé cette réparation.

Riley Cooper

Membre depuis le 10/10/16

926 Réputation

5 tutoriels rédigés

Équipe

Sam Houston State, Team 12-1, Blackburne Fall 2016 Membre de l'équipe Sam Houston State, Team 12-1, Blackburne Fall 2016

SHSU-BLACKBURNE-F16S12G1

3 membres

10 tutoriels rédigés

0 commentaires de tutoriel

Ajouter un commentaire

Nombre de vues :

Dernières 24 heures : 0

7 derniers jours : 0

30 derniers jours : 5

Total : 1,028