
Anker Soundcore 3 Microphone Replacement

Introduction
Passez à l'étape 1This is a replacement guide for the microphone on your Anker Soundcore 3. If you find that your microphone is being unresponsive fairly consistently, it may be time to replace it. Replacement of this device will require you to chip away at some glue holding certain components down, so please ensure that you are extremely careful as to not damage anything. This guide proves to only be at about a moderate difficulty so you shouldn't find too much trouble with this guide.
Ce dont vous avez besoin
Outils


Afficher plus…
-
-
Gently heat the perimeter of the device with a hairdryer to loosen the adhesive.
-
Insert a metal spudger in between the speaker's front grill and chassis.
-
Continuously pry around the edges of the casing; you should hear the glue start to separate from the front panel before the two parts separate.
-
-
-
-
Unscrew all 8 of the 10 mm screws from the speaker panel using a Phillips #0 screwdriver
-
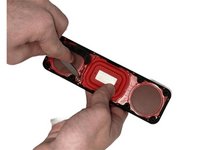
Using the metal spudger, gently pry at the outer-edges of the speaker to remove the rubber/plastic panel that sits above the motherboard.
-
Grip and disconnect the cable connector from both the rubber/plastic panel and the mainboard.
-


To reassemble your device, follow these instructions in reverse order.
To reassemble your device, follow these instructions in reverse order.

Équipe

University of North Texas, Team 5-3, Kilpatrick Fall 2024 Membre de l'équipe University of North Texas, Team 5-3, Kilpatrick Fall 2024
UNT-KILPATRICK-F24S5G3
4 membres
5 tutoriels rédigés