
Astro A40 TR Microphone Jack Replacement
Introduction
Passez à l'étape 1In this guide we will take you through replacing a faulty microphone jack of your Astro A40 TR.
If you want to be able to communicate with fellow gamers but your microphone is starting to intermittently lose sound or completely stopped working, then it may be time to replace your microphone jack. A microphone jack enables sound to transmit into the computer or other device.
In order to completely replace the speaker, step 5 contains instructions on how to solder and desolder connections.
Before you begin, make sure you have the proper tools needed.
Ce dont vous avez besoin


-
-
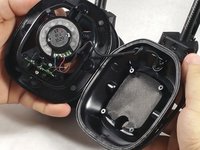
To access the speakers you need to disassemble the earpiece. First remove the foam ear piece by simply pinching the padding and pulling lightly until the magnets disengage.
-
-
-
-
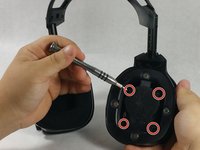
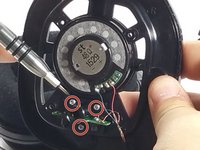
Remove the three screws in the photo with the J00 driver bit, and pull the headphone jack away from the assembly.
-


To reassemble your device, follow these instructions in reverse order.
To reassemble your device, follow these instructions in reverse order.
Annulation : je n'ai pas terminé ce tutoriel.
Une autre personne a terminé cette réparation.
Équipe

UMass Dartmouth, Team 6-5, Martin Fall 2016 Membre de l'équipe UMass Dartmouth, Team 6-5, Martin Fall 2016
UMASSD-MARTIN-F16S6G5
3 membres
10 tutoriels rédigés