
Asus 1015E-DS03 Front Screen Trim Replacement
Introduction
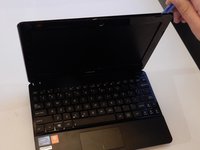
Passez à l'étape 1This guide will show the user how to remove the front secret trim. The only tool needed is a spudger which will be used to push up the tabs connecting the screen to the base of the laptop.
Ce dont vous avez besoin


-
-
-
Push up on the back of the tabs that cover the hinges connecting the screen to the base of the laptop.
-
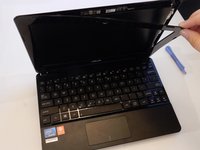
While pushing up on the back of the tabs, insert the spudger into the opening created from pushing on the tabs until the tab detaches.
-


To reassemble your device, follow these instructions in reverse order.
To reassemble your device, follow these instructions in reverse order.
Annulation : je n'ai pas terminé ce tutoriel.
2 autres ont terminé cette réparation.
Équipe

Clemson, Team 7-4, Benson Spring 2016 Membre de l'équipe Clemson, Team 7-4, Benson Spring 2016
CLEM-BENSON-S16S7G4
5 membres
7 tutoriels rédigés