Aller au contenu principal
Canon PowerShot ELPH 310 HS Shutter Button Replacement

Canon PowerShot ELPH 310 HS Shutter Button Replacement

Brandon

Brandon et 3 autres contributeurs

Dernière mise à jour le December 24, 2015

20 minutes
Modérée
Photos d’action
Nécessite plus d'images

The Canon PowerShot Elph 310 HS may have issues with the shutter button sticking. Replacing the button should only take a few minutes with these steps.

Ce dont vous avez besoin

Outils

  1. Canon PowerShot ELPH 310 HS Shutter Button Replacement, External Panels: étape 1, image 1 de 1
    • Use the Phillips #000 screwdriver from the iFixit tool kit to unscrew the two image stabilizer panel’s 2 mm Phillips head screws.

    • Using your hands, remove the image stabilizer panel.

  2. Canon PowerShot ELPH 310 HS Shutter Button Replacement: étape 2, image 1 de 2 Canon PowerShot ELPH 310 HS Shutter Button Replacement: étape 2, image 2 de 2
    • Unscrew the two 4 mm Phillips head screws from the bottom side of the camera.

  3. Canon PowerShot ELPH 310 HS Shutter Button Replacement: étape 3, image 1 de 2 Canon PowerShot ELPH 310 HS Shutter Button Replacement: étape 3, image 2 de 2
    • Using your hand, open the battery portal located on the bottom left of the camera. The screw is in the bottom left of the battery portal.

    • Unscrew the hidden 4mm Phillips head screw inside the battery portal.

  4. Canon PowerShot ELPH 310 HS Shutter Button Replacement: étape 4, image 1 de 2 Canon PowerShot ELPH 310 HS Shutter Button Replacement: étape 4, image 2 de 2
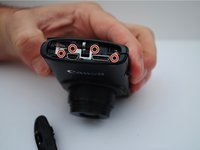
    • Remove the HDMI side panel with your hands.

    • Unscrew the four 4 mm Phillips head screws from the inside of the camera.

  5. Canon PowerShot ELPH 310 HS Shutter Button Replacement: étape 5, image 1 de 1
    • The back side of the camera should pop off or be removed by hand.

  6. Canon PowerShot ELPH 310 HS Shutter Button Replacement: étape 6, image 1 de 2 Canon PowerShot ELPH 310 HS Shutter Button Replacement: étape 6, image 2 de 2
    • Unscrew the one 3 mm Phillips head screw on the top of the camera.

  7. Canon PowerShot ELPH 310 HS Shutter Button Replacement: étape 7, image 1 de 1
    • Manually remove the front panel from the camera.

  8. Canon PowerShot ELPH 310 HS Shutter Button Replacement, Shutter Button: étape 8, image 1 de 1
    • Using your hand, lift and remove the shutter button deck from the top of camera.

    • The front clasp is fragile.

  9. Canon PowerShot ELPH 310 HS Shutter Button Replacement: étape 9, image 1 de 1
    • Unclip the cables from the front of the motherboard, using your hands.

Conclusion

To reassemble your device, follow these instructions in reverse order.

Brandon

Membre depuis le 09/24/15

101 Réputation

1 tutoriel rédigé

Équipe

University of Alabama, Team 1-4, Sydow campbell Fall 2015 Membre de l'équipe University of Alabama, Team 1-4, Sydow campbell Fall 2015

UA-SYDOW CAMPBELL-F15S1G4

4 membres

4 tutoriels rédigés

0Commentaires sur le guide

Ajouter un commentaire

Nombre de vues :

Dernières 24 heures : 0

7 derniers jours : 2

30 derniers jours : 11

Total : 539