Aller au contenu principal
Canon PowerShot G1 X Buttons Replacement

Canon PowerShot G1 X Buttons Replacement

Benjamin Irvin Bunch

Benjamin Irvin Bunch et 2 autres contributeurs

Dernière mise à jour le June 30, 2020

5 minutes
Facile
Photos d’action

Be careful when removing each screw on this camera. Each screw has a specific location and they are different sizes. The best way to make sure that you do not lose or misplace any screws is by making a list of what screws you take out and where it was located.

Ce dont vous avez besoin

Outils

  • Spudger
    Spudger
  • Phillips #000 Screwdriver
    Phillips #000 Screwdriver
  1. Canon PowerShot G1 X Buttons Replacement, Back Camera Casing: étape 1, image 1 de 2 Canon PowerShot G1 X Buttons Replacement, Back Camera Casing: étape 1, image 2 de 2
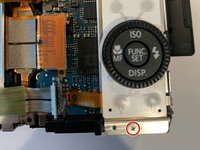
    • To begin removing the back camera casing, unscrew the Phillips screw underneath the panel covering the USB connections on the side of the camera. Use a Phillips Head 00 screwdriver for this screw.

    • Remove the screw located directly beneath the USB cover located in the second photo. Use a Phillips Head 00 screwdriver for this screw.

  2. Canon PowerShot G1 X Buttons Replacement: étape 2, image 1 de 1
    • After removing the first screw flip to the bottom side of the camera and unscrew the two screws located toward the back side of the casing. The screw on the front side can be left in. Use a Phillips Head 00 screwdriver for both of these screws.

  3. Canon PowerShot G1 X Buttons Replacement: étape 3, image 1 de 1
    • Now flip to the opposite side of the USB panel screw and unscrew the two screws holding the small speaker cover portion of the camera. Use a Phillips Head 00 screwdriver for both of these screws.

  4. Canon PowerShot G1 X Buttons Replacement: étape 4, image 1 de 1
    • The last screw is located towards the top side of the back of the camera next to the view finder. Unscrew by using a Phillips Head 00 screwdriver.

  5. Canon PowerShot G1 X Buttons Replacement: étape 5, image 1 de 1
    • Remove the side panel covering the speaker by gently pulling it away from the camera. You can also use spudgers to create a lever to help remove the panel.

  6. Canon PowerShot G1 X Buttons Replacement: étape 6, image 1 de 1
    • Remove the back casing by gently pulling. You could also use spudger to create a lever to help pry it off.

  7. Canon PowerShot G1 X Buttons Replacement, Buttons: étape 7, image 1 de 2 Canon PowerShot G1 X Buttons Replacement, Buttons: étape 7, image 2 de 2
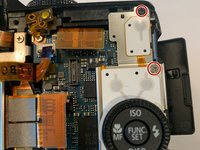
    • Remove the two screws above the buttons followed by the screw on the bottom, using a Phillips #00 screwdriver.

  8. Canon PowerShot G1 X Buttons Replacement: étape 8, image 1 de 1
    • Remove the screw on the side of the buttons using a Phillips #00 screwdriver.

  9. Canon PowerShot G1 X Buttons Replacement: étape 9, image 1 de 1
    • Gently remove buttons by hand, once all of the screws holding the buttons in are removed.

Conclusion

To reassemble your device, follow these instructions in reverse order.

0 commentaires

Ajouter un commentaire

Nombre de vues :

Dernières 24 heures : 0

7 derniers jours : 3

30 derniers jours : 12

Total : 409