Aller au contenu principal
Canon PowerShot G1 X Screen Casing Replacement

Canon PowerShot G1 X Screen Casing Replacement

Joseph Cosgrove

Joseph Cosgrove et 7 autres contributeurs

Dernière mise à jour le June 27, 2024

15 - 30 minutes
Facile

This guide will show you how to replace the screen casing of your Canon PowerShot G1 X camera. The screen casing protects the camera's display screen and ensures it functions properly. If you've accidentally damaged the casing, follow these step-by-step instructions to safely replace it.

A damaged screen casing can result in exposed internal components, cause further damage to the camera, and reduce device functionality. If you see visible damage or experience issues with your camera's screen, then it's important to perform this repair.

Before you begin, make sure your camera is powered off and the battery is removed for safety. Consider wearing anti-static wrist straps and gloves to handle sensitive components and protect against shock. Back up your data to avoid any loss during the repair.

Ce dont vous avez besoin

Outils

  1. Canon PowerShot G1 X Screen Casing Replacement, Screen Casing: étape 1, image 1 de 1
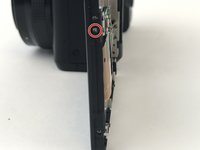
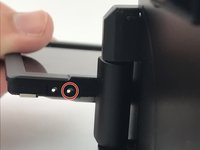
    • Remove the screws on the outside of the screen case shown in the photo.

  2. Canon PowerShot G1 X Screen Casing Replacement: étape 2, image 1 de 2 Canon PowerShot G1 X Screen Casing Replacement: étape 2, image 2 de 2
    • Remove the screws on the side of the screen casing next to the hinge on the camera.

  3. Canon PowerShot G1 X Screen Casing Replacement: étape 3, image 1 de 1
    • Remove the back side of the screen casing. When removing this back casing there will be a clear plastic piece inside, remove this as well. If this is the piece you are servicing, replace it and skip to the conclusion of this guide.

  4. Canon PowerShot G1 X Screen Casing Replacement: étape 4, image 1 de 2 Canon PowerShot G1 X Screen Casing Replacement: étape 4, image 2 de 2
    • With the plastic piece removed, locate the screws on the outside and inside of the casing shown in the photos. Remove these screws.

  5. Canon PowerShot G1 X Screen Casing Replacement: étape 5, image 1 de 1
    • Locate the four clips on the metal piece covering the back of the screen as seen in the photo. Push each of these clips in towards the center of the piece and pull up on the metal plate.

  6. Canon PowerShot G1 X Screen Casing Replacement: étape 6, image 1 de 2 Canon PowerShot G1 X Screen Casing Replacement: étape 6, image 2 de 2
    • Completely remove the casing from the screen and replace.

Conclusion

To reassemble your device, follow these instructions in reverse order.

Joseph Cosgrove

Membre depuis le 02/12/17

313 Réputation

3 tutoriels rédigés

Équipe

USF Tampa, Team 20-1, Remmell Spring 2017 Membre de l'équipe USF Tampa, Team 20-1, Remmell Spring 2017

USFT-REMMELL-S17S20G1

3 membres

4 tutoriels rédigés

0 commentaires

Ajouter un commentaire

Nombre de vues :

Dernières 24 heures : 0

7 derniers jours : 3

30 derniers jours : 7

Total : 593