Aller au contenu principal
Pour réparer ensemble - Je crée un compte
Canon PowerShot S100 Control Dial Assembly Replacement

Canon PowerShot S100 Control Dial Assembly Replacement

Ricky

Ricky et 4 autres contributeurs

Dernière mise à jour le 7 mai 2024

10 - 15 minutes
Modérée

The control dial on the back of the camera can be removed and replaced.The control dial is used to adjust the camera's settings and navigate the camera menus.

Ce dont vous avez besoin

Outils

Afficher plus…

  1. Canon PowerShot S100 Control Dial Assembly Replacement, Outer Case: étape 1, image 1 de 3 Canon PowerShot S100 Control Dial Assembly Replacement, Outer Case: étape 1, image 2 de 3 Canon PowerShot S100 Control Dial Assembly Replacement, Outer Case: étape 1, image 3 de 3
    • Remove the 2 screws (3.2mm, Phillips #00) found on the bottom side of the camera.

    • Remove the 2 screws (3.2mm, Phillips #00) found on the side of the camera.

    • Remove the 2 screws (3.2mm, Phillips #00) found on the side of the camera where the terminals are.

    • Open the flap revealing the cable inputs and remove the final screw (3.8mm, Phillips #00) found inside.

  2. Canon PowerShot S100 Control Dial Assembly Replacement: étape 2, image 1 de 1
    • Turn the camera so that the LCD screen is facing you.

    • Remove the back panel by pulling it off of the camera.

  3. Canon PowerShot S100 Control Dial Assembly Replacement: étape 3, image 1 de 3 Canon PowerShot S100 Control Dial Assembly Replacement: étape 3, image 2 de 3 Canon PowerShot S100 Control Dial Assembly Replacement: étape 3, image 3 de 3
    Outil utilisé dans cette étape :
    Tweezers
    $4.99
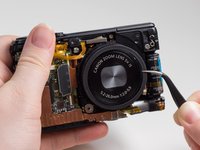
    • Turn the camera so that the lens is facing you.

    • Do not pull the front panel off without removing the ribbon cable first.

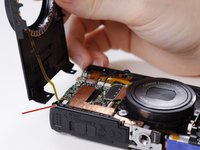
    • Slowly lift the front panel from the camera.

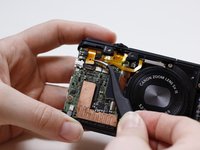
    • The ribbon cable is connecting the front panel to the camera. Using the tweezers, gently pull the ribbon cable out of its socket.

    • A spudger may also be used to remove the ribbon cable.

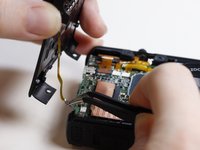
    • Remove the rubber guard that rests on top of the lens.

  4. Canon PowerShot S100 Control Dial Assembly Replacement, Control Dial Assembly: étape 4, image 1 de 1
    • Turn the camera over so that the LCD screen is facing you.

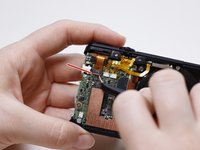
    • Remove the screw (3.9mm, Phillips #00) that is attaching the thin metal frame to the camera.

    • Remove the 2 screws (3.1mm, Phillips #00) that are attaching the control dial panel to the camera.

  5. Canon PowerShot S100 Control Dial Assembly Replacement: étape 5, image 1 de 1
    Outil utilisé dans cette étape :
    Tweezers
    $4.99
    • Using the tweezers, detach the ribbon cable that is connected to the dial panel.

    • A spudger may also be used to remove the ribbon cable.

  6. Canon PowerShot S100 Control Dial Assembly Replacement: étape 6, image 1 de 2 Canon PowerShot S100 Control Dial Assembly Replacement: étape 6, image 2 de 2
    • Turn the camera over so that the lens is facing you.

    • Using the tweezers, gently lift the flap that is securing the ribbon cable to the motherboard.

    • Using the tweezers, remove the ribbon cable from its socket.

    • A spudger may also be used to remove the ribbon cable.

  7. Canon PowerShot S100 Control Dial Assembly Replacement: étape 7, image 1 de 1
    • Turn the camera over so that the LCD screen is facing you.

    • Gently pull the control dial panel, and its attached ribbon cable, through the opening between the top panel and the camera body.

Conclusion

To reassemble your device, follow these instructions in reverse order.

Équipez-vous pour vos futures réparations

Voir tous les produits

Ricky

Membre depuis le 02/23/15

975 Réputation

5 tutoriels rédigés

Équipe

USF Tampa, Team 1-4, Leahy Winter 2015 Membre de l'équipe USF Tampa, Team 1-4, Leahy Winter 2015

USFT-LEAHY-W15S1G4

4 membres

5 tutoriels rédigés

1 commentaire de tutoriel

I have Canon S100 and it was stuck. Can I send this camera to you to get it fixed and if so, what is your address and how much it will cost?

Yeluchuri Paparao - Réponse

Ajouter un commentaire

Nombre de vues :

Dernières 24 heures : 0

7 derniers jours : 8

30 derniers jours : 18

Total : 1,463