Aller au contenu principal
Canon PowerShot S50 Left Motherboard Replacement

Canon PowerShot S50 Left Motherboard Replacement

Jacob

Jacob et 6 autres contributeurs

Dernière mise à jour le January 28, 2014

20 - 30 minutes
Modérée
Tutoriel vedette

Use this guide to remove and/or replace the motherboard on the left side of the camera.

Ce dont vous avez besoin

Outils

Afficher plus…

iFixit touche une commission lorsque vous achetez par l'intermédiaire de ces liens.
  1. Canon PowerShot S50 Left Motherboard Replacement, Battery: étape 1, image 1 de 2 Canon PowerShot S50 Left Motherboard Replacement, Battery: étape 1, image 2 de 2
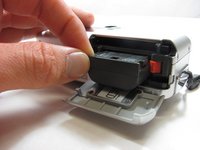
    • Place camera LCD side up and press up on the battery door.

    • Let it swing open until you can see the battery inside.

  2. Canon PowerShot S50 Left Motherboard Replacement: étape 2, image 1 de 1
    • Press down on the orange plastic.

    • This will gently eject the battery from its compartment.

  3. Canon PowerShot S50 Left Motherboard Replacement: étape 3, image 1 de 2 Canon PowerShot S50 Left Motherboard Replacement: étape 3, image 2 de 2
    • Holding the edges, slide out the battery.

  4. Canon PowerShot S50 Left Motherboard Replacement, Front Panel/Battery Door: étape 4, image 1 de 1
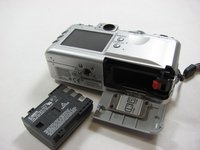
    • Look at the camera from the side with the lanyard and 4 screws.

    • Remove the two 3.4 mm screws on the metallic colored part.

  5. Canon PowerShot S50 Left Motherboard Replacement: étape 5, image 1 de 1
    • Remove the 3mm screw on the top left.

    • NOTE: When reassembling, it is helpful to put the top screw back in before placing the front cover back on the camera.

    • Now remove the 5.3mm screw on the bottom.

  6. Canon PowerShot S50 Left Motherboard Replacement: étape 6, image 1 de 1
    • Place the camera LCD side down.

    • Remove the two 5.3mm screws by the battery door.

  7. Canon PowerShot S50 Left Motherboard Replacement: étape 7, image 1 de 1
    • Remove the four 3.4mm screws on the bottom of the camera around the tripod mount.

    • Make sure to keep these screws separate from the previous 5.3 mm screws.

  8. Canon PowerShot S50 Left Motherboard Replacement: étape 8, image 1 de 1
    • Stand the camera back up.

    • Remove the two 3.6mm screws on the side with the A/V Out port.

  9. Canon PowerShot S50 Left Motherboard Replacement: étape 9, image 1 de 1
    • Lift open the rubber flap covering the A/V Out port.

    • Remove the 3.4mm screw in the center.

    • During reassembly, put the A/V out rubber door on before replacing the front panel of the camera

  10. Canon PowerShot S50 Left Motherboard Replacement: étape 10, image 1 de 1
    • Use a spudger and gently open up the front panel of the camera.

    • A thin plastic ribbon will stay connected by a brown piece to front panel of the camera.

  11. Canon PowerShot S50 Left Motherboard Replacement: étape 11, image 1 de 1
    • There will be a brown plastic piece keeping the thin plastic ribbon in place.

    • Use the spudger to pull out the brown plastic piece attached to the orange plastic.

  12. Canon PowerShot S50 Left Motherboard Replacement: étape 12, image 1 de 1
    Outil utilisé dans cette étape :
    Tweezers
    $4.99
    • Use a pair of tweezers and remove the metal piece inside the camera.

  13. Canon PowerShot S50 Left Motherboard Replacement: étape 13, image 1 de 1
    • Remove the battery door

    • NOTE: Putting this back on requires aligning the spring on the back of the door with the hole on the camera

  14. Canon PowerShot S50 Left Motherboard Replacement, Left Motherboard: étape 14, image 1 de 1
    • Disconnect the black and red cable on the left side of the lens.

  15. Canon PowerShot S50 Left Motherboard Replacement: étape 15, image 1 de 1
    • Disconnect the two orange ribbons on the front of the mother board.

  16. Canon PowerShot S50 Left Motherboard Replacement: étape 16, image 1 de 1
    • Pull off the orange ribbon on the upper left of the motherboard.

    • This will become available only after removing the ribbon on top.

    • Remove the other two orange ribbons on the middle of the left motherboard.

  17. Canon PowerShot S50 Left Motherboard Replacement: étape 17, image 1 de 1
    • Remove the 3.3mm screw halfway up the left side of the motherboard just to the left of the lens.

    • Go under the piece of plastic and remove the 2.6mm screw.

  18. Canon PowerShot S50 Left Motherboard Replacement: étape 18, image 1 de 2 Canon PowerShot S50 Left Motherboard Replacement: étape 18, image 2 de 2
    • Unplug the top part of the left motherboard.

    • Gently lift the left motherboard up to remove

Conclusion

To reassemble your device, follow these instructions in reverse order.

Jacob

Membre depuis le 03/29/12

13 Réputation

3 tutoriels rédigés

Équipe

Cal Poly, Team 7-34, Maness Spring 2012 Membre de l'équipe Cal Poly, Team 7-34, Maness Spring 2012

CPSU-MANESS-S12S7G34

5 membres

6 tutoriels rédigés

0 commentaires

Ajouter un commentaire

Nombre de vues :

Dernières 24 heures : 0

7 derniers jours : 4

30 derniers jours : 12

Total : 1,184