Aller au contenu principal

Canon PowerShot S500 Front and Rear Casing Replacement

Ce dont vous avez besoin

  1. Canon PowerShot S500 Front and Rear Casing  Replacement, Front and Rear Casing : étape 1, image 1 de 2 Canon PowerShot S500 Front and Rear Casing  Replacement, Front and Rear Casing : étape 1, image 2 de 2
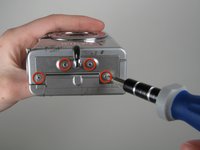
    • Unscrew five Phillips screws using a #0 Phillips screwdriver.

    • One screw is on upper right corner of the back panel.

    • The other four screws are on the bottom of the camera.

  2. Canon PowerShot S500 Front and Rear Casing  Replacement: étape 2, image 1 de 1
    • Open the memory card cover by moving the slide switch toward the top end of of the camera.

    • Remove the memory card from the slot.

  3. Canon PowerShot S500 Front and Rear Casing  Replacement: étape 3, image 1 de 1
    • Remove the rear cover from the rest of the camera.

    • This may require gentle rocking of the case to free it.

  4. Canon PowerShot S500 Front and Rear Casing  Replacement: étape 4, image 1 de 2 Canon PowerShot S500 Front and Rear Casing  Replacement: étape 4, image 2 de 2
    • Unscrew the four Phillips screws from the side of the casing and one screw from the bottom using a #0 Phillips screwdriver.

  5. Canon PowerShot S500 Front and Rear Casing  Replacement: étape 5, image 1 de 1
    • Free the front cover from the rest of the camera.

    • The cover may require gentle rocking to remove.

Ligne d'arrivée

Une autre personne a terminé cette réparation.

Nathan Balcom

Membre depuis le 01/21/10

81 Réputation

8 tutoriels rédigés

Équipe

Cal Poly, Team 16-28, Maness Winter 2010 Membre de l'équipe Cal Poly, Team 16-28, Maness Winter 2010

CPSU-MANESS-W10S16G28

4 membres

8 tutoriels rédigés

0 commentaires

Ajouter un commentaire

Nombre de vues :

Dernières 24 heures : 0

7 derniers jours : 0

30 derniers jours : 2

Total : 1,602