Aller au contenu principal

Canon Powershot SX500 IS Lens Replacement

Ce dont vous avez besoin

  1. Canon Powershot SX500 IS Lens Replacement, Battery: étape 1, image 1 de 1
    • Rotate the camera to expose the underside of the camera.

  2. Canon Powershot SX500 IS Lens Replacement: étape 2, image 1 de 1
    • Slide the rounded rectangle tab to the left to release the battery cover.

  3. Canon Powershot SX500 IS Lens Replacement: étape 3, image 1 de 1
    • Push the small orange tab forward to release the battery (Battery is ready for removal).

  4. Canon Powershot SX500 IS Lens Replacement, Back Cover: étape 4, image 1 de 3 Canon Powershot SX500 IS Lens Replacement, Back Cover: étape 4, image 2 de 3 Canon Powershot SX500 IS Lens Replacement, Back Cover: étape 4, image 3 de 3
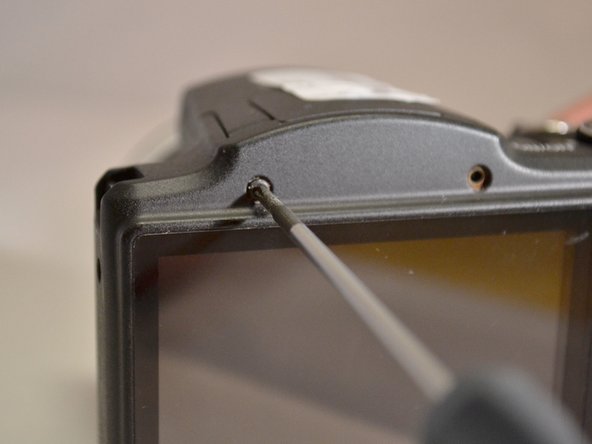
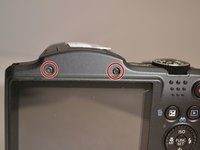
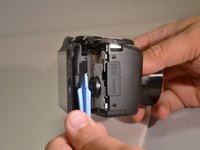
    • Using the Phillips 00 screwdriver, remove the two 4mm top screws above the LCD screen.

  5. Canon Powershot SX500 IS Lens Replacement: étape 5, image 1 de 1
    • Using the Phillips 00 screwdriver, remove the two 4mm side screws to the left of the LCD screen.

  6. Canon Powershot SX500 IS Lens Replacement: étape 6, image 1 de 1
    • Using the Phillips 00 screwdriver, remove the two 4mm side screws to the left of the LCD screen.

  7. Canon Powershot SX500 IS Lens Replacement: étape 7, image 1 de 1
    • Using the Phillips 00 screwdriver, remove the three 4mm screws from the underside of the camera.

  8. Canon Powershot SX500 IS Lens Replacement: étape 8, image 1 de 2 Canon Powershot SX500 IS Lens Replacement: étape 8, image 2 de 2
    • Using the plastic pry tool, remove the back cover from camera.

  9. Canon Powershot SX500 IS Lens Replacement, LCD Screen: étape 9, image 1 de 1
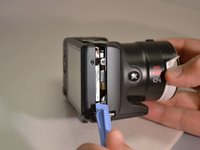
    • Using spudger, lift the tab on the connector and remove the orange ribbon from motherboard (LCD screen is separated from camera).

  10. Canon Powershot SX500 IS Lens Replacement, Lens: étape 10, image 1 de 1
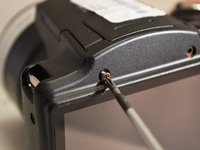
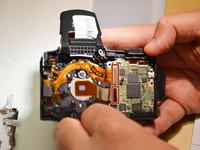
    • Using the Phillips 00 screwdriver remove the seven 6mm screws from the housing plate of the LCD screen.

  11. Canon Powershot SX500 IS Lens Replacement: étape 11, image 1 de 1
    • Using the Phillips 00 screwdriver, remove the 4mm mounting screw from underneath the flash.

  12. Canon Powershot SX500 IS Lens Replacement: étape 12, image 1 de 1
    • Using the spudger, lift the flash unit away from the metal housing (Flash is lifted to allow more room for metal housing).

  13. Canon Powershot SX500 IS Lens Replacement: étape 13, image 1 de 1
    • Using the spudger, remove the metal housing (Metal housing is removed from camera).

  14. Canon Powershot SX500 IS Lens Replacement: étape 14, image 1 de 2 Canon Powershot SX500 IS Lens Replacement: étape 14, image 2 de 2
    • Using the spudger, lift the tab on the ZIF connector and remove both orange ribbons connected to the green motherboard (Motherboard is lifted from camera).

  15. Canon Powershot SX500 IS Lens Replacement: étape 15, image 1 de 1
    • Remove the lens from the lens shaft (Lens is removed from camera).

Conclusion

To reassemble your device, follow these instructions in reverse order.

2 autres ont terminé cette réparation.

Jody Wilkerson

Membre depuis le 04/07/15

565 Réputation

4 tutoriels rédigés

0 commentaires

Ajouter un commentaire

Nombre de vues :

Dernières 24 heures : 2

7 derniers jours : 10

30 derniers jours : 37

Total : 3,593