Aller au contenu principal
Canon SX40 HS camera LCD Screen Cover Replacement

Canon SX40 HS camera LCD Screen Cover Replacement

John Bui

John Bui et 4 autres contributeurs

Dernière mise à jour le March 21, 2018

Aucune estimation
Modérée
Photos d’action
Meilleure introduction

Ce dont vous avez besoin

Outils

  • Phillips #00 Screwdriver
    Phillips #00 Screwdriver
  • Spudger
    Spudger
  • iFixit Opening Tool
    iFixit Opening Tool

Afficher plus…

  1. Canon SX40 HS camera LCD Screen Cover Replacement, LCD Screen Cover: étape 1, image 1 de 2 Canon SX40 HS camera LCD Screen Cover Replacement, LCD Screen Cover: étape 1, image 2 de 2
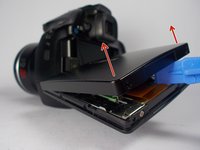
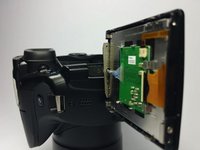
    • Open/turn the LCD screen until it fully extends outwards.

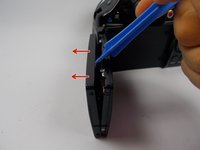
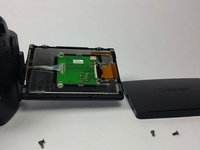
    • Remove these two 4 mm black screws on the left side of the screen with a Phillips size #00 screwdriver.

  2. Canon SX40 HS camera LCD Screen Cover Replacement: étape 2, image 1 de 1
    • Partially close the screen and rotate it 90 degrees until the screen is facing upwards (photo view from the left front of the camera). Remove the 4mm black screw, indicated in the picture, with a Phillips #00 screwdriver.

  3. Canon SX40 HS camera LCD Screen Cover Replacement: étape 3, image 1 de 1
    • Rotate the screen 180 degrees until the monitor is facing downwards. Remove the 4mm black screw, indicated in the picture, with a Phillips #00 screwdriver.

  4. Canon SX40 HS camera LCD Screen Cover Replacement: étape 4, image 1 de 3 Canon SX40 HS camera LCD Screen Cover Replacement: étape 4, image 2 de 3 Canon SX40 HS camera LCD Screen Cover Replacement: étape 4, image 3 de 3
    • Using a plastic opening tool, remove the unfastened LCD screen cover from the camera.

    • Be careful not to pry and damage the circuit card under the screen cover.

  5. Canon SX40 HS camera LCD Screen Cover Replacement: étape 5, image 1 de 3 Canon SX40 HS camera LCD Screen Cover Replacement: étape 5, image 2 de 3 Canon SX40 HS camera LCD Screen Cover Replacement: étape 5, image 3 de 3
    • This is what you should see after removing the LCD screen cover. Replace the LCD screen cover if damaged.

Conclusion

To reassemble your device, follow these instructions in reverse order.

2 autres ont terminé cette réparation.

John Bui

Membre depuis le 03/26/15

352 Réputation

3 tutoriels rédigés

Équipe

UMass Dartmouth, Team 7-7, Cichon Spring 2015 Membre de l'équipe UMass Dartmouth, Team 7-7, Cichon Spring 2015

UMASSD-CICHON-S15S7G7

3 membres

3 tutoriels rédigés

0 commentaires

Ajouter un commentaire

Nombre de vues :

Dernières 24 heures : 0

7 derniers jours : 6

30 derniers jours : 26

Total : 1,898