Introduction
Si votre écran iPhone 11 est fissuré, que le tactile ne répond plus ou ne montre pas d'image lorsqu'il est allumé, suivez ce tutoriel pour réparer votre iPhone avec un nouvel écran.
Ce tutoriel est écrit pour les ensembles écran iPhone 11 avec la plaque de protection LCD métallique pré-installée. Si votre nouvel écran n'inclut pas cette plaque, suivez ce tutoriel à la place pour effectuer votre réparation écran iPhone 11.
Le module haut-parleur interne + capteurs fixés au dos de l'écran est couplé individuellement en usine avec votre iPhone. Vous devez donc suivre les instructions ci-dessous pour le transférer depuis votre ancien écran sur le nouveau. Cette pièce comprend l'illuminateur infrarouge qui fait partie intégrante la sécurité biométrique de Face ID. S'il est endommagé ou remplacé, Face ID ne fonctionnera plus, donc faites très attention à n'endommager aucun de ces capteurs durant la procédure. Sinon, seul un technicien "agréé" par Apple pourra restaurer la fonctionnalité Face ID.
Remarque : la fonctionnalité True Tone ne fonctionnera plus après un changement écran iPhone 11, même si vous utilisez un écran d'origine Apple.
Ce dont vous avez besoin
-
-
Éteignez votre iPhone avant de commencer à le démonter.
-
Dévissez les deux vis Pentalobe de 6,7 mm de long en bas de l'écran de l'iPhone.
-
-
-
Mesurez 3 mm à partir de la pointe et tracez une ligne sur le médiator avec un marqueur permanent.
Got to step 2 and realized the fix kit doesn't include an opening pick! Looks like a guitar pick, and I have those lying around. Is that expected? Looks like the pick is used in many steps below. There's a little blue crowbar that isn't mentioned in the instructions. Perhaps that replaces the opening pick?
Hi! I can't see which guide you were using when writing this comment. Can you reply here with which guide and fix kit you used?
I see you posted this in Meta. I hope it's resolved soon! In the meantime, a guitar pick may work well enough for your repair.
what fix kit?
My fix kit didn't include an opening pick either
My AliExpress refurbished screen came with a pick that has a coin-like circle that pops out, so no modification was necessary
It's not an Ifixit KIT if it doesn't include everything. You'll need to order the opening pic separately. Or head to Walmart like myself and look for guitar pics. Hopefully, this will work just as well.
No pick in mine as well. It’s really not clear that you have to order this separately when ordering an IPhone SE 202/2022 screen repair kit. Is this the case?
Frustrated, I ordered a compact package where everything was encapsulated. Useless suction tools could not separate the screen. If it is unable to decouple the screen, then why sucking suction tools you have provided.
For my kit the triangle pick was stuck inside the box with the screen not with the other tools maybe it's also there for you
Y’all are getting far, FAR too detailed with some of this stuff…. Measuring and marking the pick that you won’t actually use to open the device?!? lol that’s kinda funny. Just heat it up, grab a spudger, and the back just pops right off! The iFixit tech need to stick to the KISS method more often, you know KEEP IT SIMPLE STUPID!!! Like l, for reals, I’ve been doing this stuff for YEARS and using iFixit guides regularly and this is just ridiculous at this point!
Will the phone still work if the sensor assembly on the back of the screen is damaged?
-
-
-
Recouvrez l'écran de bandes de ruban adhésif, qui se chevauchent, jusqu'à ce que toute la surface soit couverte.
-
Si la ventouse n'adhère pas au cours des étapes suivantes, pliez un morceau de ruban adhésif épais (du ruban adhésif toilé p.e.) pour former une poignée et soulevez l'écran de cette façon.
-
-
Outil utilisé dans cette étape :Clampy - Anti-Clamp$24.95
-
Tirez la poignée bleue vers l'arrière pour déverrouiller les bras de l'Anti-Clamp.
-
Faites glisser les bras sur le bord gauche ou droit de votre iPhone.
-
Positionnez les ventouses en bas de l'iPhone : une sur le dessus, l'autre en dessous.
-
Pressez les ventouses l'une contre l'autre pour appliquer la succion sur la zone souhaitée.
-
-
-
Tirez la poignée vers l'avant pour bloquer les bras.
-
Tournez la poignée dans le sens horaire de 360 degrés, ou bien jusqu'à voir les ventouses commencer à s'étirer.
-
Assurez-vous que les deux ventouses restent alignées. Si elles commencent à se désaligner, détendez les ventouses et réalignez-les.
-
-
-
Chauffez un iOpener et faites-le passer à travers les bras de l'Anti-Clamp.
-
Pliez l'iOpener de façon qu'il repose sur le bord inférieur de l'iPhone.
-
Attendez une minute que l'adhésif se ramollisse et qu'un espace s'ouvre.
-
Insérez un médiator dans l'espace entre l'écran et le joint en plastique, et non dans l'écran.
-
Passez les trois étapes suivantes.
Insert an opening pick into the gap under the screen and the plastic bezel, not the screen itself.
Any suggestions if the screen is broken and the anti-clamp just separates the screen from the bezel?
-
-
-
Servez-vous d'un sèche-cheveux ou d'un pistolet à air chaud, ou bien préparez un iOpener et posez-le sur le bord inférieur de l'iPhone pendant environ une minute.
-
-
-
Tirez fermement et constamment sur la ventouse pour ouvrir un léger espace entre le panneau de l'écran et la coque arrière.
-
Insérez un médiator dans l'espace entre l'écran et le joint en plastique, et non dans l'écran.
This turned out to be the most difficult part for me. My old ifixit suction cup didn't suck hard enough to generate enough force to pry the display from the case. I ended up applying heat at least a dozen times, and I had to pull up on the suction cup forcefully over and over and over while repositioning it several times. I finally had success inserting my pick into the tiny gap after 30 or so rapid tugs on the suction cup.
I have the same question
After heating (I used a hair dryer for 4-5 mins, moving around whole frame, to make sure was pretty hot, then let sit for 1 minute), insert a razor blade between the bezel and the frame, at the bottom edge. Lever upwards, the screen will easily pull away. You won’t even need the suction cup.
-
-
-
Faites glisser le médiator le long du coin inférieur gauche et du bord gauche de l'iPhone, en tranchant l'adhésif qui maintient l'écran en place.
-
-
-
-
Réinsérez votre médiator dans le bord inférieur de l'iPhone et faites-le glisser le long du bord droit pour continuer à couper l'adhésif.
Instructions are confusing as the last step says not to insert at certain points, while this says to slide all the way up the right side - is it that sliding is ok but inserting isn't (whatever that might mean) or just not more than 3mm?
Just slide slightly and the display will rise without problems on all iPhone models, sometimes if I have long nails I even insert a fingernail and lift the display.
Tonynox -
-
-
-
Tirez sur la bosse de la ventouse pour détacher l'outil du panneau frontal.
-
-
-
Ouvrez l'iPhone en soulevant le côté gauche de l'écran comme on ouvre la couverture arrière d'un livre.
-
Calez l'écran contre un objet stable.
-
-
-
Pour accéder aux vis de l'étape suivante, faites pivoter le bord inférieur de l'écran.
-
-
-
Servez-vous d'un tournevis Y000 pour dévisser les trois vis de 1,1 mm de long qui fixent le cache du connecteur de la batterie.
During reassembly, I had to connect my phone to the charger before it would power up.
Die Schrauben sind wahnsinnig kurz, tatsächlich winzig klein. Nach dem Herausdrehen könnte es im ersten Moment so aussehen, als habe man die Schrauben ausgebohrt anstatt herauszudrehen, sie sind jedoch sehr schnell gelöst und liegen dann entweder im Gehäuse oder sind neben dem Gehäuse herausgefallen. In jedem Fall sollten sie nie auf den Boden fallen, da sie dann kaum mehr auffindbar wären.
I got to this point thinking/hoping I could eek by with a Y1 orY0 or even a PH000 driver but no such luck. The Y000 is in fact necessary. Finishing this repair will have to wait for now.
ALSO thanks Apple, there is ABSOLUTELY no reason AT. ALL. to use so many random, oddball screw heads, BUT to make self repairs more difficult and expensive. A real F-U to the consumer!
-
-
-
Prenez une spatule (spudger) ou un ongle propre pour soulever le connecteur de la batterie de sa prise sur la carte mère.
-
Repliez légèrement le connecteur par rapport à la carte mère pour l'empêcher de faire accidentellement contact avec la prise.
-
-
-
À l'aide d'un tournevis Y000, dévissez les cinq vis de 1,1 mm qui maintiennent le cache de la carte mère en place.
Die Schrauben sind wahnsinnig kurz, tatsächlich winzig klein. Nach dem Herausdrehen könnte es im ersten Moment so aussehen, als habe man die Schrauben ausgebohrt anstatt herauszudrehen, sie sind jedoch sehr schnell gelöst und liegen dann entweder im Gehäuse oder sind neben dem Gehäuse herausgefallen. In jedem Fall sollten sie nie auf den Boden fallen, da sie dann kaum mehr auffindbar wären.
-
-
-
Servez-vous d'une spatule ou d'un ongle pour débrancher le connecteur de la nappe du panneau LCD.
-
Déconnectez le connecteur de la vitre tactile, qui se trouve juste à côté.
Be mindful when reconnecting LCD panel connector and digitizer connector. It’s looks very similar. These 2 ribbon connectors a slightly different.
Pay attention.
내 아이폰이 디스플레이 분리 단계를 거친 후, 전원이 들어오지 않습니다. 층전기를 꽂아도 배터리에 미세한 전기 반응이 느껴지지 않고, 탭틱 엔진도 작동하지 않게 되었습니다. cpu 온도는 여전히 뜨껍습니다. 내 마더보드가 디스플레이 분리 후 갑자기 고장난건가요?
Hast Du das Problem gelöst?
커넥터 핀을 빼거나 다시 넣기 위해 구부러졌을 수 있습니다. 핀이 구부러진 경우 돋보기 등으로 살펴보고, 그렇다면 적절한 매장에 가져가세요.
Hampter -
-
-
-
Prenez la pointe d'une spatule ou un ongle pour débrancher la nappe des capteurs du panneau frontal.
There needs to be an extra step between 24 and 25 for reassembly, telling folks to apply adhesive here. I got the thing almost all the way put back together before realizing that the adhesive was a single piece that needs the cables to be disconnected in order to apply it.
-
-
-
Retirez l'ensemble écran.
After this step its probably a good idea to test the new screen (you dont have to plug in the front camera assembly)
Not a technician, so correct me if I'm wrong: I think that it's at this step of reassembly (before you reattach the screen) that you apply waterproof glue, if you have it.
You are both correct. Testing the screen before putting on adhesive means the screen can be returned if faulty. Many places will not accept a screen return that has adhesive on it.
So if it works apply adhesive at this point. When testing don’t just rely on Apple logo test touch functionality also .
-
-
-
Retirez les quatre vis qui fixent le module haut-parleur/capteurs :
-
Trois vis cruciformes de 1,6 mm
-
Une vis Y000 de 1,3 mm
Correct me if I am wrong but you no longer need to do this as of IOS 15.2 as apple doesnt disable Face ID on 3rd party repairs
-
-
-
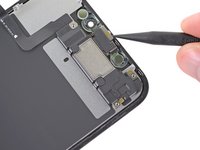
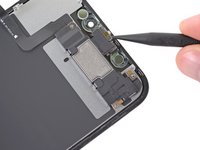
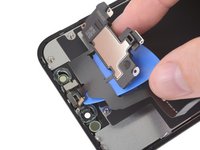
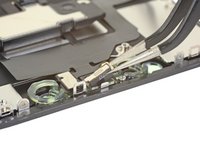
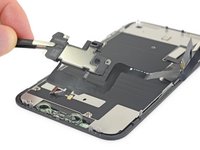
Utilisez la pointe d'une spatule (spudger) pour soulever le bord supérieur du haut-parleur.
-
Faites pivoter le module haut-parleur vers le bas, en l'éloignant du bord supérieur de l'écran.
-
-
-
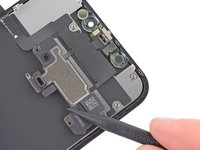
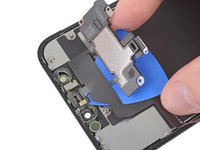
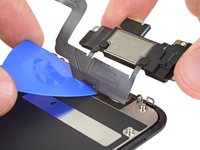
Utilisez un sèche-cheveux, un pistolet à air chaud, ou bien préparez un iOpener et posez-le sur le bord supérieur de l'écran pendant 1 à 2 minutes, pour ramollir la colle qui retient les capteurs.
Sometimes this won't be sufficient for the glue to melt. I ripped the ambient cable twice trying to remove it from the greenish plastic piece (the one with two round holes on the two sides). Here's a less risky procedure: take off the plastic piece together with the rest of the speaker + front sensors, as a block. Then when reassembling, remove the plastic piece from the new screen, and apply the whole block instead.
-
-
-
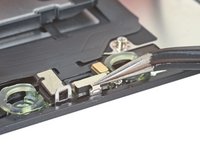
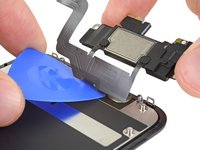
Glissez délicatement le bord de votre médiateur sous la nappe qui se trouve en dessous du microphone.
-
Faites-le légèrement pivoter pour détacher le microphone, tout en faisant attention à ni forcer ni endommager la nappe.
-
Si besoin, utilisez la pointe de la spatule pour finir de détacher le microphone de son encoche dans le panneau frontal.
This step was a little bit confusing. I thought that the entire ribbon assm should be removed once the speaker was detached. The entire assm doesn’t actually come off until Step 30.
Be careful in the next few steps, as you can easily damage some parts. Make sure that you operate gently, and that you don't pull, twist or apply too much pressure on the components.
-
-
Outil utilisé dans cette étape :Tweezers$4.99
-
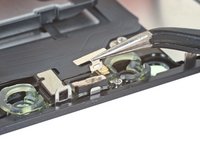
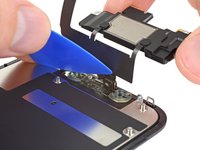
Utilisez une pincette pour soulever le petit cache et le détacher du capteur de luminosité ambiante.
As you remove it, familiarise with its position. It will be hard to put it back into place. If you pay close attention to how it comes out, it will be easier to put it back
-
-
-
Utilisez une pincette pour faire jouer le capteur de luminosité et le désolidariser de son encoche dans l'écran.
-
-
-
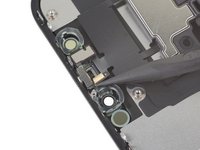
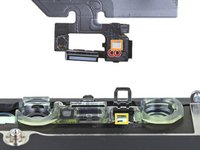
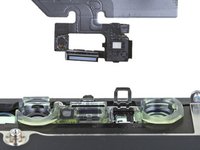
Retirez le module haut-parleur interne et capteurs frontaux.
-
Capteur de proximité
-
Illuminateur infrarouge
-
Le module doit être positionné de telle sorte qu'aucun de ces composants n'est obstrué par de l'adhésif.
Right here. Hope it helps!
When I reinstall this assembly on the new (ifixit) screen, once all the sensors are in their holes and you fold the speaker back over, the screw holes don't line up, OR the speaker doesn't fit snugly. You can move the speaker so its no longer snug, and the screw holes line up. Is there a trick to this?
My replacement screen didn't come with the transparent plastic bits surrounding the front camera, infrared and earpiece speaker... I wonder what would have turned up if I didn't purchase the " original" version in that dodgy shop... lol. If this is your case, you need to clean the glass off this piece of plastic and metal, try not to damage the earpiece protection included on top of that piece, and go back to that shop for a good argument! Got some pics if needed.
Correction: I finally got rid of the earpiece protection because I hadn't noticed that was included in the replacement screen, although of much lower quality than the "real" original.
In addition: be veeeeeery gentle on the heat gun, I accidentally melted a bit of the plastic in the "plastic and metal piece"... Made the ambient light sensor fit kinda loose. :/
Thanks a lot ! My son's iphone is reborned, and I'm upskilled !
-


Pour remonter votre appareil et finir votre changement écran iPhone 11, suivez les étapes ci-dessus dans l'ordre inverse.
Déposez vos déchets électroniques dans un point de recyclage certifié.
La réparation écran iPhone 11 ne s'est pas déroulée comme prévu ? Essayez un diagnostic de base ou demandez de l'aide sur notre Forum.
Annulation : je n'ai pas terminé ce tutoriel.
154 autres ont terminé cette réparation.
Merci à ces traducteurs :
100%


Ces traducteurs nous aident réparer le monde ! Vous voulez contribuer ?
Commencez à traduire ›


9 commentaires
Zu Schritt 13:
Was kann ich tun wenn die Metallplatte sich nicht aus dem Gehäuse löst?
Versuchen Sie, das Telefon beim zweiten Mal dort erneut aufzuwärmen, wo es in der Anleitung angegeben ist. Vielleicht versuchen Sie auch, Ihren iOpener für längere Zeit in der Mikrowelle zu erhitzen/zu erhitzen. Wenn das nicht funktioniert, überprüfen Sie, ob keine weiteren Schrauben entfernt werden müssen. Und das Letzte, was Sie versuchen könnten, wäre, ein paar andere Hebelwerkzeuge zu verwenden und/oder zu versuchen, es in einer anderen Richtung aus dem Gehäuse zu bekommen.
During reassembly, is there a step in which I need to apply adhesive? (asking since you find adhesive as you disassemble)
Most often you will re-apply the adhesive to the new LCD assembly itself. Note that the part you will need is designed to provide waterproofing to the device. If you put the adhesive + waterproof seal onto the new LCD incorrectly then the device will not be waterproof. Note: I'm no qualified professional, and I'm only a 9th grader but I have lots of experience with this particular repair and I have almost mastered it.( I have fixed maybe 7 or 8 iPhone 11s alone) And in my experience, applying the new adhesive + seal to the new LCD assembly has always worked out great and resulted in a happy customer and good feedback.
I had the same problem, I had ordered a display plus adhesive here at iFixit shop, but there were no instruction how to attach it. I looked at manuals of other adhesives and found a proper way, that worked for me: Before reattaching the display cables I attached the adhesive on the phone, not on the display. At first you have to remove all old adhesive properly, if you have isopropanol you can use it to clean the frame. Then you remove the protective sheet (the side with the tab) from the new adhersive, place it carefully on the phone and press it with a spudger all around the frame. The protective sheet on this side is made of different parts so you can remove them on parts where you have to work on. Then you can attach the display cables and the battery cable and test if it works. If all works fine you can remove the last protective sheets and go on to attach the whole display unit.
SiRo -
flawless execution!
Will I still be able to use face id
Hey thank you for this guide, I just followed it and didn't kill my phone! The level of detail is super appreciated.
the right screws wouldn’t come off
Yusef San Inocencio - Réponse
ok one came of but my right wont come of either!!!!
Aisa Jawara -
Hello guys, I still haven't found away to power off the iphone without using the screen. Cheers!
danielaguirre93 - Réponse
You can try this.
Quickly Press and release the volume up button.
then Quickly Press and release the volume down button.
then press and hold the power button and wait until it turns off.
worked for me :D
Benóný Egilson - Réponse
Where does one get replacement seals? Is this the same as the display assembly adhesive?
Brian Baker - Réponse
not of the screwdrivers i have seem to be able to turn the screws
Aisa Jawara - Réponse
how do you change battery of an iPhone 11 and still the battery health shows, do you use a software for that?
Great Me - Réponse
Battery health won’t show on a non Apple battery.
DON’T forget to discharge old battery before removing it. Very impressive fire (and smoke!) if you puncture it. Ask me how I know
Doug Harrowing - Réponse