Introduction
Utilisez ce tutoriel pour remplacer le SSD de votre Steam Deck LCD, afin de le réparer ou d'améliorer sa capacité. Le SSD du Steam Deck est un M.2 2230 à simple face.
Pour remplacer ou upgrader le SSD d'une Steam Deck OLED, suivez plutôt ce tutoriel.
Rappelez-vous : Respectez les consignes générales de prévention des décharges électrostatiques (ESD) pendant que vous effectuez votre réparation.
Ces instructions décrivent seulement comment retirer et changer physiquement le SSD de votre console. Des logiciels supplémentaires et des procédures de calibration seront nécessaires pour installer un OS (système d'exploitation) et mettre votre SSD de remplacement en état de fonctionner comme souhaité.
Suivez les instructions de récupération pour Steam Deck de Valve afin de récupérer, réparer ou réimager votre SSD Steam Deck avec SteamOS. Pour installer Windows, des ressources officielles sont disponibles ici.
Note : Les boutons, joysticks, et pavés tactiles peuvent ne pas fonctionner après que vous ayez ré-imagé le SSD. Utilisez l'écran tactile pour suivre la mise en place initiale de SteamOS, en autorisant l'appareil à télécharger les mises à jour. Les fonctionnalités devraient être de retour une fois que la Steam Deck redémarre.
Note : Valve a commencé à expédier des Steam Deck avec un agencement interne remanié au début de l'année 2023. Votre Steam Deck peut être différente de celle illustrée dans les photos, mais la procédure reste la même. Retirez la coque arrière pour vérifier quelle version vous avez. Une Steam Deck d'origine aura une protection de carte mère métallique et un ventilateur aux côtés carrés, comme visible ici. Une Steam Deck remaniée aura une protection de carte mère noire et un ventilateur aux côtés courbés, comme visible ici.
Ce dont vous avez besoin
Vidéo d'introduction
-
-
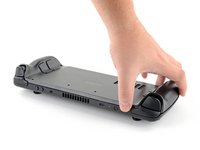
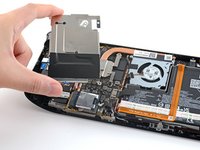
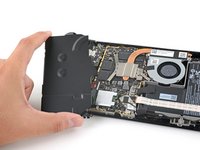
Éteignez votre Steam Deck et débranchez tous les câbles connectés.
-
-
Outil utilisé dans cette étape :FixMat$36.95
-
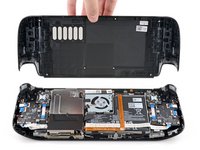
Avec un tournevis cruciforme, dévissez les huit vis qui fixent la coque arrière :
-
Quatre vis à filetage épais de 9,5 mm de long
-
Quatre vis à filetage fin de 5,8 mm de long
there should be a picture of the SD card slot at the start of every Steam Deck teardown. i know the note is there but i generally use the pictures to guide me and forgetting to remove the SD card is a very critical step
I agree, I just broke mine...
What is the the #1 philips used for? Only the #0 is mentioned in the instructions.
I wish they would specify which size to use for which screws.
Mark D -
I found it easiest to use a PH1 for the red screws, and PH0 for the rest (including the internals.)
I used the PH1 bit for this. You can use smaller bits but ideally there should be no play of the bit in the screw head.
I used the PH1 for the 9.5mm screws and PH00 for the 5.8mm screws. The PH0 wanted to strip one of the small ones.
Just a point for knowledge sake, the Four 5.8mm screws on this step are factory installed with a version of locktite. Not sure why but there will be slight resistance when removing the first time.
The screw bit that came with my fix kit just stripped the screws of my steam deck. I guess I should've just sent it in...
Model 1030 SteamDeck uses Torque #6 (CR-V T6) 5.0mm for all 8 screws making it far less likely to damage the screw heads.
Model 1030 is the OLED version, which we have separate guides for! See here: Steam Deck OLED
-
-
-
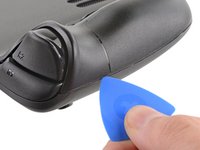
Insérez un médiator dans l'étroit interstice entre la coque arrière et la coque frontale, le long de la poignée droite.
-
Faites levier sur la coque arrière pour la détacher de ses clips.
I found it easiest to start this process at the top of the device near the fan exit.
second that and inserting the pick in the bottom middle and sliding the pick to each side
Sub -
I also found the top near the fan exit to be easier
Thank you for this tip, it definitely was easy starting at the top instead of by the bumper/triggers. After I opened the top I did the bottom and then it was way easier to gently open the sides. be very careful and go slowly to make sure that none of the clips are damaged
Luis B -
this as suggested above:
1. open the top
2. open the bottom
3.gently open the sides
I also started from the middle of the deck and worked my way out since I couldn't get a grip with the pick on the deck's side grips. Since this is a common step for pretty much all guides for opening the deck I think it's also worth noting that you should be careful not to bend the trims/seams where the front and back covers meet with the pick. When I first opened my deck you can definitely see where I nudged the pick in between the covers since I was probably using too much force on the pick itself.
It would be useful to note here that if you want to insert the little blue triangular iFixit opening picks into the right side along the edge, there isn't actually a gap as the directions say, at least not on newer Decks. You'll be making the initial gap using the pick. Brace it on something because you will need to use enough downward force that you're flexing the pick a bit and it'll probably be digging into the skin of a bare hand. With enough force suddenly it will make a click and go in just a bit, and then you're in business.
plastic picks didnt work for me but finger males did the job on prying this open
This step was the hardest by far. First I didn't find an opening at the sides, and it did take a really long time until I finally got it open... Then, when I had the one side opening open it didn't just pop out, I needed to slide all the way to the other side with the pick and open everything. I guess they made it even more drop resistant.
-
-
-
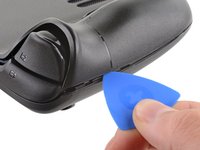
Saisissez la coque arrière au niveau de l'interstice que vous venez d'élargir et soulevez-la pour détacher les longs bords.
-
Enlevez la coque arrière.
If you have an SD card, you will want to take it out. I followed the guide and didn't think about the SD card I had inside. When I went to snap the case back on it clapped shut on the exposed SD card, shearing it in half and leaving the bottom half stuck in the SD card slot. I am still endeavoring to get it out.
you can use the case that comes with the steam deck to support it once the lid is removed
You can get the pry pick inserted easier if you start in the gap for the shoulder buttons. A lego brick separator works well here
-
-
-
Outil utilisé dans cette étape :Tweezers$4.99
-
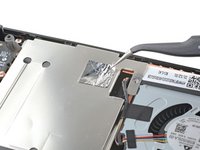
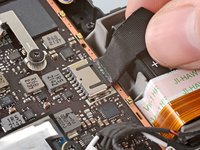
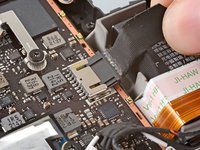
Avec une pincette, retirez le morceau de film adhésif qui recouvre la vis cachée de la plaque de protection de la carte mère.
Use some heat here from a hairdryer to make this part easier.
If you screw up here you can replace the little aluminium square with some aluminium tape from Amazon. No less than 50 microns thick, slightly thicker is fine. and the square is 13mm both ways.
Thanks for that Matt, i destroyed the original tape and i had no solution since i read your comment.
You should not. This is EM shielding to protect your processor and ram from radio waves in the air
I found out my 3 Weeks new Steam Deck is a old Version... gg. Valve...
wenn ich aluminium foile benutze, womit soll ich sie dann verkleben?
If we have the new version with the black shield, how do we access the SSD?
I need this part, does anyone know where to get it?
-
-
-
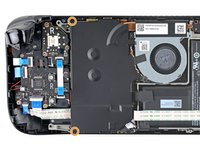
Avec un tournevis cruciforme, dévissez les trois vis qui fixent la plaque de protection :
-
Une vis de 3,4 mm
-
Deux vis de 3,7 mm
The procedure ended here for me, used an ifixit PH 00 bit on the screw behind the aluminium tape, bit wouldnt bite too great, one wrong twist and the screw was stripped. Not sure who or what initially screwed in that particular screw as the rest of the screws on the shield were fine, but boy is it in there tight. So now i have a stripped screw and a botched ssd replacement, don't think valve will let me RMA for this, but i'll give it a try and update accordingly.
Any updates? Did they let you RMA?
I found one screw to be ridiculously tight too, managed to undo it without stripping thanks to reading your comment beforehand and going extra careful. Not going to lie, it was a tense moment :D
Andy HL -
I'm stuck in the same place. I haven't fully stripped it, but I can tell you that if I try and make it budge it will strip. The thing is massively overtightened. The driver fit fine, the metal just gives way before the screw will budge.
I think the tendency is to go too small on the screwdriver bits because you're working on small electronics.
I used the PH1 bit on the screw under the foil and the PH0 bit for the two remaining screws without any problems.
What does this shield actually do? Some kind of magnetic protection?
if I had to replace the key (R2) and that's it, can I directly remove it or do I have to act here on the motherboard too?
have you gotten an answer yet? trying to change mines as well but dont wanna do too much to the deck
briaNN -
button Not key, i’m sorry
FYI there is a little pin on the cover that slots into the board. It is located near the top screw. I needed that to be inserted for the cover to go back down properly.
For anyone who may have stripped a 3.7mm screw, Steam Support states it's M1.6 diameter with a 0.35 thread pitch and a 3mm length. Hopefully that'll help anyone trying to locate a replacement screw. Hoping iFixIt can make an internal screws kit as they're kinda hard to find the right one online.
Did valve change the shield recently as my new 64gb deck has a black shield with no hidden screw.
Yes there's a new hardware revision out there that some people are getting. Consider stopping at this point and putting your deck back together if you have one of these new hardware revisions (the fan is quite different as well to the pictures) until iFixit has an updated repair guide.
Simon M. -
There are only 2 screws now, but be careful taking the shield off, because there are still thermal pads under it sticking it to a heat pipe.
I need this piece, can someone help me where can I find it please?
Hi, is it possible to buy these shields somewhere? I am extremely interested in buying a replacement.
Model 1030 is the OLED version, which we have separate guides for! See here: Steam Deck OLED
-
-
-
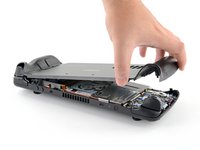
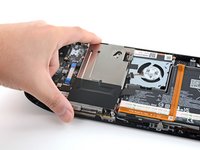
Retirez la plaque de protection.
During reassembly, ensure that the fan cable lays on the side of the board shield and isn't pinched underneath.
Are you saying that the fan cable should be positioned above the board shield instead of being pressed down by it? Just like the image shows, where it 'lays on the side of the board shield'?
Necesito esta pieza la mía no la traía se ve que se la quitaro
-
-
-
Saisissez la nappe de la batterie Steam Deck et tirez-la dans la direction opposée à la carte mère, pour la déconnecter.
After fully reassembling my device I found that my battery was not showing any stats anymore. I couldn't start the device without being plugged in, however if I restarted it would stay on even if my power cable was detached. Battery showed 0%. It turns out I had not fully reinserted the battery cable at this stage during reassembly. MAKE SURE YOU PUSH IT ALL THE WAY BACK IN!
Awesome thanks for this tip!
It is helpful to lift up gently with a the tapered end of a spudger underneath the tucked-in portion of the battery cable, creating a bit of flex in the cable before pulling on the pull tab. I found that without doing so, the fabric pull-tab simply tore off of the cable under light-to-moderate force (the fabric itself ripped cleanly across, like a paper towel). Careful, gentle pressure with a spudger can be used to remove the plug by prying gently on the rear ridge of the plastic plug (not the wire!) if this happens.
This is exactly what happened to me. Maybe it was a pull tab previously, mine was a ribbon cable that tore - captured the image here: https://www.ianwootten.co.uk/2022/11/22/...
This was the best approach (and I feel safest for the wiring) for me. Mostly push pressure on the plastic ridge with some minor pull tension on the fabric.
Victor -
I found it less scary and easier to remove the battery connection by using a fingernail on the ridge and pushing it off the connector. I felt like pulling on the battery cable was too harsh.
Yeah, pulling cables like these is usually ill advice. They might be fine if it's a new device, but for old devices that have been sitting there for years, there's a good chance the connector has grown brittle and the cable might just come off separately (something I learnt the hard way).
skzm -
I second this approach. For me, the cable felt way to flimsy and the connector wouldn't budge even under moderate force. Except I used the flat end of a spudger to "scrape" it out.
Misza -
Upon plugging the battery back in, I found it easy to use two spudgers- one on each side- to pull/push the connector back into it's port. Be careful to not put any pressure on the battery wires themselves.
When reconnecting the battery cable, you'll know when it's inserted and power is restored, because the white LED will illuminate at the top of the Deck near the power button. You should be able to see it while you're reconnecting the battery cable
This is only true if you haven't put the deck into battery storage mode as directed.
Why not just let the battery discharge completely and then not have to disconnect it?
Completely discharging a battery reduces its lifespan. It's completely unnecessary.
Because no lipo battery is ever completely discharged -- you would not be able to recharge it if it was. There will always be enough power left in it to cause damage if shorted even if it isn't charged enough to power up the device it's connected to.
I would personally not recommend pulling the tab. It doesn’t apply force at the correct angle. You should revise these instructions to advise using a combination of pulling on the tab, and careful pressure on the connector towards the right of the mainboard to carefully work it out.
Using the pull tab alone could cause problems if not done extremely carefully.
This part was wayyyyy easier than I anticipated and I worried for nothing because I used the ifixit spudger to push it out a bit and then I literally used my finger nail and was able to slide it right off. Dont be afraid, its not that difficult and its not that delicate to break if you do it patiently
I inserted the cable very firmly with a spunger, being careful not to press down too hard on the cables, and even tried redoing it, but I don't see any LED illumination. I am now unable to boot the deck into the boot manager. Any additional tips?
What is the risk of not unplugging the battery? Just curious!
Once I was changing termal paste on my Windows based expensive tablet PC... And I was so scared to disconnect any cables (there was many of them), so I did it all with battery connected (I didn't even knew where is battery cable). When I tried to put board shield back... it didn't go right into needed place... and short circuit some small component. It flashed. That was the end of my repair. Dudies from repair service later told me that multiple components fried including CPU, so repairing is too hard. That's what can happen if you don't disconnect battery.
To pull the battery out I used my spunger, but the batter had actually not space to be pulled out completely. I needed to lift the cable up with the spunger to get the cable fully out. When plugging it in again I had to press the battery down kinda hard so it would fit again. This was really scary and I recommand using two spunger as someone said above.
Does it have to be a clean fingernail?
I disagree with the order here: I think the battery should be disconnected right after step 4. You can do that before touching anything else by gently pulling the pull tab to the right.
If all you want to do is to disconnect and reconnect your battery (because your Steam Deck is not booting up... again...) then with a bit of finesse, luck and a flat plastic tool you can even push it back in without removing the shield. Make sure it went all the way back in.
-
-
-
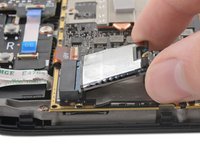
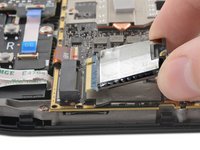
Avec un tournevis cruciforme, dévissez la vis de 3,4 mm qui fixe le SSD.
-
-
-
Saisissez l'extrémité du SSD et sortez-le de son connecteur de carte M.2 pour le retirer.
-
-
-
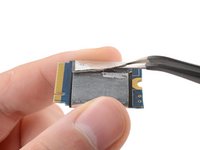
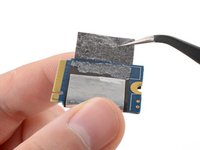
Utilisez une pincette pour faire glisser la protection du SSD.
-
Si vous avez du mal à retirer la protection, utilisez la pincette pour la décoller et la retirer. Veillez à la conserver dans le meilleur état possible si vous souhaitez la réutiliser.
-
Il ne reste plus que le SSD.
-
La Steam Deck utilise un M.2 2230 à une face.
If ESD shielding needed to be replaced, what would be recommended?
Also would like to know where to buy replacement for shielding. Would prefer not to re-use the existing one.
I broke the shielding. Can not find where to buy one. Currently panicking. Help?
IFix it litterally sells replacement shielding.
There is a link in this guid to the shielding...
Link was added just about a week prior to your comment.
skzm -
I'm happy the SSD upgrade kit already comes with a ESD shield (plus everything else you need). Just 5 bucks more than the SSD alone.
Excellent guide! Thakns for posting this!
You don't need to remove the shielding that way.
Just slide it out and install it on the new ssd.My Steam deck apparently had a different shield (probably upgrade to make sure there's no issues with the fan cable) there were just the two screws on the left side and there was no screw under any piece of foil tape (no foil tape at all) and the shield was black made it somewhat easier. Also when removing the board shield it can kinda be stuck due to cooling pads attached to the shield, just wiggle evenly from all sides pulling gently upward and it will get loose eventually. This makes sure the shield doesn't get bend.
What happens if when using the Rufus utility, GPT option does not appear? Thanks in advance
The shielding for the SSD is just some insulating tape and foil. If you need a new one, just cover the SSD in electrical tape and then wrap a strip of foil all the way around it, using some additional bits of tape to hold the edges in place so it stays entirely on top of the tape.
OnZoRAW's answer (3 above) should definitively be used to improve the description of this step!
100% agree. I kept thinking I missed a screw because the shield was well adhered to the thermal pads and took more force than I was initially comfortable applying to pry it off. In fact, after scouring this whole guide for this precise step, the comment above by OnZoRAW is the only mention of it.
-


Pour remonter votre appareil, suivez ces instructions en sens inverse.
Pour récupérer, réparer ou ré-éditer l'image du SSD de votre Steam Deck avec SteamOS, suivez les instructions de récupération pour Steam Deck de Valve.
Déposez vos déchets électroniques dans un point de recyclage certifié.
Votre réparation Steam Deck ne s’est pas déroulée comme prévu ? Consultez nos conseils basiques de diagnostic ou notre Forum pour obtenir de l’aide.
Annulation : je n'ai pas terminé ce tutoriel.
310 autres ont terminé cette réparation.
Merci à ces traducteurs :
100%


Ces traducteurs nous aident réparer le monde ! Vous voulez contribuer ?
Commencez à traduire ›


63 commentaires
idk why valve couldn't have just made the m.2 slot a 2230/2242/2260 & 2280 m.2 NVMe SSDs support??/ they could have done it! im hoping someone out there can make a new back shell that includes the nvme. m2 adapter riser cable extender that moves the nvme ssd to the back case somewhere else with more room and to also not only allow for better cooling of the SSD but also allows us to use any size m.2 nvme SSDs like 2230 up to 2280 m.2 size ssds as i have tons of gen3 x4 2280 nvme ssd lying around from all my AMD ryzen machines from my 1800X X370 all way up to X570 and 5700X / 5800X & 5800X3D etc..
I think it has to do with power draw... The Steam Deck isn't designed to cope with a incredibly fast (and power hungry) 2280 drive. I learned this the hard way on my laptop. I changed the drive myself to a 5500MB/s one and I could tell that not only did the SSD run hotter but also the components surrounding the SSD, it completely changed the thermal characteristics of the device. I added this drive to my desktop computer instead and bought a low powered one for the laptop. By having a 2230 drive on the Steam Deck, Valve forces users to choose drives that are typically designed for small and low powered devices.
Dennis -
lol thats a massive first world problem. we dont all have "tons" of m2 drives, ya know a reletively new tech, laying around
sk8r2211 -
and possibly even a m.2 door/cover to allow easier m.2 ssd removal W/O having to disassemble our steam deck! if the battery needs unplugged then a battery "KILLSWITCH" or "BATTERY DISCONNECT" Switch be also added to the decks after market backplate/cover to allow the steam decks battery to be disconnected from the unit with a toggle of a switch? allows for safter disassembly and m.2 SSD replacement with out having to repeatedly disassemble the steam deck....(SSD nand flash memory can fail) if i had the tools and capabilities to do this myself i would/ but i still dont even have my steam deck yet (Q3 July -Sept. 2022 ;( my friend just got his (ordered on same day) so WTF is mine valve!?????
It's already incredibly impressive that the Deck does what it does, at its price point, with its form factor. It'd be even bigger with any other physical features like that.
The unit isn't necessarily designed with modularity in mind, at least not first and foremost. People aren't "supposed" to be replacing these according to Valve; if that were the case then the internals would have to be shifted around quite a bit to ensure that people wouldn't be able to break stuff when they swap drives/etc. Although this is a very easy repair, people will inevitably mess it up. Valve doesn't want to have to replace everyone's devices if they destroy the internals on their own volition.
The fact that the SSD replacement process is this easy, and it doesn't instantly void your warranty, is amazing. Very few companies have this type of policy with hardware of this nature. A handheld device with fully upgrade-able storage to this extent has been neigh unheard of until now.
ralkia -
eh. i guess pwr draw// but adding a 5500mbps nvme sounds like a gen4 pci-e nvme m.2 im sure the steam deck (even thougt it is running AMD's Zen2 (4c/8t ) CPU cores with a small cluster of( i think) 8cus (in the decks APU) but i dont think it has gen4 pci-e support to using an m.2 gen4 speed (4000mps+ (usually gen4 nvme are (1st gen ones like saberent rocket 4(OG model) below specs..
Tech Specs
SKU
SB-ROCKET-NVME4-1TB
Performance
Up to 5,000 Seq. Read /&/ 4,400 MB/s Seq.Write (yeah this one would not work) but I do have some low power (2280) m.2 nvme gen3 ssds that came from older laptops!
**(Steam Deck cant do these speed cuz pci-e gen4 isnt even supported(not implemented in the apus I/O :( Not even in any laptop APU (except new Ryzen 6000 series with RDNA2 RX 680m igp with (12CU's) (& up to 8c/16t zen3)& does have Pci-e gen4 i think) I wish valve would have used this APU / SoC instead ( this steam deck would have been a much more capable Unit) & i would have paid up to $1000($ or 999) with a 2280 m2
GPD WinMax 2
I've been googling for 15 minutes what size SSD I actually need to purchase for this swap, I've watched two 10 minute YouTube videos. All I can find are videos and articles telling me why I shouldn't use the wrong size- not what the correct size is, even this article leaves that information out!
It's a 2230 size, single sided.
To be honest, this is a pretty easy answers to get. Just type: "steam deck ssd size" into goole and it is literally the 1st answer it will pull up, highlighted mind you.
Are you using bing or something for your research?
Would anyone recommend a thinner Thermal Pad under the ESD shielding on the SSD itself?
(I have started doing this religiously in my PCs/Laptops with great results - Even with no Heat Sync.. Just Pad... So I was wondering if anyone would adamantly recommend against it)
Great guide, but looks like I messed up somewhere when it comes to opening the Steam Deck itself. I was able to put in the replacement SSD and reboot the system, but the top portion of the back plate forms a gap on the top instead of being fully closed. Any help for this? I'm willing to buy an entirely back plate/front plate if I need to.
Did you ever figure this out? Take out the skews again. Remember that the longer screws in the holes furthest out to the sides and the shorter screws go in the 4 holes closest to the center(look at the first picture in Step one). If it's not that, take out all the screws and pry it open again and see if something is there up top that could be causing it not to be able to close. You should be able to completely close it if nothing is in the way. Don't put the screws in until you are able to actually close it.
TalonJH -
Here's a screenshot as a reference. (Sorry for the low quality)
what about putting it back together without messing any thing up
hello can someone help me i got a new ssd for my steam deck everything was installed according to the instructions via usb recovery mode the error always occurs I eventually get into a desktop mode, however when i try to Re-image I get the error:- !! /dev/nvme0n1 does not exist -- no nvme drive detected? Can anyone help me the hard drives on the PC go bad, so they can't be
Exactement the same case here ! Not found on USB recovery but found in the BIOS !
Someone can help us please ?
same thing, dont't know what to do with this problem
Forcen -
https://bigtechquestion.com/2022/05/31/h... - See most recent comment as well - It's okay to get the error, you just have to re-flash the deck. The SSD is okay most likely.
I was really disappointed with the ifixit screwdriver.. but having the kit was invaluable for this guide :)
Will the device utilize more than 512Gb? Like a 1Tb? M.2 2230?
Will the device utilize more than 512Gb? Like a 1Tb? M.2 2230?
Thinking of purchasing the 64Gb model then replacing the storage. (40 years Electronics Tech.)
Help! I followed these instructions to a T and now I'm presented with this message:
"Default Boot Device Missing or Boot Failed. Insert Recovery Media and Hit any key
Then Select 'Boot Manager' to choose a new Boot Device of to Boot Recovery Media."
I don't know what any of this means and I can't find a single straight answer anywhere.
https://bigtechquestion.com/2022/05/31/h... - It's okay to get the error, you just have to re-flash the deck. The SSD is okay most likely.
https://bigtechquestion.com/2022/05/31/h... - See most recent comment as well - It's okay to get the error, you just have to re-flash the deck. The SSD is okay most likely.
What brand of ssd 1Tb will work I keep seen samsung, sabrent, or wd I want to use the right one that won't over heat or damage my steam deck any advice
after installing the ssd and putting the back case back on, the bottom part isn't flush. I wonder if it has anything to do with the fact that the sabrent ssd is a little thicker. When i was putting the shielding on it, it was very difficult to do so without ripping it (unlike the original ssd where it slides on and off without any issue)
I’m pretty certain I’ve broken the SSD shield beyond repair. Is it possible to get a replacement anywhere?
We plan to carry replacements shortly — hang tight!
Bonjour,
Aprés avoir remplacé mon SSD par un KingSpec 2230 de 1 TB, tout fonctionnait correctement. Au bout de 2jours d'utilisation impossible d'acceder à SteamOS, et lorsque j'essaie de réimager le SSD n'est plus reconnu par le Steamdeck... quelqu'un saurait quoi faire?
Hello,
After 2 dayx of use with the SSD KingSpec 2230 - 1TBn it has stopped working and is no longer recognised by my steamdeck (use become impossible), could you help me solve this issu ?
Merci par avance / thank you in advance.
Hey, I'd just like to point out, that maybe add a notice to take care for the cable running on the bottom side of the battery. It can quite easily slide out out of the little "tunnel", and when you screw in the cover, you can damage the cable. It's the bottom right of the inner/center four screws. My screw was just turning in place and not settling in, so I took the cover off again after replacing the SSD and noticed I took some rubber protection off. Luckily it was just just that and I patched it up with space tape, but if the cable was in a different position it could have been more seriously damaged. Sorry I don't have pictures because I closed everything up before remembering I can tell someone about this, but hopefully it helps. @carsten
After attempting to do this with a screwdriver set that is close to 15 years old. I stripped almost 3 screws and gave up after a screw on the metal shielding didn't come lose. I went to the store and bought an iFixit repair kit. Came home and all of the screws came out like it was nothing. Lesson learned. Don't be like me. Buy the proper tools for the job! 10/10 for the iFixit toolkit. Keep up the amazing work you do there!
I just got my 64gb model and I bought a 512gb replacement. Who ever assembled my steam deck put thread locker on all of the back plate screws and cut off the battery cable pull tab. This was 10x harder than it should have been because of this. It's so f*&$+* up.
i recommend putting the steam deck in the top part of the case so it does not rest on the thumbsticks
Alex,
Great recommendation! This is a good tip to both protect the thumbsticks and make the Steam Deck easier to work on. I've added a photo and a bullet to the first step. Thanks!
Just a heads up that your face buttons, analog sticks, and/or touchpads might not work out of the box after reinstalling/reimaging the Steam Deck in step 11. Use the touch screen to go through the initial network setup and allow the device to download updates and functionality should return once the Deck restarts.
Thank you so much. This info should be on the guide. I pannicked for a while until button functionality came back.
cfjr -
Thank you! This info has been added to the guide.
Si può fare sulla versione da 64gb?
I did this successfully, I installed games for a few hours. Then I applied some pressure to the back of the device on the hard drive area and power completely cut out on the Steam Deck.
I am unable to make this happen until I put the back panel back on the device. I can't get it to happen relialby either. I recorded an example:
After it happens, I have to re-open the whole thing. It starts working again, I put it back together, then this problem again... Any ideas what is wrong?
Battery connection looks good.
Hard drive is good. I replaced the old drive back in to see if it was a problem with the new drive. Same problem.
https://www.youtube.com/shorts/jsJY9ypn7...
I am setting up an RMA... I was hoping there would be a simpler solutoin...
Excellent guide thank you, I upgraded from 256GB to 1TB
What ssd did you buy?
I ordered the 64GB Steamdeck a couple of days ago and it should be coming in, in about a week or two, I also bought the Sabrent Rock 1TB SSD so I can upgrade it and after watching some tutorials and whatnot to upgrade the SSD, I've been wondering if recovering, re-imaging, etc., is necessary if it's brand new and there will be nothing on the Steamdeck to recover/re-install? Should I still think about purchasing a flash drive and following recovery instructions or is it okay to just change the SSD, close the Steamdeck up and call it a day?
The operating system is installed on the SSD. If you swap it, there is no OS that the Steamdeck can boot from and you get an error message to that effect. So you have to reinstall the OS even if you did not use it before.
I would also recommend to use the Steamdeck as it is for a few days, before upgrading the SSD. So you can make sure that everything works and you do not have to RMA it (I imagine a RMA is more complicated/impossible if you have swapped the SSD).
Reihnold -
In my case, I had to use a #0 Phillips screwdriver and a 1.4mm flathead screwdriver. There were some screws that just wouldn't budge with the #0, so I used the flathead for those. My #1 Phillips didn't seem to work for anything that I tried it on.
I don't know what revision mine is, but I purchased my 64GB Steam Deck on July 2, 2023.
I lost the screw of the ssd. What can I do?
Grosse arnaque ce changement de SSD, j'ai fais comme indiqué sauf qu'au moment d'allumé le steam deck après changement de SSD le deck n'arrive plus à démarrer le mode BIOS, la console s'allume sans le carillon avec un écran gris fixe, le ventilo souffle fort et c'est tout ! J'ai remis mon ancien SSD et tout fonctionne normalement, donc soit votre SSD est défaillant soit c'est une grosse arnaque et ceci n'est pas compatible. De plus c'est assez étrange que ma commande est disparu de votre site, voulant noté le produit en question je me suis retrouvé confus devant la disparation de mon historique des commandes, comme si je n'avais jamais rien acheté... Bizarre tout sa
Bonjour @benjaminde55111, je suis désolée d'apprendre que votre redémarrage ne s'est pas déroulé comme prévu ! Veuillez contacter notre service client au support@ifixit.com (pour la boutique américaine) ou au eustore@ifixit.com (pour la boutique européenne et française), en expliquant ce qui s'est passé avec le SSD et la disparition de la commande dans votre espace client.
Dank der Anleitung war der Umbau super easy!
Leider ließ sich eine der kürzeren Schrauben in der Abdeckung nicht lösen. Schraubenkopf dadurch beschädigt.
Alle Schrauben mit PZ 0 Schraubendreher gelöst.
Dieser hat am besten gepasst.
Mein Optiker hat mir dann mit Spezialwerkzeug aus der Patsche helfen können.
wieder zuhause 15 min. Arbeit investiert und nun habe ich ein 2TB SteamDeck.
The YouTube video was extremely helpful for me as were everyone's supplemental comments. Some takeaways I wanted to share that for me were either crucial or hurdles:
- outer case screws: the four inner came out with a Phillips #0 (some said #00 worked better for them) and #1 on the outer screws
- when disconnecting the battery, apply more pressure on the left side against a plastic ridge to push out the connector and less tension tugging on the fabric around the wiring
- when re-imaging, if you use Balena Etcher, remember to extract the .bz file to .img; it may hang otherwise. On Windows, Rufus will handle that automatically so you don't need this step.
- although I had a USB-C to A adapter that worked well on my laptop, but did not seemingly on the SD. It could have been my 16Gig USB-A thumb drive, still not sure which was at fault. The drive did image across both a MacOS and Windows laptop without issue. After many tries I switched to a Kingston USB-C drive and it worked the first time. :/
Thanks for this. Went like a charm and maybe an hour later I am installing games!
Hello everyone!
I think I damaged my power button while trying to unclip the back cover.
I did manage to do the SSD upgrade, and it made me really proud of myself since it was the first time I've done something like this.
The part that I struggled with the most was unclipping the back cover, I started on the top of the steam deck, where the power button is located.
Maybe I inserted way to deep my pick?
After finishing the upgrade, the first time I turned on my steam deck I had to put a little more effort into pressing the button, but nothing significant at the moment, in the course of 5 days the amount of extra force I had to do the button grew and grew to the point that a had to put a lot a force to turn in on, and now today it won't turn on no matter how much pressure I give, and I don't want to risk breaking the button.
The button does still click though.
So if someone knows how to fix this I would appreciate your help!
Thank you all in advance for all the support!
Milanor,
The power button is a plastic "button" insert that presses against the physical button that's soldered to the underside of the motherboard. It's unlikely that you damaged the physical button when upgrading your SSD. Your back cover, however, may be contacting the plastic power button insert and affecting its action/motion. I recommend removing the back cover again and investigating the power button area for a blockage or a misaligned part. Best of luck in your repair!
This is the first time I followed this tutorial to change an SSD for a Steam Deck. I have replaced one before with no problems but after following this guide the only difference is the battery storage mode and no matter how many ways I try to get it to wake back up it refuses. No LED, No sounds, Left on the original charger for days, and yes I have tried the million different button combos to wake it up. Even reopened it, disconnected the battery, reconnected it, etc. Put the old SSD card in. Literally nothing. This has completely bricked my device and I am so frustrated I am down so much money over a simple fix. Is there any way I can get some help or anything??
Did you try plug in the provided power supply and power it on normally?
Yes no luck at all no matter what I do I cannot get any kind of LED to work to show if there is power or anything :(
Steph D -
What about the Battery-Storage-Mode . Does it have to be disabled afterwards?
My experience (upgrading to a Crucial 2TB) - slow and steady wins the race
* Step 3 if difficult, play along other seams with pick
* Step 5, just uncover the screw when peeling back the shielding, no need to remove it, just get room to take screw out
* Step 8, disconnecting battery is best done by using a spudger to push the connector out on each side firmly, back and forth a little at a time
* Step 11, similarly with the SSD shielding, wiggle each side, use a tweezers to help
* During reassembly, firmly get battery connector in with back and forth process. When putting screws in, align correctly and do not cross thread, you may have to open up again in the future.
* Used a small powered USB-C hub with reimaging, took quite a while, just sit and be patient
Great guide, but hey man... we should really be making the boot up drive on step one... or at least starting the download. I sped through my fix and finished up only to be greeted with a big download from Steam. It would have been really cool to have knocked that out before I started undoing the first screw.
Hi, I'm planning to upgrade my steamdeck ssd to a 2tb one, and I've read about adding a copper heatsink to the ssd. If I want to add a copper heatsink to the ssd should I apply the ESD shield on top of the copper heatsink or cover ssd with the ESD shield and then the copper heatsink. Also would adding a copper heatsink add undue pressure on the board? I will add it but I'm worried about the ssd + heatsink + ESD shield package being too thick for the motherboard
Awesome guide, I added some information from https://www.pcgameshardware.de/Steam-Dec...
Be so kind and buy from iFixit, these guides are worth every penny. Will definitely buy again.
What I am missing though is a way to access the files on the old SSD, bought an enclosure, but all that I can mount is the two partitions called efi. Tried steamOS, macOS and Windows. Any help would be appreciated. Have a nice day!