
Classique 087CQA Heating Element Replacement
10 - 15 minutes
Facile
Introduction
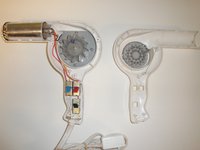
Passez à l'étape 1A defective heating element can prevent the hair dryer from heating blown air, so we are replacing the heating element. Replacing the heating element should ensure hot air when blown.
Ce dont vous avez besoin


Presque terminé !
To reassemble your device, follow these instructions in reverse order.
Conclusion
To reassemble your device, follow these instructions in reverse order.
Équipe

University of North Texas, Team 1-3, Campbell Spring 2017 Membre de l'équipe University of North Texas, Team 1-3, Campbell Spring 2017
UNT-CAMPBELL-S17S1G3
3 membres
4 tutoriels rédigés