Aller au contenu principal
Cosori Pro II Motor/Fan Replacement

Cosori Pro II Motor/Fan Replacement

Davian E. Aguilera

Davian E. Aguilera et 2 autres contributeurs

Dernière mise à jour le January 3, 2025

45 minutes
Modérée
Nécessite plus d'images
Meilleure introduction

Ce dont vous avez besoin

Outils

Afficher plus…

iFixit touche une commission lorsque vous achetez par l'intermédiaire de ces liens.
  1. Cosori Pro II Motor/Fan Replacement, Shell: étape 1, image 1 de 1
    • Flip the device upside down and remove all of the Phillips #1 screws.

  2. Cosori Pro II Motor/Fan Replacement: étape 2, image 1 de 2 Cosori Pro II Motor/Fan Replacement: étape 2, image 2 de 2
    • Use an opening tool to push on the retaining hooks to disengage them while prying slightly.

    • Remove the panel.

  3. Cosori Pro II Motor/Fan Replacement: étape 3, image 1 de 1
    • Use a Phillips #1 screwdriver to remove all four screws.

    • Lift off the bracket.

    • When lifting this off be careful to not unplug the screen.

  4. Cosori Pro II Motor/Fan Replacement: étape 4, image 1 de 2 Cosori Pro II Motor/Fan Replacement: étape 4, image 2 de 2
    • Use a Phillips #0 screwdriver to remove all the screws connecting to the shell.

    • Dissemble the shell going up to separate the basket holder.

  5. Cosori Pro II Motor/Fan Replacement: étape 5, image 1 de 2 Cosori Pro II Motor/Fan Replacement: étape 5, image 2 de 2
    • Use a Phillips #0 screwdriver and the 150 mm Flex Extension to unscrew the bottom plastic connecting to the basket holder.

    • Be careful to not apply too much force to the metal as it can cause it to warp it, and so it is easy rescrew the plastic piece in place.

  6. Cosori Pro II Motor/Fan Replacement: étape 6, image 1 de 2 Cosori Pro II Motor/Fan Replacement: étape 6, image 2 de 2
    • Pull the bottom shell down pulling at the sides to get them over screw holes.

  7. Cosori Pro II Motor/Fan Replacement, Heating Coil: étape 7, image 1 de 1
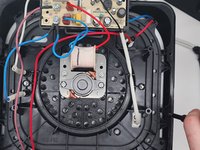
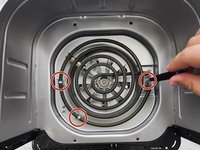
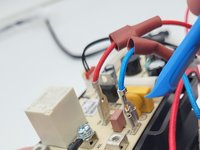
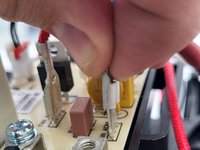
    • Remove the screws holding the cables into the distribution board with a Phillips #2 screwdriver.

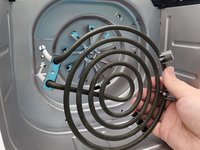
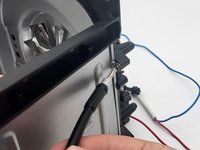
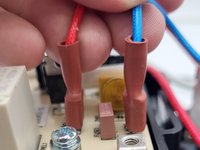
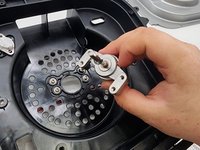
    • Remove the 2 cables that connect the heating coil to the distribution board on the top of the cooking chamber, there should be one blue and one white cable, both with a white shroud leading into the cooking chamber.

  8. Cosori Pro II Motor/Fan Replacement: étape 8, image 1 de 2 Cosori Pro II Motor/Fan Replacement: étape 8, image 2 de 2
    • Flip the device backward so the metal walls appear in a U-shape.

    • Remove the 3 screws inside the cooking chamber that hold the heating coil in place using a 2 Philips screwdriver.

    • Remove the heating coil.

  9. Cosori Pro II Motor/Fan Replacement, Motor/fan: étape 9, image 1 de 2 Cosori Pro II Motor/Fan Replacement, Motor/fan: étape 9, image 2 de 2
    • Remove the walls of the cooking chamber to get easier access to the fan.

  10. Cosori Pro II Motor/Fan Replacement: étape 10, image 1 de 3 Cosori Pro II Motor/Fan Replacement: étape 10, image 2 de 3 Cosori Pro II Motor/Fan Replacement: étape 10, image 3 de 3
    • Squeeze and disconnect the connectors.

    • Press the tab on the disconnector down then carefully pull it off to remove the wires from the board.

  11. Cosori Pro II Motor/Fan Replacement: étape 11, image 1 de 2 Cosori Pro II Motor/Fan Replacement: étape 11, image 2 de 2
    • Use a Phillips screwdriver to remove the two screws from the motor.

  12. Cosori Pro II Motor/Fan Replacement: étape 12, image 1 de 1
    • Remove the screws securing the heat detector using a Phillips #1 screwdrivers.

  13. Cosori Pro II Motor/Fan Replacement: étape 13, image 1 de 1
    • Using a 3/8" socket, unscrew the hex nut holding the fan in place, making sure to not apply to much pressure on the fan to avoid warping.

  14. Cosori Pro II Motor/Fan Replacement: étape 14, image 1 de 2 Cosori Pro II Motor/Fan Replacement: étape 14, image 2 de 2
    • Remove each piece to the roof of the cooking chamber.

  15. Cosori Pro II Motor/Fan Replacement: étape 15, image 1 de 2 Cosori Pro II Motor/Fan Replacement: étape 15, image 2 de 2
    • Use a Phillips #2 screwdriver to remove the screws securing the motor.

    • Remove the motor.

Conclusion

To reassemble your device, follow these instructions in reverse order.

Davian E. Aguilera

Membre depuis le 08/28/24

241 Réputation

2 tutoriels rédigés

Équipe

0 commentaires

Ajouter un commentaire

Nombre de vues :

Dernières 24 heures : 2

7 derniers jours : 12

30 derniers jours : 35

Total : 98