
Cuisinart CPT-140BK Circuit Board Replacement
20 minutes
Modérée
Introduction
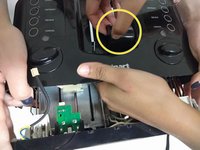
Passez à l'étape 1This guide will explain how to replace Cuisinart CPT-140BK toaster circuit board. It instructs through the process of disassembly to prevent damage on display cables and panels.
Ce dont vous avez besoin

iFixit touche une commission lorsque vous achetez par l'intermédiaire de ces liens.


Presque terminé !
To reassemble your device, follow these instructions in reverse order.
Conclusion
To reassemble your device, follow these instructions in reverse order.
Équipe

University of North Texas, Team S7-G3, Thomas Fall 2017 Membre de l'équipe University of North Texas, Team S7-G3, Thomas Fall 2017
UNT-THOMAS-F17S7G3
3 membres
3 tutoriels rédigés