Aller au contenu principal

DJI Phantom Case Top Shell Replacement

Conditions préalables uniquement
Ce tutoriel est uniquement destiné à être utilisé comme prérequis d'autres tutoriels. Il ne se suffit pas à lui-même.

Ce dont vous avez besoin

  1. DJI Phantom Case Top Shell Replacement, Remove Case Screws: étape 1, image 1 de 3 DJI Phantom Case Top Shell Replacement, Remove Case Screws: étape 1, image 2 de 3 DJI Phantom Case Top Shell Replacement, Remove Case Screws: étape 1, image 3 de 3
    • After removing all four propellors, flip the drone over.

    • Remove the following screws from the underside of the drone:

    • Twelve 2.0 mm hex screws

    • Four Phillips #0 screws

  2. DJI Phantom Case Top Shell Replacement, Unplug Magnetometer: étape 2, image 1 de 3 DJI Phantom Case Top Shell Replacement, Unplug Magnetometer: étape 2, image 2 de 3 DJI Phantom Case Top Shell Replacement, Unplug Magnetometer: étape 2, image 3 de 3
    • Loosen the cable from the plastic landing gear.

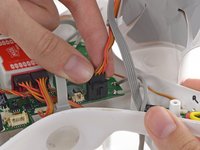
    • Unplug the magnetometer molex connector.

  3. DJI Phantom Case Top Shell Replacement, Remove the Top Shell: étape 3, image 1 de 3 DJI Phantom Case Top Shell Replacement, Remove the Top Shell: étape 3, image 2 de 3 DJI Phantom Case Top Shell Replacement, Remove the Top Shell: étape 3, image 3 de 3
    • Lift up on the top portion of the shell and set it on its side.

    • Do not attempt to fully remove the case. The GPS and Magnetometer cables connect the top shell to the rest of the Phantom, be careful not to stress or break these cables.

  4. DJI Phantom Case Top Shell Replacement, Disconnect GPS Cable: étape 4, image 1 de 2 DJI Phantom Case Top Shell Replacement, Disconnect GPS Cable: étape 4, image 2 de 2
    • Lift the GPS cable molex connector up out of its socket on the main board.

  5. DJI Phantom Case Top Shell Replacement, Loosen Magnetometer Cable: étape 5, image 1 de 3 DJI Phantom Case Top Shell Replacement, Loosen Magnetometer Cable: étape 5, image 2 de 3 DJI Phantom Case Top Shell Replacement, Loosen Magnetometer Cable: étape 5, image 3 de 3
    • Gently pull the slack of the magnetometer cable through the case bottom shell.

    • The case top shell should now have enough slack to work on the interior of the Phantom.

Conclusion

To reassemble your device, follow these instructions in reverse order.

David Hoyt

Membre depuis le 04/09/10

4 023 Réputation

43 tutoriels rédigés

Équipe

Cal Poly, Team 25-89, Amido Spring 2010 Membre de l'équipe Cal Poly, Team 25-89, Amido Spring 2010

CPSU-AMIDO-S10S25G89

4 membres

63 tutoriels rédigés

0 commentaires

Ajouter un commentaire

Nombre de vues :

Dernières 24 heures : 0

7 derniers jours : 0

30 derniers jours : 0

Total : 63