Aller au contenu principal

Dell Chromebook 13-7310 Keyboard Replacement

Ce dont vous avez besoin

  1. Dell Chromebook 13-7310 Keyboard Replacement, Back Cover: étape 1, image 1 de 2 Dell Chromebook 13-7310 Keyboard Replacement, Back Cover: étape 1, image 2 de 2
    • Remove the eleven 3mm Phillips #1 screws.

  2. Dell Chromebook 13-7310 Keyboard Replacement: étape 2, image 1 de 1
    • Use a plastic opening tool to gently remove the back panel.

    • It can be easier to pry open near a corner.

  3. Dell Chromebook 13-7310 Keyboard Replacement, Battery: étape 3, image 1 de 1
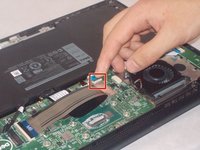
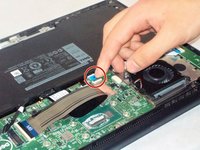
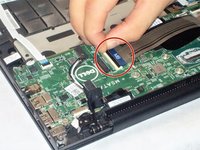
    • Use your fingers to remove the connecting cable to the battery unit. Firmly grab the cord closest to the motherboard connection and pull straight back.

  4. Dell Chromebook 13-7310 Keyboard Replacement: étape 4, image 1 de 1
    • Remove the four 2mm screws on the sides of the battery.

  5. Dell Chromebook 13-7310 Keyboard Replacement: étape 5, image 1 de 1
    • To remove the battery, lift up on one side to get your fingers underneath and lift away.

  6. Dell Chromebook 13-7310 Keyboard Replacement, Motherboard: étape 6, image 1 de 1
    • Gently pull to unplug fan connector.

  7. Dell Chromebook 13-7310 Keyboard Replacement: étape 7, image 1 de 2 Dell Chromebook 13-7310 Keyboard Replacement: étape 7, image 2 de 2
    • Remove 4 screws securing heat sink.

  8. Dell Chromebook 13-7310 Keyboard Replacement: étape 8, image 1 de 1
    • Lift away heat sink.

  9. Dell Chromebook 13-7310 Keyboard Replacement: étape 9, image 1 de 1
    • Remove the eight 2mm screws securing the motherboard in place.

  10. Dell Chromebook 13-7310 Keyboard Replacement: étape 10, image 1 de 1
    • Release cable for the LED charging indicator by pulling up on connector.

  11. Dell Chromebook 13-7310 Keyboard Replacement: étape 11, image 1 de 1
    • Gently remove the cable.

  12. Dell Chromebook 13-7310 Keyboard Replacement: étape 12, image 1 de 1
    • Pull up on connector tab to release IO board cable.

  13. Dell Chromebook 13-7310 Keyboard Replacement: étape 13, image 1 de 2 Dell Chromebook 13-7310 Keyboard Replacement: étape 13, image 2 de 2
    • Pull up on connector tab to release touchpad cable.

  14. Dell Chromebook 13-7310 Keyboard Replacement: étape 14, image 1 de 1
    • Release the keyboard backlight cable.

  15. Dell Chromebook 13-7310 Keyboard Replacement: étape 15, image 1 de 2 Dell Chromebook 13-7310 Keyboard Replacement: étape 15, image 2 de 2
    • Release the keyboard cable.

    • If taped to the motherboard, gently peel it off.

  16. Dell Chromebook 13-7310 Keyboard Replacement: étape 16, image 1 de 1
    • Release eDP cable.

  17. Dell Chromebook 13-7310 Keyboard Replacement: étape 17, image 1 de 1
    • Release dc-in cable.

  18. Dell Chromebook 13-7310 Keyboard Replacement: étape 18, image 1 de 1
    • Gently lift up the motherboard to remove it.

  19. Dell Chromebook 13-7310 Keyboard Replacement, Cooling Fan: étape 19, image 1 de 2 Dell Chromebook 13-7310 Keyboard Replacement, Cooling Fan: étape 19, image 2 de 2
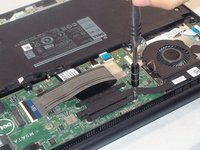
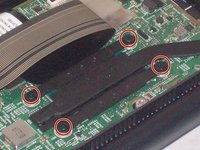
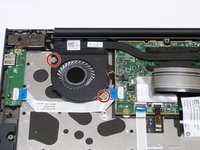
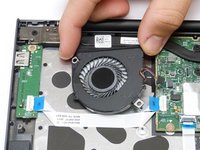
    • Using the #1 Philips screwdriver, remove the two, 2mm screws securing the fan assembly.

  20. Dell Chromebook 13-7310 Keyboard Replacement: étape 20, image 1 de 2 Dell Chromebook 13-7310 Keyboard Replacement: étape 20, image 2 de 2
    • Using your fingernails, pull the cooling fan cables loose from the motherboard.

    • We have the tweezers pictured to allow for a clear view of components. DO NOT use the tweezers to remove the cables, they could be damaged in the process.

    • Finally, lift the fan assembly away from the computer.

  21. Dell Chromebook 13-7310 Keyboard Replacement, IO Board: étape 21, image 1 de 1
    • Remove the single 2mm screw securing the IO board to the laptop.

  22. Dell Chromebook 13-7310 Keyboard Replacement: étape 22, image 1 de 1
    • Pull up on the connector to release the IO board cable from the motherboard.

    • It may be easier to pull from the blue tab.

  23. Dell Chromebook 13-7310 Keyboard Replacement: étape 23, image 1 de 1
    • Remove the IO board.

  24. Dell Chromebook 13-7310 Keyboard Replacement, Keyboard: étape 24, image 1 de 1
    • Remove all screws.

    • All screws for the keyboard will have a "K" next to them.

  25. Dell Chromebook 13-7310 Keyboard Replacement: étape 25, image 1 de 1
    • Gently lift up the keyboard and remove.

    • This step does not require much force. If you have to use a lot of force to lift the keyboard, check to make sure you didn't miss a screw.

Conclusion

To reassemble your device, follow these instructions in reverse order.

3 autres ont terminé cette réparation.

Damon

Membre depuis le 11/01/18

181 Réputation

2 tutoriels rédigés

Équipe

UMass Dartmouth, Team S5-G1, Gulbrandsen Fall 2018 Membre de l'équipe UMass Dartmouth, Team S5-G1, Gulbrandsen Fall 2018

UMASSD-GULBRANDSEN-F18S5G1

3 membres

5 tutoriels rédigés

Un commentaire

I’ve never pulled apart a computer before, and this guide was perfect! thanks

Owen Thomas - Réponse

Ajouter un commentaire

Nombre de vues :

Dernières 24 heures : 1

7 derniers jours : 2

30 derniers jours : 8

Total : 717