Aller au contenu principal
Dell Inspiron 11 i3147 Camera Replacement

Dell Inspiron 11 i3147 Camera Replacement

Muhammad Erchid

Muhammad Erchid et 4 autres contributeurs

Dernière mise à jour le June 30, 2023

35 - 50 minutes
Modérée
Nécessite plus d'images

If you wish to replace your Dell Inspiron 11 i3147 Camera for any reason, use this guide for step-by-step instructions.

Before beginning, make sure the malfunction is not caused by a system-level setting for your built-in webcam that has turned off the camera, and that there is no obstruction causing distortion or clarity issues on the camera lens.

Safety first! Remember to unplug and turn off your device before opening the back cover.

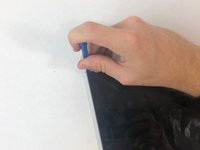
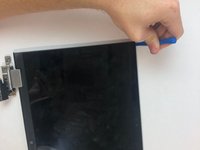
For steps 7, 10, and 13 inspect the connection between the device and the plugged-in component to check if a lose connection may be the cause of the camera malfunction.

Ce dont vous avez besoin

Outils

Afficher plus…

  1. Dell Inspiron 11 i3147 Camera Replacement, Camera: étape 1, image 1 de 1
    • Close the computer and turn it over, with the bottom of the computer facing up.

  2. Dell Inspiron 11 i3147 Camera Replacement: étape 2, image 1 de 1
    • Remove the nine 7.6mm PH0 screws on the cover.

  3. Dell Inspiron 11 i3147 Camera Replacement: étape 3, image 1 de 1
    • Use a plastic opening tool to remove the cover from the computer.

  4. Dell Inspiron 11 i3147 Camera Replacement: étape 4, image 1 de 1
    • Remove the three 4.7mm PH0 screws that secure the battery to the computer.

  5. Dell Inspiron 11 i3147 Camera Replacement: étape 5, image 1 de 1
    • Remove the hard drive cable from the battery.

  6. Dell Inspiron 11 i3147 Camera Replacement: étape 6, image 1 de 1
    • Lift the battery from the keyboard.

  7. Dell Inspiron 11 i3147 Camera Replacement: étape 7, image 1 de 1
    • Disconnect antenna cables.

  8. Dell Inspiron 11 i3147 Camera Replacement: étape 8, image 1 de 1
    • Remove 2 4mm PH0 screws that connect display cable bracket to the system board.

    • Lift display cable bracket off the system board.

  9. Dell Inspiron 11 i3147 Camera Replacement: étape 9, image 1 de 1
    • Use the pull tab to disconnect the display cable from the system board.

  10. Dell Inspiron 11 i3147 Camera Replacement: étape 10, image 1 de 1
    • Pull the windows button board cable from the system board.

  11. Dell Inspiron 11 i3147 Camera Replacement: étape 11, image 1 de 1
    • Remove the 2 5.6mm PH0 screws.

  12. Dell Inspiron 11 i3147 Camera Replacement: étape 12, image 1 de 1
    • Separate the screen and body of the computer.

  13. Dell Inspiron 11 i3147 Camera Replacement: étape 13, image 1 de 2 Dell Inspiron 11 i3147 Camera Replacement: étape 13, image 2 de 2
    • Use a plastic opening tool to take the display panel assembly off the display back cover and antenna assembly. Start from the top.

    • Place display panel face down on a flat surface

  14. Dell Inspiron 11 i3147 Camera Replacement: étape 15, image 1 de 1
    • Use a plastic opening tool to take the camera module off the display.

Conclusion

To reassemble your device, follow these instructions in reverse order.

Muhammad Erchid

Membre depuis le 10/09/18

1 087 Réputation

5 tutoriels rédigés

Équipe

USF Tampa, Team S1-G6, Leahy Fall 2018 Membre de l'équipe USF Tampa, Team S1-G6, Leahy Fall 2018

USFT-LEAHY-F18S1G6

3 membres

5 tutoriels rédigés

0 commentaires

Ajouter un commentaire

Nombre de vues :

Dernières 24 heures : 3

7 derniers jours : 8

30 derniers jours : 8

Total : 243