
Dell Inspiron 13-5368 Heatsink Replacement
Introduction
Passez à l'étape 1This is a simple step-by-step guide on how to remove and replace a screen display for a Dell Inspiron 13-5368. You will need a Philips Head J-0 screwdriver and a pry tool in order to perform this task. This is a relatively easy task and will take about 8 minutes to complete.
Ce dont vous avez besoin


-
-
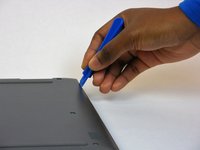
Remove the nine 6mm Phillips #0 screws that secure the back cover of the laptop.
-
-
-
-
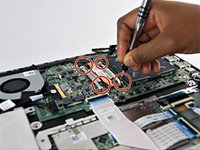
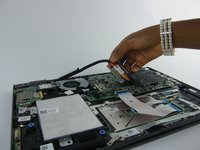
Unscrew the four screws securing the heatsink and remove it.
-
Remember to reapply a small amount of thermal paste, then screw the heatsink onto the motherboard in numberical order (i.e. 1, 2, 3, 4).
-


Remember to clean off any old thermal paste, then apply a small amount of new thermal paste (dime size will be fine). Screw the heatsink on in numerical order so the thermal paste is evenly distributed on the processor. To reassemble your device, follow these instructions in reverse order.
Remember to clean off any old thermal paste, then apply a small amount of new thermal paste (dime size will be fine). Screw the heatsink on in numerical order so the thermal paste is evenly distributed on the processor. To reassemble your device, follow these instructions in reverse order.
Annulation : je n'ai pas terminé ce tutoriel.
Une autre personne a terminé cette réparation.
Équipe

USF Tampa, Team S14-G6, Boczar Fall 2017 Membre de l'équipe USF Tampa, Team S14-G6, Boczar Fall 2017
USFT-BOCZAR-F17S14G6
4 membres
13 tutoriels rédigés