Aller au contenu principal
Dell Inspiron 1420 Disassembly

Dell Inspiron 1420 Disassembly

Braxton Quillin

Braxton Quillin et 2 autres contributeurs

Dernière mise à jour le November 21, 2024

45 minutes - 1 heure
Modérée
Tutoriel réalisé par la communauté

This guide shows how to fully extract the Dell Inspiron 1420 Motherboard.

Ce dont vous avez besoin

Outils

Afficher plus…

  1. Dell Inspiron 1420 Disassembly, Remove Battery: étape 1, image 1 de 2 Dell Inspiron 1420 Disassembly, Remove Battery: étape 1, image 2 de 2
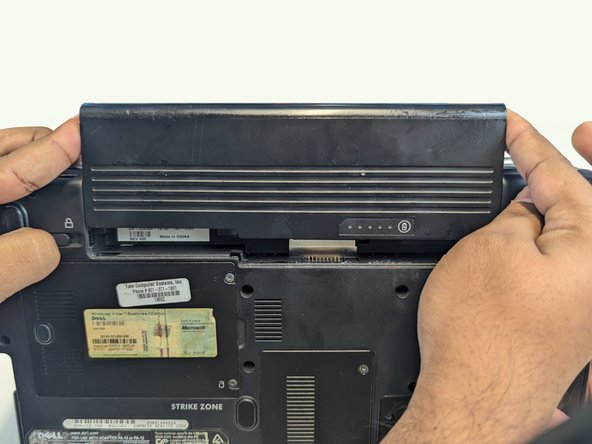
    • Press both indicated locks on the bottom side of the laptop to release and remove the battery.

  2. Dell Inspiron 1420 Disassembly, Unscrew Back Panel Screws: étape 2, image 1 de 2 Dell Inspiron 1420 Disassembly, Unscrew Back Panel Screws: étape 2, image 2 de 2
    • Loosen and remove indicated screws on the back panel using a Phillips #1 screwdriver.

    • Back cover screws

    • These screws are a different length than the others and can be stored separately for reassembly.

    • Hard drive cover screws

    • RAM cover screws

    • CD drive cover screw

    • Heat sink cover screws

  3. Dell Inspiron 1420 Disassembly, Remove Hard Drive: étape 3, image 1 de 1
    • Remove the hard drive cover.

    • Pull the tab in the direction of the arrows to remove the hard drive.

  4. Dell Inspiron 1420 Disassembly, Remove CD Drive: étape 4, image 1 de 2 Dell Inspiron 1420 Disassembly, Remove CD Drive: étape 4, image 2 de 2
    • Using a screwdriver, slide out the CD drive bracket enough for it to be grabbed.

    • Remove CD drive from housing.

  5. Dell Inspiron 1420 Disassembly, Remove RAM: étape 5, image 1 de 2 Dell Inspiron 1420 Disassembly, Remove RAM: étape 5, image 2 de 2
    • Remove RAM cover.

    • Pull the metal tabs above and below the RAM outward and remove both RAM sticks.

  6. Dell Inspiron 1420 Disassembly, Remove Heat Sink: étape 6, image 1 de 3 Dell Inspiron 1420 Disassembly, Remove Heat Sink: étape 6, image 2 de 3 Dell Inspiron 1420 Disassembly, Remove Heat Sink: étape 6, image 3 de 3
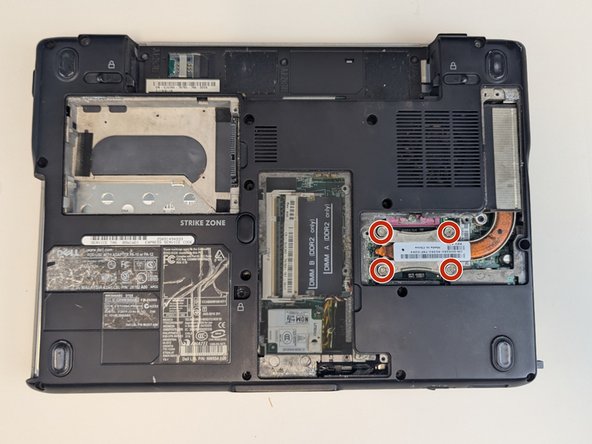
    • Remove the heat sink cover.

    • Using a Phillips #1 screwdriver, loosen and remove screws from heat sink.

    • Remove the heat sink.

  7. Dell Inspiron 1420 Disassembly, Remove CPU: étape 7, image 1 de 3 Dell Inspiron 1420 Disassembly, Remove CPU: étape 7, image 2 de 3 Dell Inspiron 1420 Disassembly, Remove CPU: étape 7, image 3 de 3
    • Using a flathead screwdriver, quarter turn the screw anticlockwise to release the CPU.

    • Gently lift the CPU out of the housing.

    • The pins on the bottom of the CPU are very fragile and will not function if any are bent.

  8. Dell Inspiron 1420 Disassembly, Remove Bracket: étape 8, image 1 de 2 Dell Inspiron 1420 Disassembly, Remove Bracket: étape 8, image 2 de 2
    • Using a Phillips #1 screwdriver, unscrew and remove bracket.

    • There may be a card along with the bracket in your machine. If there is, unplug and remove this card as well.

  9. Dell Inspiron 1420 Disassembly, Remove Back Screws: étape 9, image 1 de 1
    • Using a Phillips #1 screwdriver, loosen and remove the indicated screws.

  10. Dell Inspiron 1420 Disassembly, Pry Control Panel: étape 10, image 1 de 1
    • Use a spudger to pry off the control panel.

  11. Dell Inspiron 1420 Disassembly, Pry Hinge Covers: étape 11, image 1 de 1
    • Use a spudger to pry off the hinge covers.

  12. Dell Inspiron 1420 Disassembly, Remove Keyboard Screws: étape 12, image 1 de 1
    • Using a Phillips #1 screwdriver, loosen and remove the keyboard screws.

  13. Dell Inspiron 1420 Disassembly, Remove Keyboard: étape 13, image 1 de 2 Dell Inspiron 1420 Disassembly, Remove Keyboard: étape 13, image 2 de 2
    • Gently lift keyboard to reveal blue ribbon connection.

    • Use a spudger to flip the blue ribbon lever and release the keyboard.

  14. Dell Inspiron 1420 Disassembly, Remove Wifi-Card: étape 14, image 1 de 2 Dell Inspiron 1420 Disassembly, Remove Wifi-Card: étape 14, image 2 de 2
    • Using a Phillips #1 screwdriver, remove the screw holding in the Wi-Fi card.

    • Unplug cables connected to Wi-Fi card.

    • Slide Wi-Fi card out of connection to remove.

  15. Dell Inspiron 1420 Disassembly, Lift Control Panel: étape 15, image 1 de 2 Dell Inspiron 1420 Disassembly, Lift Control Panel: étape 15, image 2 de 2
    • Using a Phillips #1 screwdriver, loosen and remove control panel screw.

    • Carefully pull up control panel. Being sure to keep the cable attached, set to the side.

  16. Dell Inspiron 1420 Disassembly, Remove Monitor: étape 16, image 1 de 2 Dell Inspiron 1420 Disassembly, Remove Monitor: étape 16, image 2 de 2
    • Pull the blue tab up to release the monitor.

    • Remove monitor.

  17. Dell Inspiron 1420 Disassembly, Remove Screws: étape 17, image 1 de 1
    • Using a Phillips #1 screwdriver, remove remaining screws from cover panel.

  18. Dell Inspiron 1420 Disassembly, Unplug Connections: étape 18, image 1 de 3 Dell Inspiron 1420 Disassembly, Unplug Connections: étape 18, image 2 de 3 Dell Inspiron 1420 Disassembly, Unplug Connections: étape 18, image 3 de 3
    • Using a spudger, disconnect control panel motherboard cable.

    • Using a spudger, flip up blue lever and disconnect touchpad cable.

  19. Dell Inspiron 1420 Disassembly, Remove Screws and Connections: étape 19, image 1 de 1
    • Lift off cover panel.

    • Using a Phillips #1 screwdriver, loosen and remove screws from motherboard.

    • Disconnect the indicated cables from the motherboard.

  20. Dell Inspiron 1420 Disassembly, Remove SIM Board: étape 20, image 1 de 1
    • Using a Phillips #1 screwdriver, remove screw.

    • Disconnect indicated cable and remove SIM board.

  21. Dell Inspiron 1420 Disassembly, Remove Memory Card Holder: étape 21, image 1 de 1
    • Slide memory card holder out of housing.

  22. Dell Inspiron 1420 Disassembly, Remove Modem Card: étape 22, image 1 de 1
    • Flip laptop over to show backplate.

    • Loosen and remove modem card screw using a Phillips #1 screwdriver.

    • Remove modem card.

  23. Dell Inspiron 1420 Disassembly, Release Motherboard: étape 23, image 1 de 2 Dell Inspiron 1420 Disassembly, Release Motherboard: étape 23, image 2 de 2
    • Flip laptop over and gently pull motherboard away from backplate.

    • Disconnect the indicated connection to release the motherboard.

Conclusion

To reassemble your device, follow these instructions in reverse order.

3 autres ont terminé cette réparation.

Braxton Quillin

Membre depuis le 11/07/24

184 Réputation

1 tutoriel rédigé

0 commentaires

Ajouter un commentaire

Nombre de vues :

Dernières 24 heures : 0

7 derniers jours : 5

30 derniers jours : 9

Total : 100