
Dell Inspiron 15 7579 Touchpad Replacement

Introduction
Passez à l'étape 1This guide will explain how to replace a Dell Inspiron 15 7579 Laptop Touchpad if it no longer functions properly due to a mechanical malfunction, accidental damage, or normal wear and tear. It is important to make sure that the touchpad is actually the cause of the issue before using this guide. First, make sure that it is not a software issue by using Windows Update to check for any touchpad driver updates. You should also clean the touchpad using isopropyl alcohol on a microfiber cloth to make sure that the issue is not just caused by dirt or dust. If neither of these steps solve the issue, you should proceed with this guide.
Make sure that your device is unplugged and turned off before beginning the repair process. In addition, do not forget to follow any other safety guidance provided by Dell.
Ce dont vous avez besoin
Kit de réparation
Ce kit contient toutes les pièces et tous les outils nécessaires à la réalisation de ce tutoriel.

Pièces

Outils


Afficher plus…
-
-
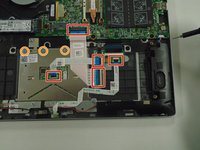
Use a Phillips #0 screwdriver to remove the ten 8 mm securing the bottom panel.
-
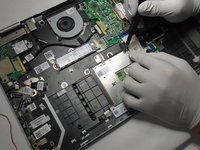
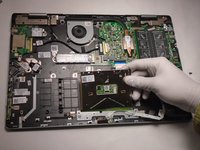
Lift the bottom panel up and off of the chassis.
-
-


To reassemble your device, follow these instructions in reverse order.
To reassemble your device, follow these instructions in reverse order.
Annulation : je n'ai pas terminé ce tutoriel.
2 autres ont terminé cette réparation.

Équipe

The Citadel Military College of South Carolina, Team 7-11, Eggleston Spring 2022 Membre de l'équipe The Citadel Military College of South Carolina, Team 7-11, Eggleston Spring 2022
CMCSC-EGGLESTON-S22S7G11
3 membres
1 tutoriel rédigé