Aller au contenu principal
Dell Inspiron 15 Ram (Memory Module) Replacement

Dell Inspiron 15 Ram (Memory Module) Replacement

Edward Pacheco

Edward Pacheco et 3 autres contributeurs

Dernière mise à jour le May 17, 2016

15 minutes
Facile

You will be able to remove and replace the Ram in your computer with ease after this guide.

Ce dont vous avez besoin

Outils

  1. Dell Inspiron 15 Ram (Memory Module) Replacement, Battery: étape 1, image 1 de 2 Dell Inspiron 15 Ram (Memory Module) Replacement, Battery: étape 1, image 2 de 2
    • Make sure your laptop is powered off completely and is not connected to the charger.

    • Close the laptop and place it so that the back of the screen is lying flat on your work surface.

    • Slide both of the battery-release latches towards the outer edges of the laptop to unlock the battery flap.

  2. Dell Inspiron 15 Ram (Memory Module) Replacement: étape 2, image 1 de 1
    • Lift the battery at an angle using your fingertips and remove it from the laptop.

    • Press and hold the power button for 5 seconds. This ensures that any remaining power will drain out of the computer.

  3. Dell Inspiron 15 Ram (Memory Module) Replacement, Ram  (Memory Module): étape 3, image 1 de 3 Dell Inspiron 15 Ram (Memory Module) Replacement, Ram  (Memory Module): étape 3, image 2 de 3 Dell Inspiron 15 Ram (Memory Module) Replacement, Ram  (Memory Module): étape 3, image 3 de 3
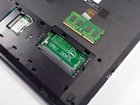
    • Remove the bottom cover by removing the 4 mm screw using a PH-0 Phillips screwdriver that secures the base cover to the laptop base.

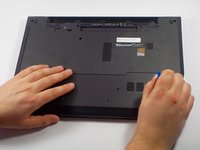
    • Using the plastic opening tool, pry the base cover from the base.

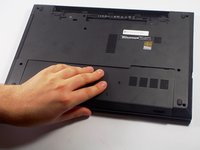
    • Slide the base cover towards you and remove it from the base. Put it aside.

  4. Dell Inspiron 15 Ram (Memory Module) Replacement: étape 4, image 1 de 3 Dell Inspiron 15 Ram (Memory Module) Replacement: étape 4, image 2 de 3 Dell Inspiron 15 Ram (Memory Module) Replacement: étape 4, image 3 de 3
    • Using your fingertips, pry the vertical sides of the memory module apart until the piece pops out of place.

    • Slide the memory module out of its slot and lift it out of the laptop base.

Conclusion

To reassemble your device, follow these instructions in reverse order.

4 autres ont terminé cette réparation.

Edward Pacheco

Membre depuis le 03/06/16

845 Réputation

3 tutoriels rédigés

Équipe

UMass Dartmouth, Team 5-8, Landers Spring 2016 Membre de l'équipe UMass Dartmouth, Team 5-8, Landers Spring 2016

UMASSD-LANDERS-S16S5G8

3 membres

6 tutoriels rédigés

0 commentaires

Ajouter un commentaire

Nombre de vues :

Dernières 24 heures : 3

7 derniers jours : 21

30 derniers jours : 40

Total : 6,733